> ## Documentation Index
> Fetch the complete documentation index at: https://docs.didit.me/llms.txt
> Use this file to discover all available pages before exploring further.
# Salesforce
> Add Didit identity verification to Salesforce with our managed package. No-code setup for KYC and KYB. Pay-per-call from $0.30, 500 free verifications/month.
Add Didit identity verification to Salesforce Sales Cloud / Service Cloud with our managed package. The component drops onto Contact and Lead record pages, creates sessions through your org via Apex (your Didit API key stays inside Salesforce), and writes results back to standard fields on the record so Flows and Reports can act on them. A built-in **Invocable Action** lets Flow Builder trigger verifications automatically — for example, when a new lead is created.
## Prerequisites
* A Salesforce org (Enterprise edition or higher; Developer Edition for testing)
* A [Didit Console](https://business.didit.me) account with a configured workflow
* Permission to install managed packages and create Sites in Setup
***
### Step 1: Install the app
1. Open the install link: [https://login.salesforce.com/packaging/installPackage.apexp?p0=04tg50000003q0TAAQ](https://login.salesforce.com/packaging/installPackage.apexp?p0=04tg50000003q0TAAQ)
2. Select **Install for all users**
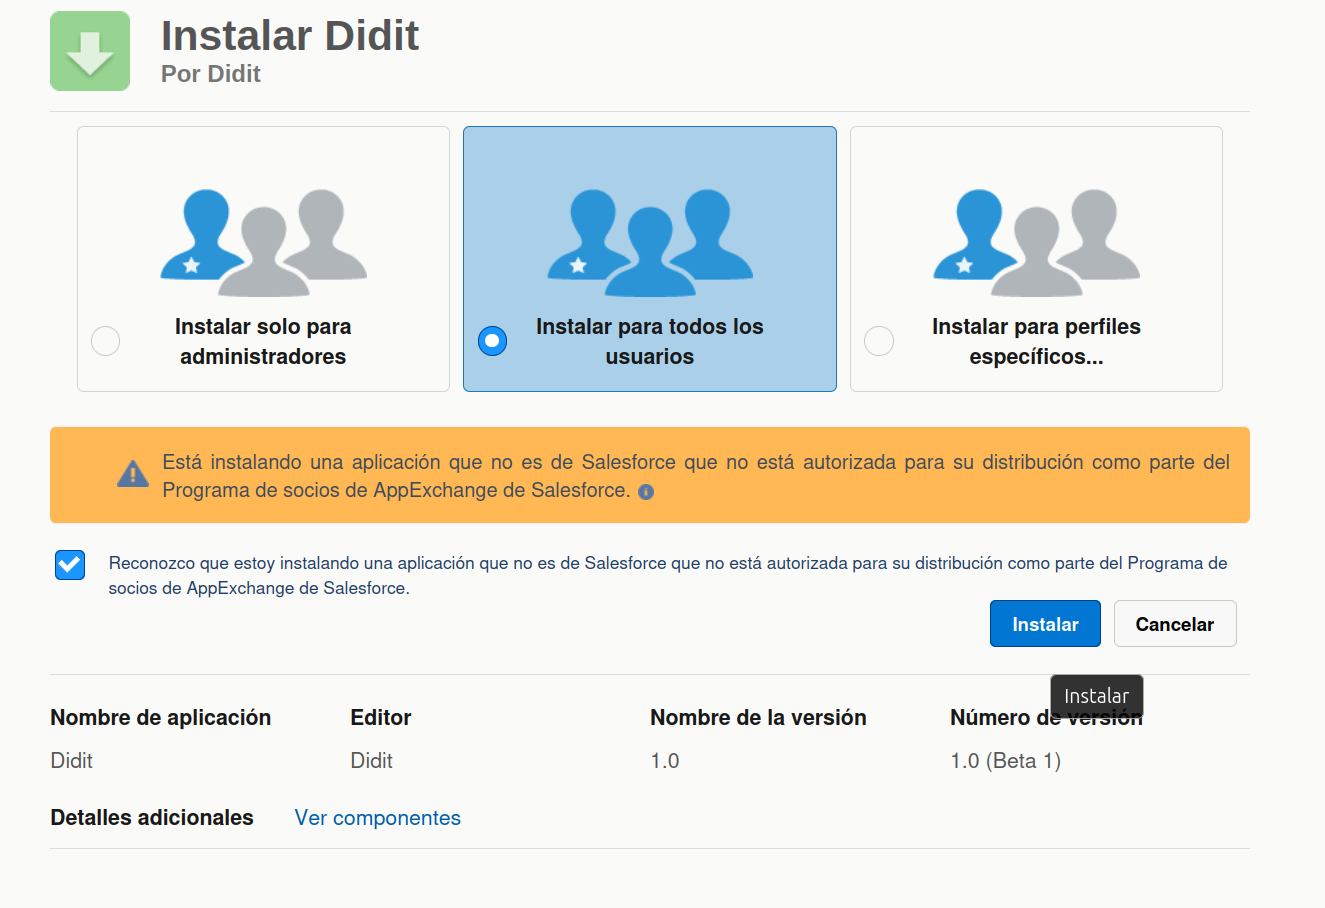 3. Click **Install**
***
### Step 2: Get Your Didit Credentials
#### Get Your API Key (for API mode)
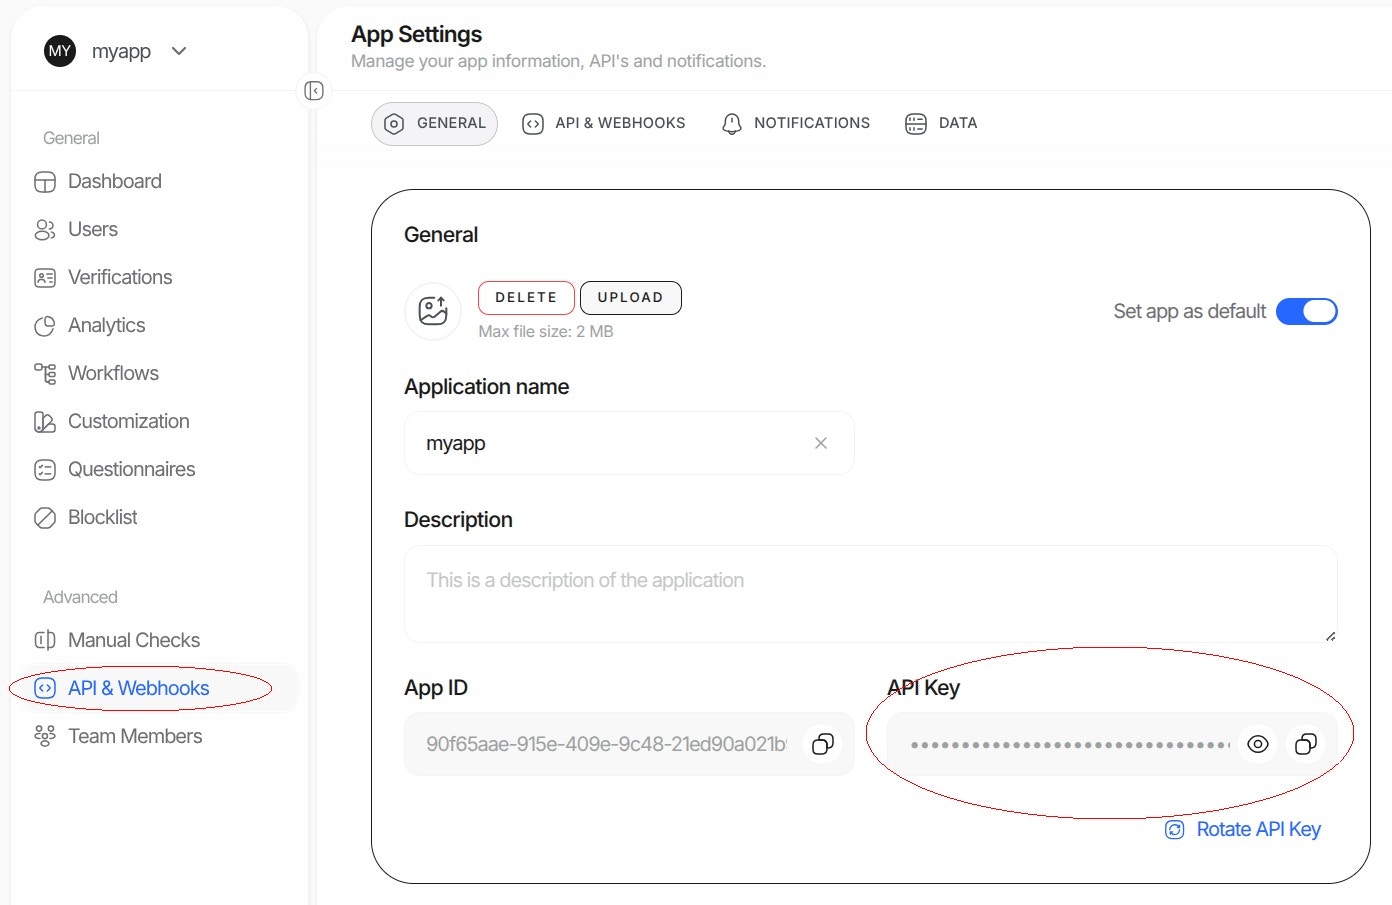
1. Log in to the [Didit Business Console](https://business.didit.me)
2. Navigate to **API & Webhooks** in the left-hand sidebar
3. Copy your API key
3. Click **Install**
***
### Step 2: Get Your Didit Credentials
#### Get Your API Key (for API mode)
1. Log in to the [Didit Business Console](https://business.didit.me)
2. Navigate to **API & Webhooks** in the left-hand sidebar
3. Copy your API key
 #### Get Your Workflow ID
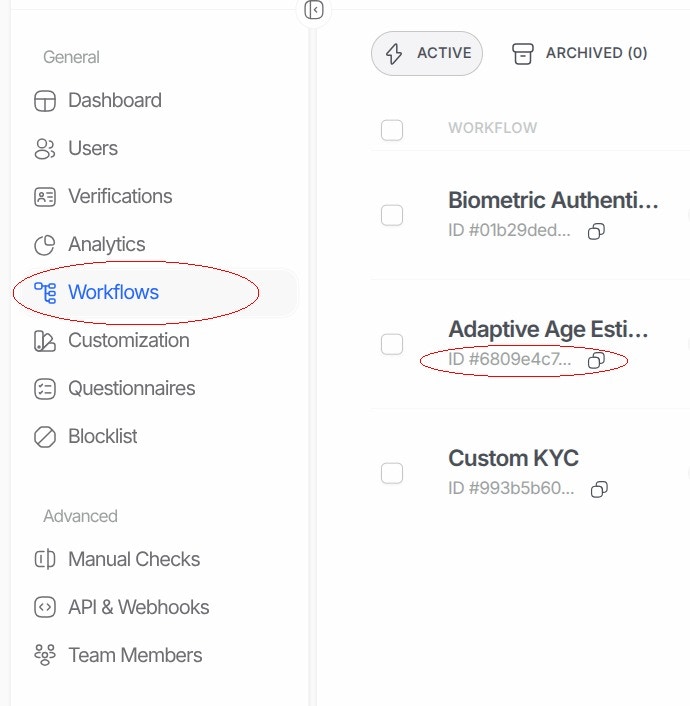
1. In the Didit Business Console, go to **Workflows**
2. Select the workflow you want to use (or create a new one)
3. Copy the **Workflow ID** (a UUID like `xxxxxxxx-xxxx-xxxx-xxxx-xxxxxxxxxxxx`)
#### Get Your Workflow ID
1. In the Didit Business Console, go to **Workflows**
2. Select the workflow you want to use (or create a new one)
3. Copy the **Workflow ID** (a UUID like `xxxxxxxx-xxxx-xxxx-xxxx-xxxxxxxxxxxx`)
 ***
### Step 3: Configure Didit Settings
1. Click the **App Launcher** (grid icon, top-left) and search for **"Didit"**
***
### Step 3: Configure Didit Settings
1. Click the **App Launcher** (grid icon, top-left) and search for **"Didit"**
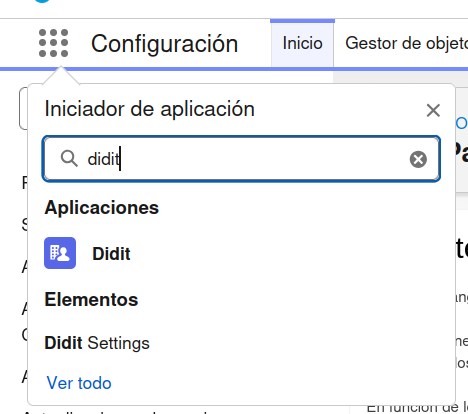 2. Open the **Didit** app — you'll land on the **Didit Settings** tab
3. Fill in your credentials and preferences:
| Field | Description | Default |
| -------------------------- | ------------------------------------------------------------------------------------------------------------------------------------------------------- | ------------------------ |
| **Mode** | `api` (recommended) or `unilink` | `api` |
| **Didit API Key** | Your Didit API key (API mode only) | — |
| **Workflow ID** | Your Didit workflow ID (API mode only) | — |
| **Webhook Secret** | HMAC secret from Didit Console → API & Webhooks. Required to receive real-time verification updates. If left empty, all incoming webhooks are rejected. | — |
| **UniLink URL** | Fixed verification URL (UniLink mode only) | — |
| **Display Mode** | `modal` (popup) or `embedded` (inline) | `embedded` |
| **Vendor Data** | `record_id`, `record_email`, `custom prefix + record id`, or `none` | `record_id` |
| **Language** | Language code (e.g., `en`, `es`, `fr`) | `Auto detect by browser` |
| **Auto Send Contact Data** | Prefill verification with record data | `true` |
| **Show Close Button** | Show X button on modal | `true` |
| **Exit Confirmation** | Confirm before closing modal | `true` |
| **Auto-close on Complete** | Auto-close modal after completion | `false` |
| **Debug Logging** | Enable browser console logging | `false` |
| **Button Text** | Verify button label | `Verify Identity` |
| **Button Success Text** | Label after verification | `Identity Verified` |
| **Button Color** | Button background hex color | `#2667ff` |
4. Click **Save Settings**
### Step 4: Add the Component to Record Pages
1. Navigate to a **Contact** or **Lead** record
2. Open the **Didit** app — you'll land on the **Didit Settings** tab
3. Fill in your credentials and preferences:
| Field | Description | Default |
| -------------------------- | ------------------------------------------------------------------------------------------------------------------------------------------------------- | ------------------------ |
| **Mode** | `api` (recommended) or `unilink` | `api` |
| **Didit API Key** | Your Didit API key (API mode only) | — |
| **Workflow ID** | Your Didit workflow ID (API mode only) | — |
| **Webhook Secret** | HMAC secret from Didit Console → API & Webhooks. Required to receive real-time verification updates. If left empty, all incoming webhooks are rejected. | — |
| **UniLink URL** | Fixed verification URL (UniLink mode only) | — |
| **Display Mode** | `modal` (popup) or `embedded` (inline) | `embedded` |
| **Vendor Data** | `record_id`, `record_email`, `custom prefix + record id`, or `none` | `record_id` |
| **Language** | Language code (e.g., `en`, `es`, `fr`) | `Auto detect by browser` |
| **Auto Send Contact Data** | Prefill verification with record data | `true` |
| **Show Close Button** | Show X button on modal | `true` |
| **Exit Confirmation** | Confirm before closing modal | `true` |
| **Auto-close on Complete** | Auto-close modal after completion | `false` |
| **Debug Logging** | Enable browser console logging | `false` |
| **Button Text** | Verify button label | `Verify Identity` |
| **Button Success Text** | Label after verification | `Identity Verified` |
| **Button Color** | Button background hex color | `#2667ff` |
4. Click **Save Settings**
### Step 4: Add the Component to Record Pages
1. Navigate to a **Contact** or **Lead** record
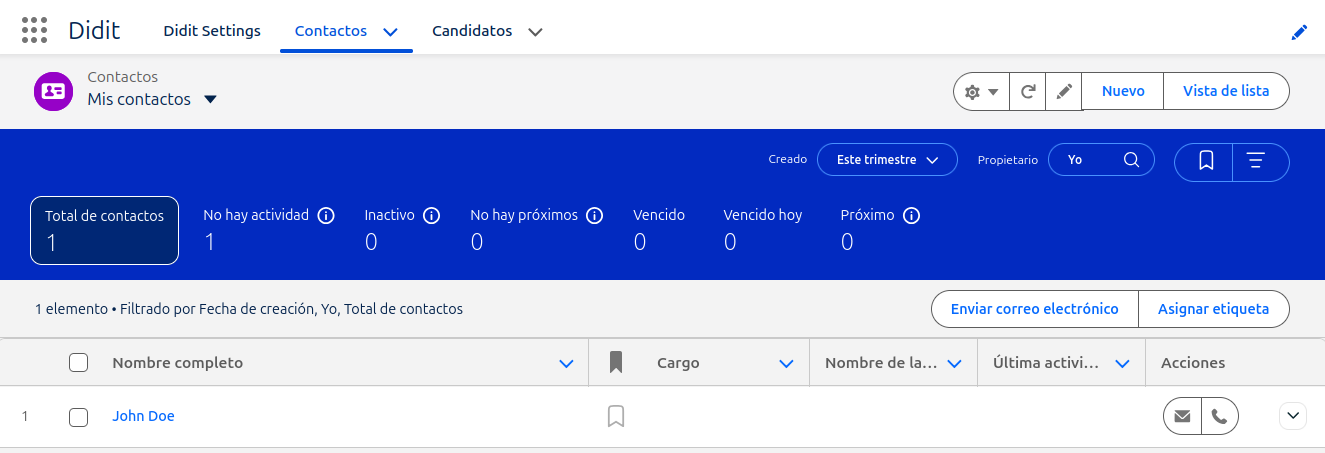 2. Click the **gear icon → Edit Page** (or Setup → Object Manager → Contact/Lead → Lightning Record Pages)
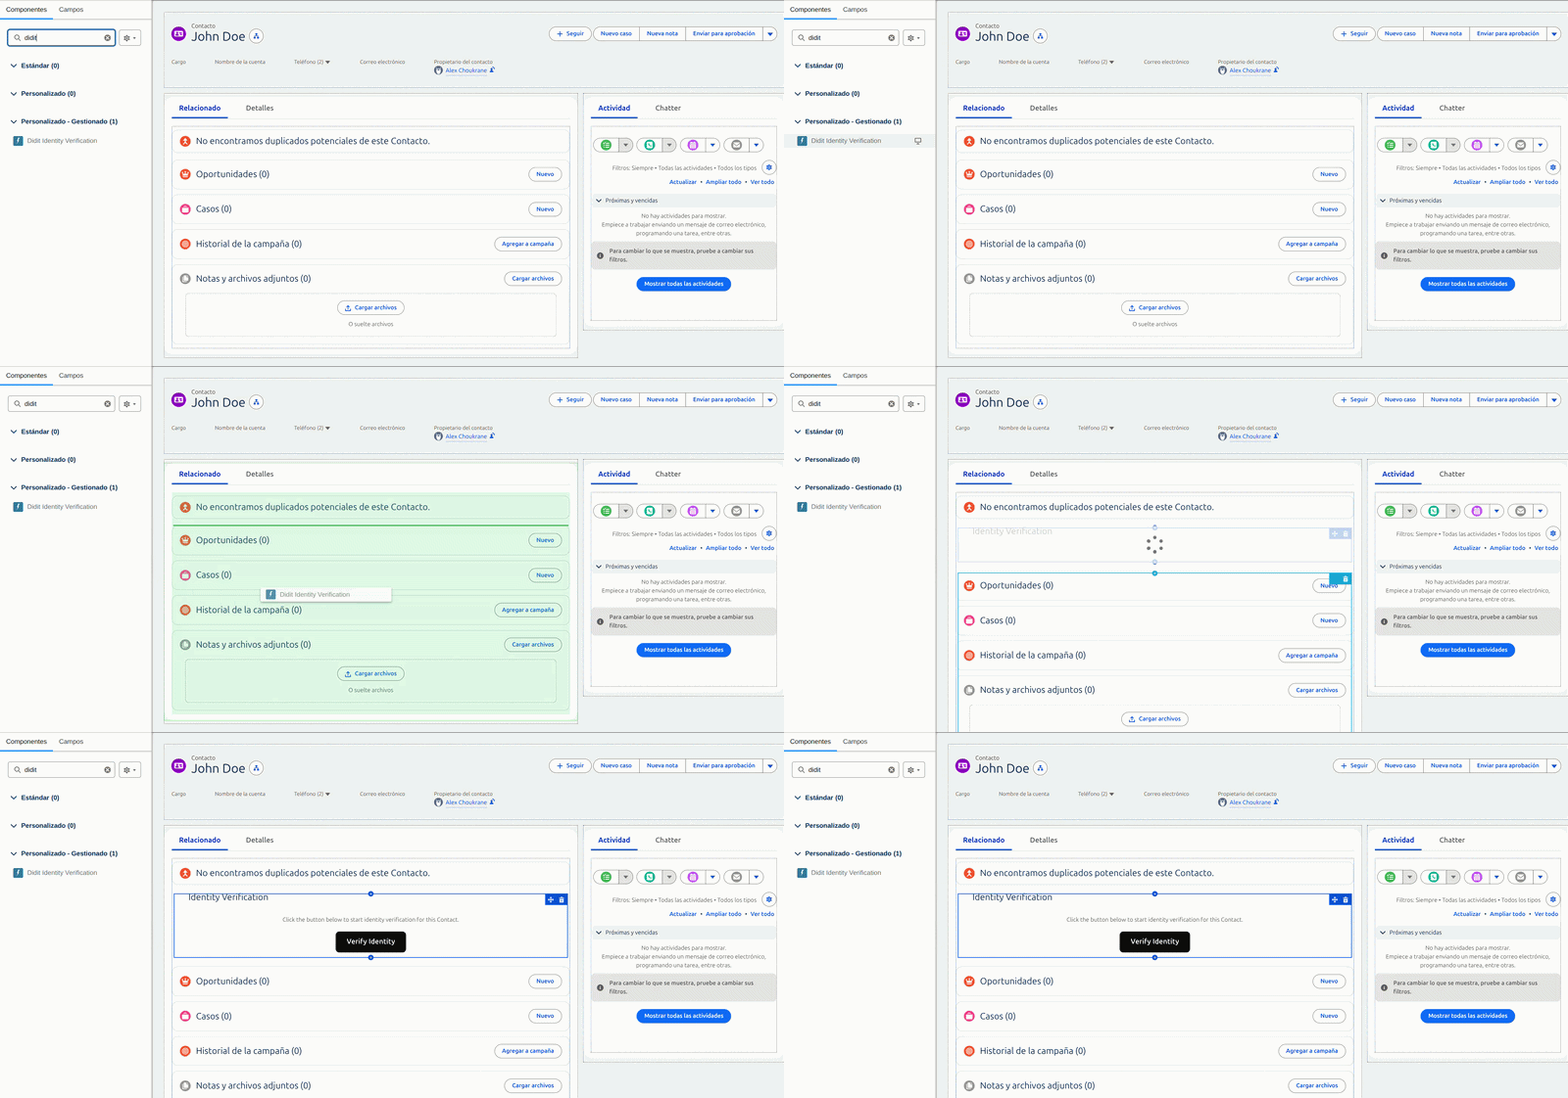
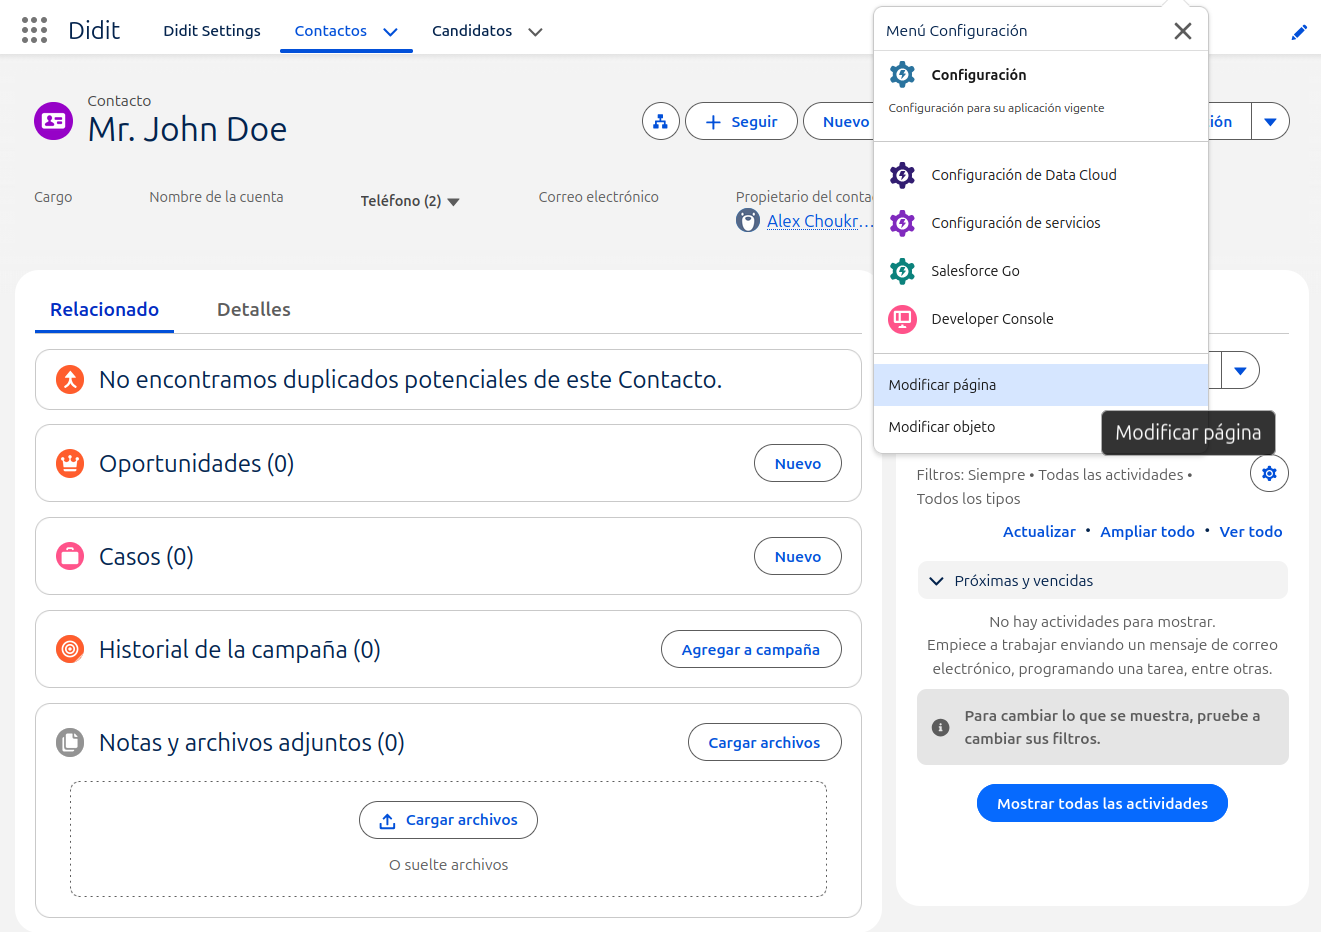 3. In Lightning App Builder, drag **Didit Identity Verification** from the Components panel
 4. Click **Save** and **Activate** the page, select "Assign as Org Default" when activating, check the video:
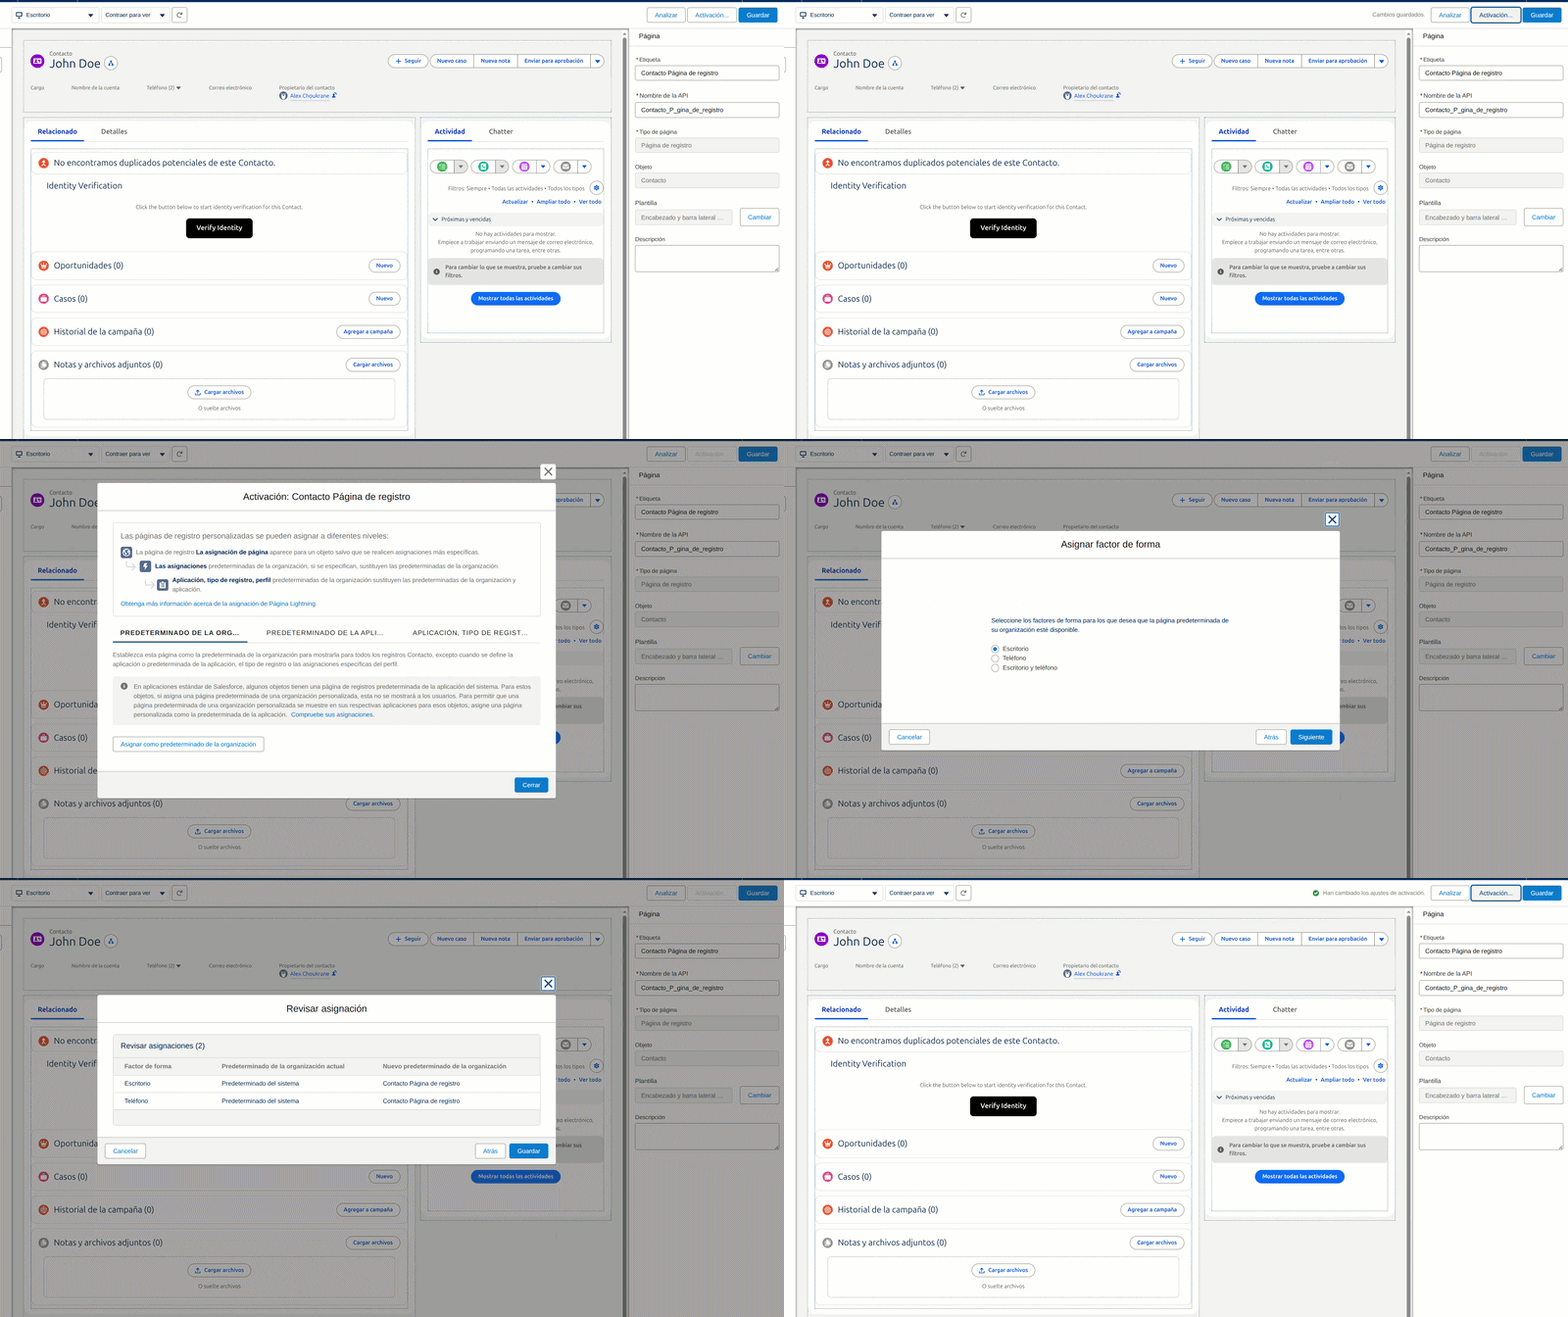 5. The example above uses a Contact record page — the steps are identical for Lead record pages.
## How It Works
### API Mode (Recommended)
1. User clicks **Verify Identity** on a Contact/Lead record
2. Apex creates a session via the Didit API (API key stays server-side)
3. The Didit SDK opens the verification flow — as a modal overlay or inline embedded view depending on your Display Mode setting
4. On completion, the record is updated automatically:
* `Verification Status` → the session result (`Approved`, `Declined`, `In Review`, etc.)
* `Identity Verified` → `true` on Approved; `false` on Declined
* `Verified At` timestamp and `Didit Session ID`
* `Verified Document Type`, `Document Expiry Date`, `AML Check Status` (populated via webhook — see below)
5. The component shows the verified status, document type, expiry date, and AML result inline — no page layout configuration needed
### UniLink Mode
1. User clicks **Verify Identity**
2. A fixed UniLink URL opens in modal or iframe (no API call needed)
3. On completion, result is saved to the record
### Automatic Verification Updates (Webhooks)
When a verification session completes (whether the agent is watching the page or not), Didit sends a webhook to your Salesforce org to automatically update the Contact/Lead record. This requires a one-time Salesforce Site setup.
#### Why is this needed?
Salesforce does not accept incoming HTTP requests from external services without a public endpoint. A Salesforce Site creates this endpoint so Didit can push verification results directly to your org in real-time.
#### Step 1: Go to Setup > Sites
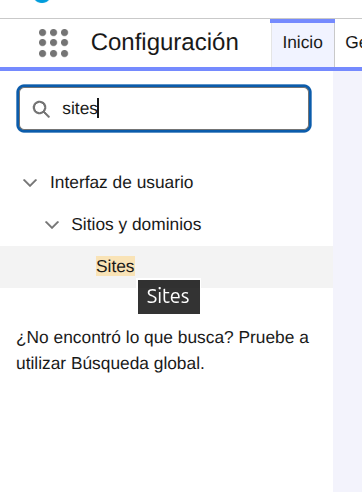
In Salesforce, click the **gear icon > Setup**. In the Quick Find box, type **Sites** and click on it under **Sites and Domains**.
5. The example above uses a Contact record page — the steps are identical for Lead record pages.
## How It Works
### API Mode (Recommended)
1. User clicks **Verify Identity** on a Contact/Lead record
2. Apex creates a session via the Didit API (API key stays server-side)
3. The Didit SDK opens the verification flow — as a modal overlay or inline embedded view depending on your Display Mode setting
4. On completion, the record is updated automatically:
* `Verification Status` → the session result (`Approved`, `Declined`, `In Review`, etc.)
* `Identity Verified` → `true` on Approved; `false` on Declined
* `Verified At` timestamp and `Didit Session ID`
* `Verified Document Type`, `Document Expiry Date`, `AML Check Status` (populated via webhook — see below)
5. The component shows the verified status, document type, expiry date, and AML result inline — no page layout configuration needed
### UniLink Mode
1. User clicks **Verify Identity**
2. A fixed UniLink URL opens in modal or iframe (no API call needed)
3. On completion, result is saved to the record
### Automatic Verification Updates (Webhooks)
When a verification session completes (whether the agent is watching the page or not), Didit sends a webhook to your Salesforce org to automatically update the Contact/Lead record. This requires a one-time Salesforce Site setup.
#### Why is this needed?
Salesforce does not accept incoming HTTP requests from external services without a public endpoint. A Salesforce Site creates this endpoint so Didit can push verification results directly to your org in real-time.
#### Step 1: Go to Setup > Sites
In Salesforce, click the **gear icon > Setup**. In the Quick Find box, type **Sites** and click on it under **Sites and Domains**.
 If this is your first time, check **"I have read and accepted the Salesforce Site Terms of Use"** and click **Register My Salesforce Site Domain**.
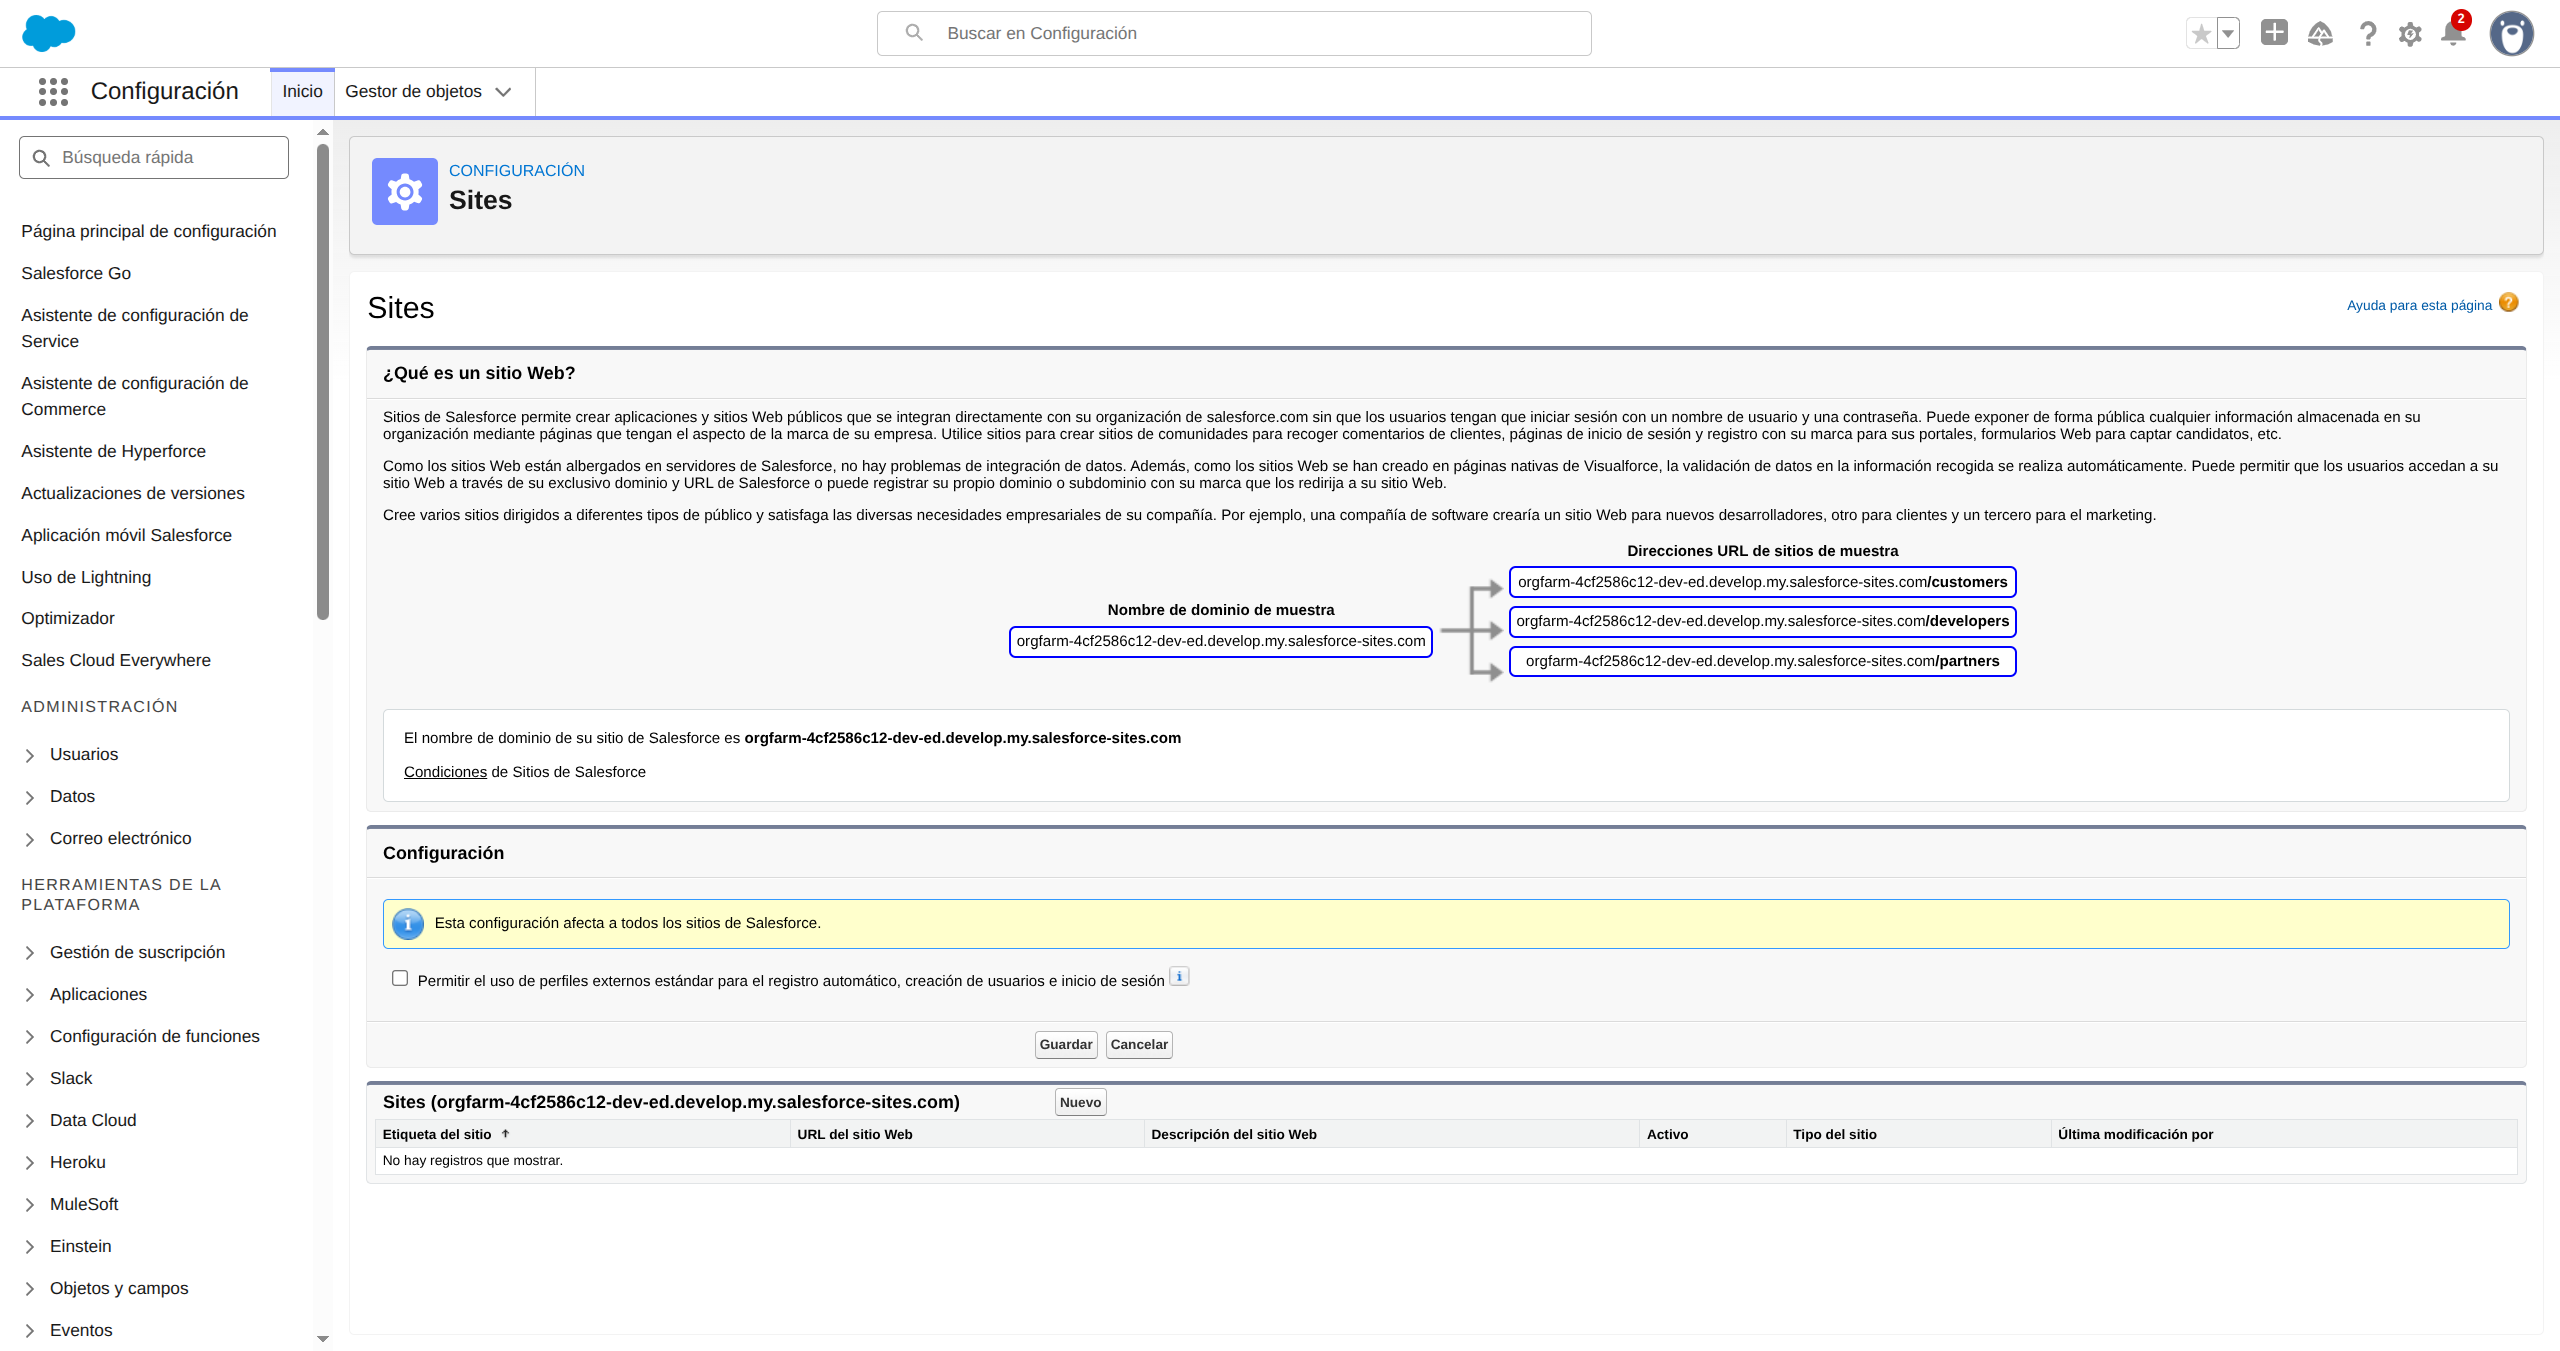 #### Step 2: Create a new Site
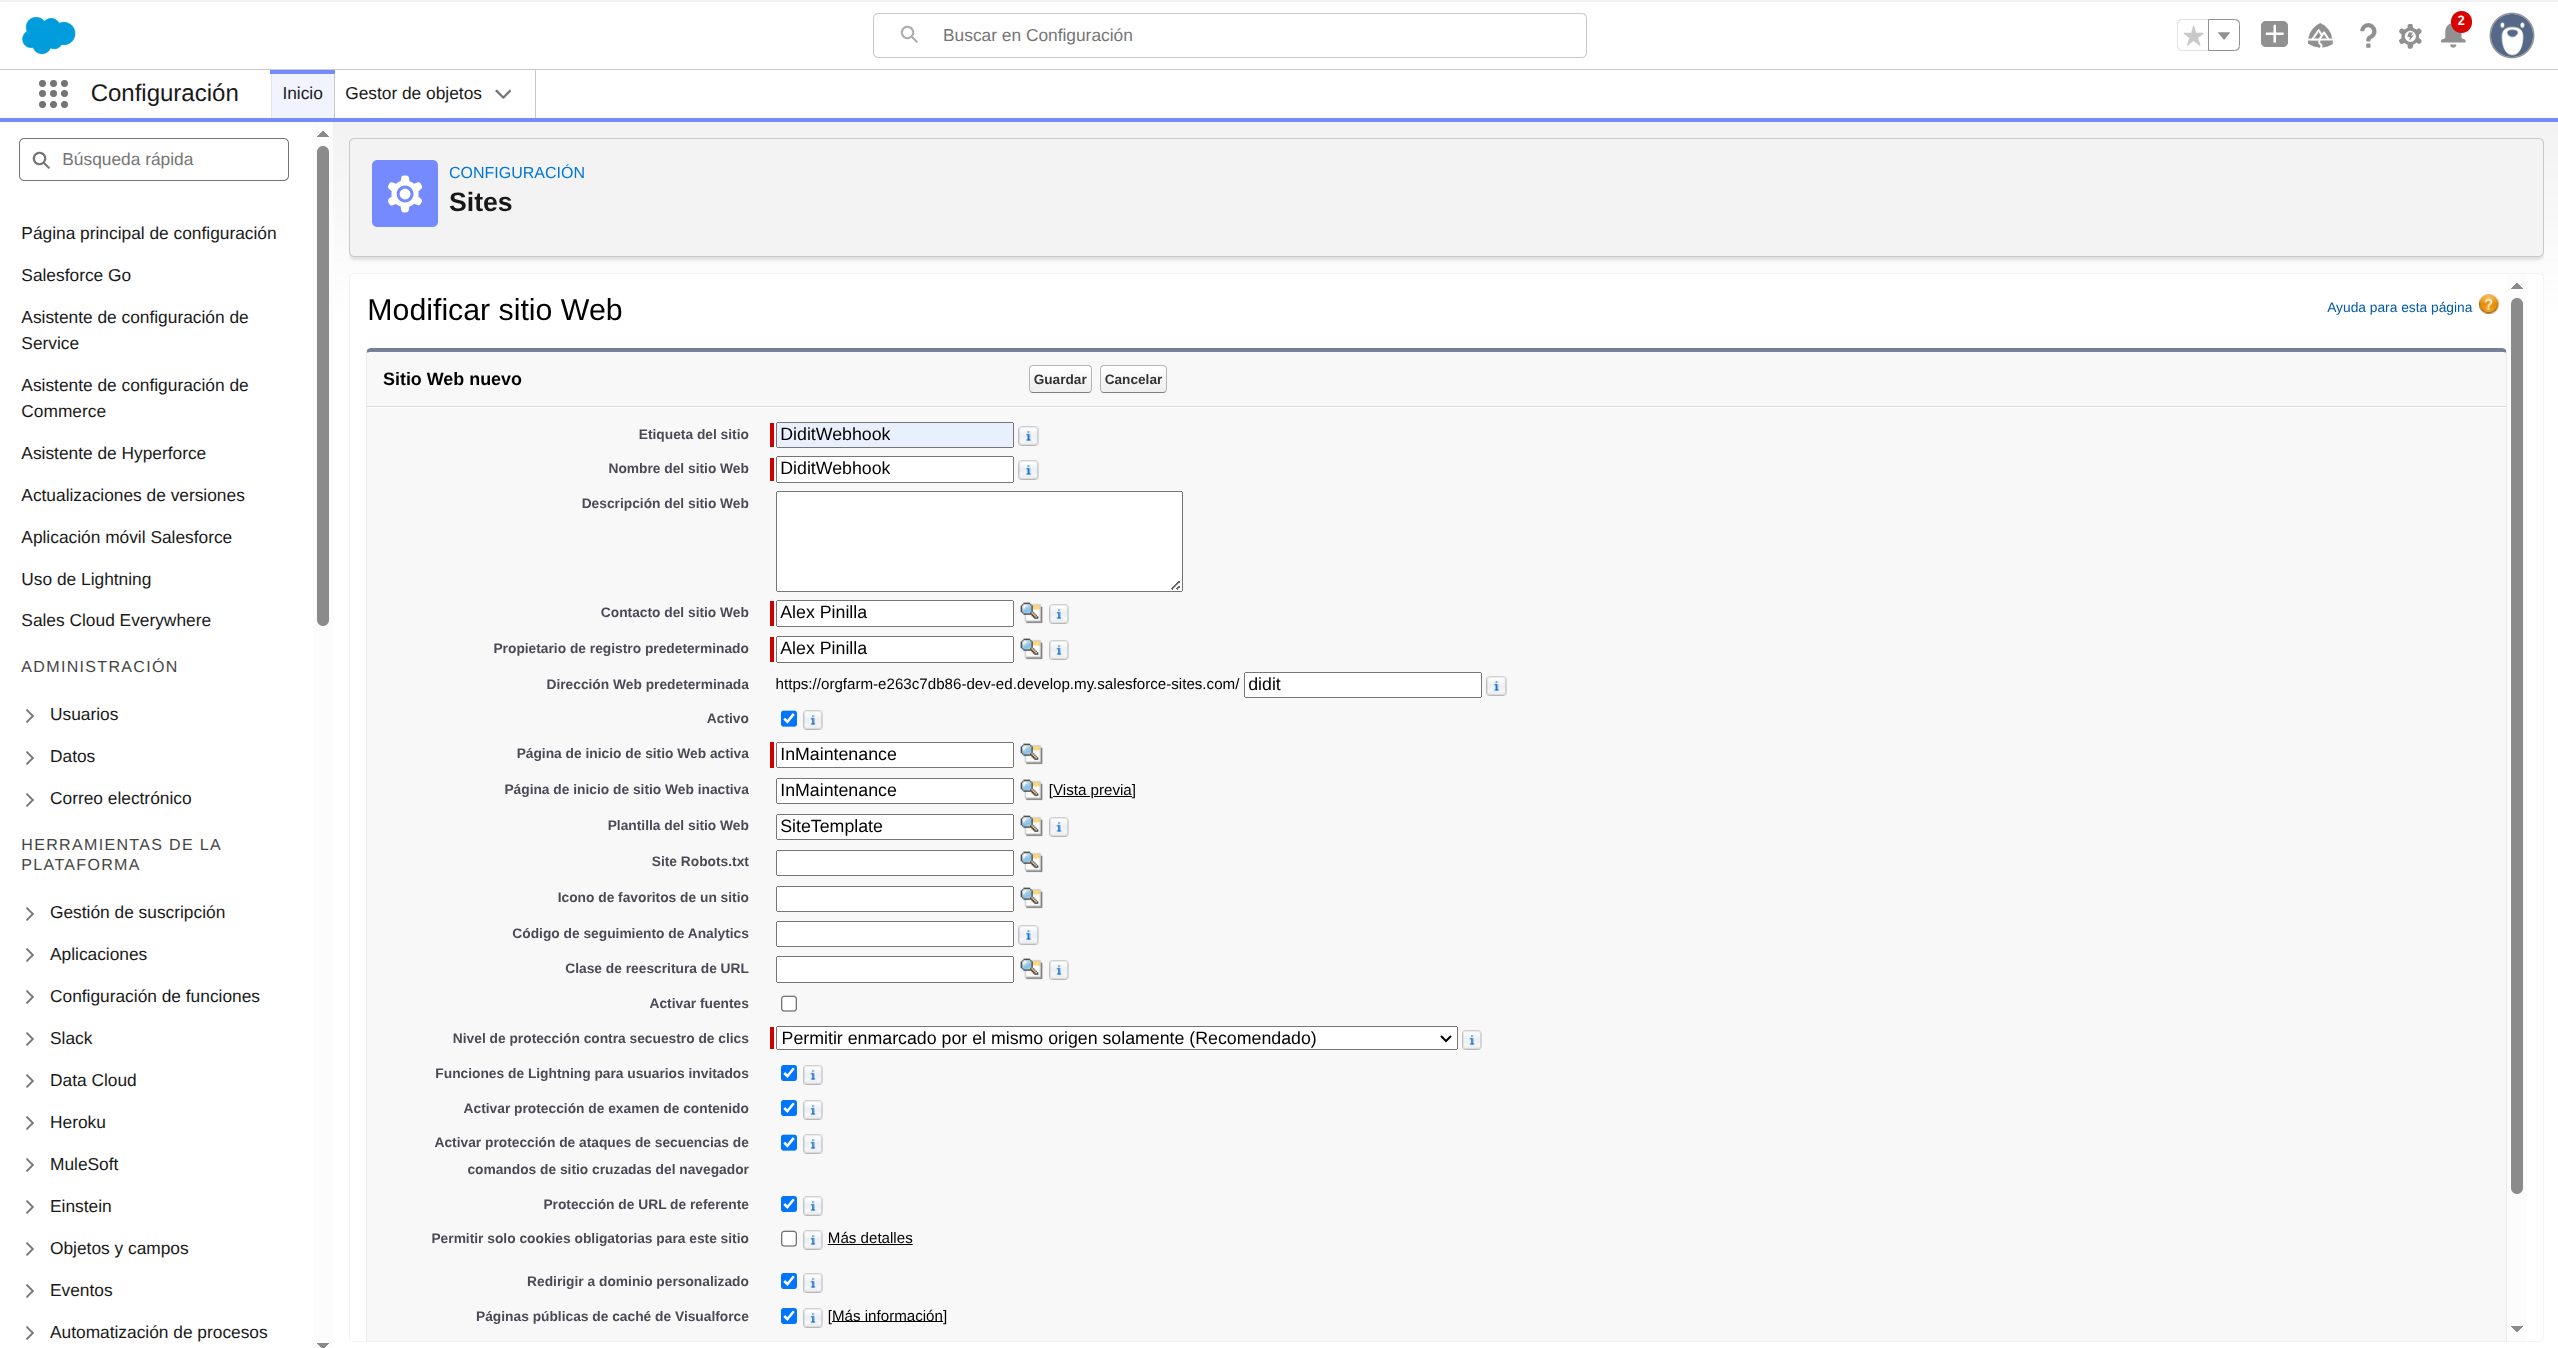
Click the **New** button in the Sites list. Fill in:
* **Site Label**: `DiditWebhook`
* **Site Name**: auto-fills as `DiditWebhook`
* **Default Web Address**: `didit`
* **Active**: checked
* **Active Site Home Page**: `InMaintenance`
Leave all other fields as defaults and click **Save**.
#### Step 2: Create a new Site
Click the **New** button in the Sites list. Fill in:
* **Site Label**: `DiditWebhook`
* **Site Name**: auto-fills as `DiditWebhook`
* **Default Web Address**: `didit`
* **Active**: checked
* **Active Site Home Page**: `InMaintenance`
Leave all other fields as defaults and click **Save**.
 #### Step 3: Verify the Site was created
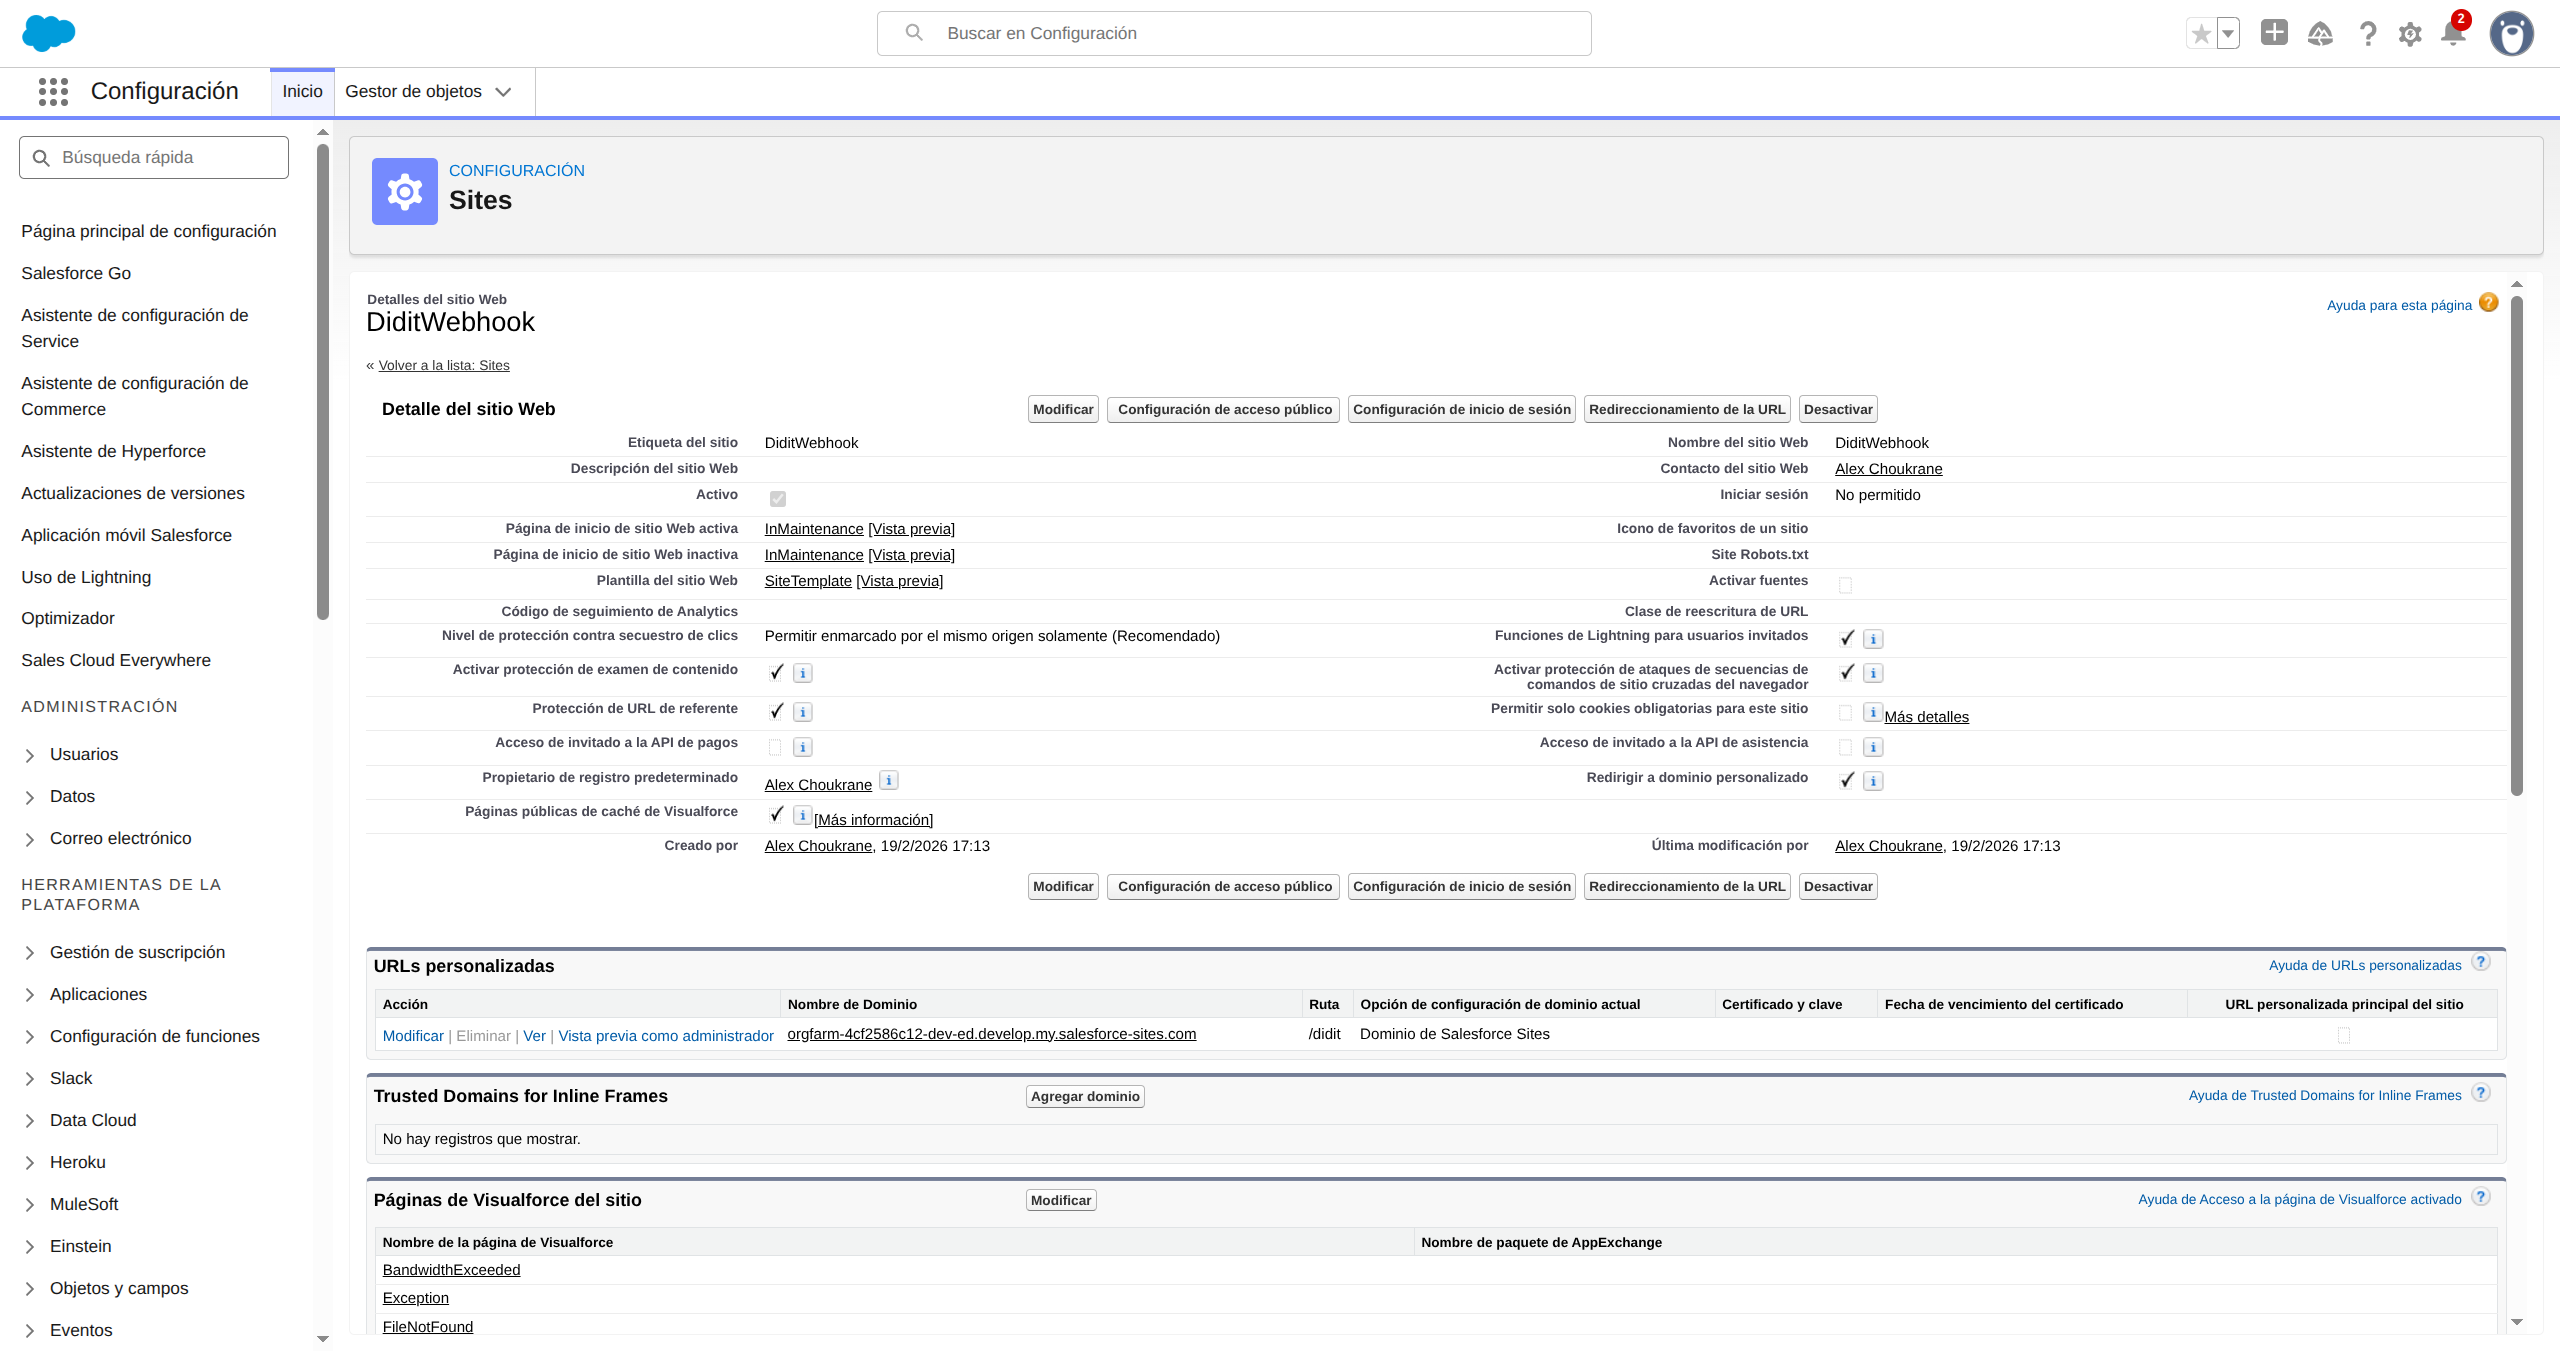
After saving, you'll see the Site detail page. Note the **Site URL** — it will look like `https://your-org.develop.my.salesforce-sites.com/didit`. You'll need this later.
#### Step 3: Verify the Site was created
After saving, you'll see the Site detail page. Note the **Site URL** — it will look like `https://your-org.develop.my.salesforce-sites.com/didit`. You'll need this later.
 #### Step 4: Grant Guest User access to the webhook class
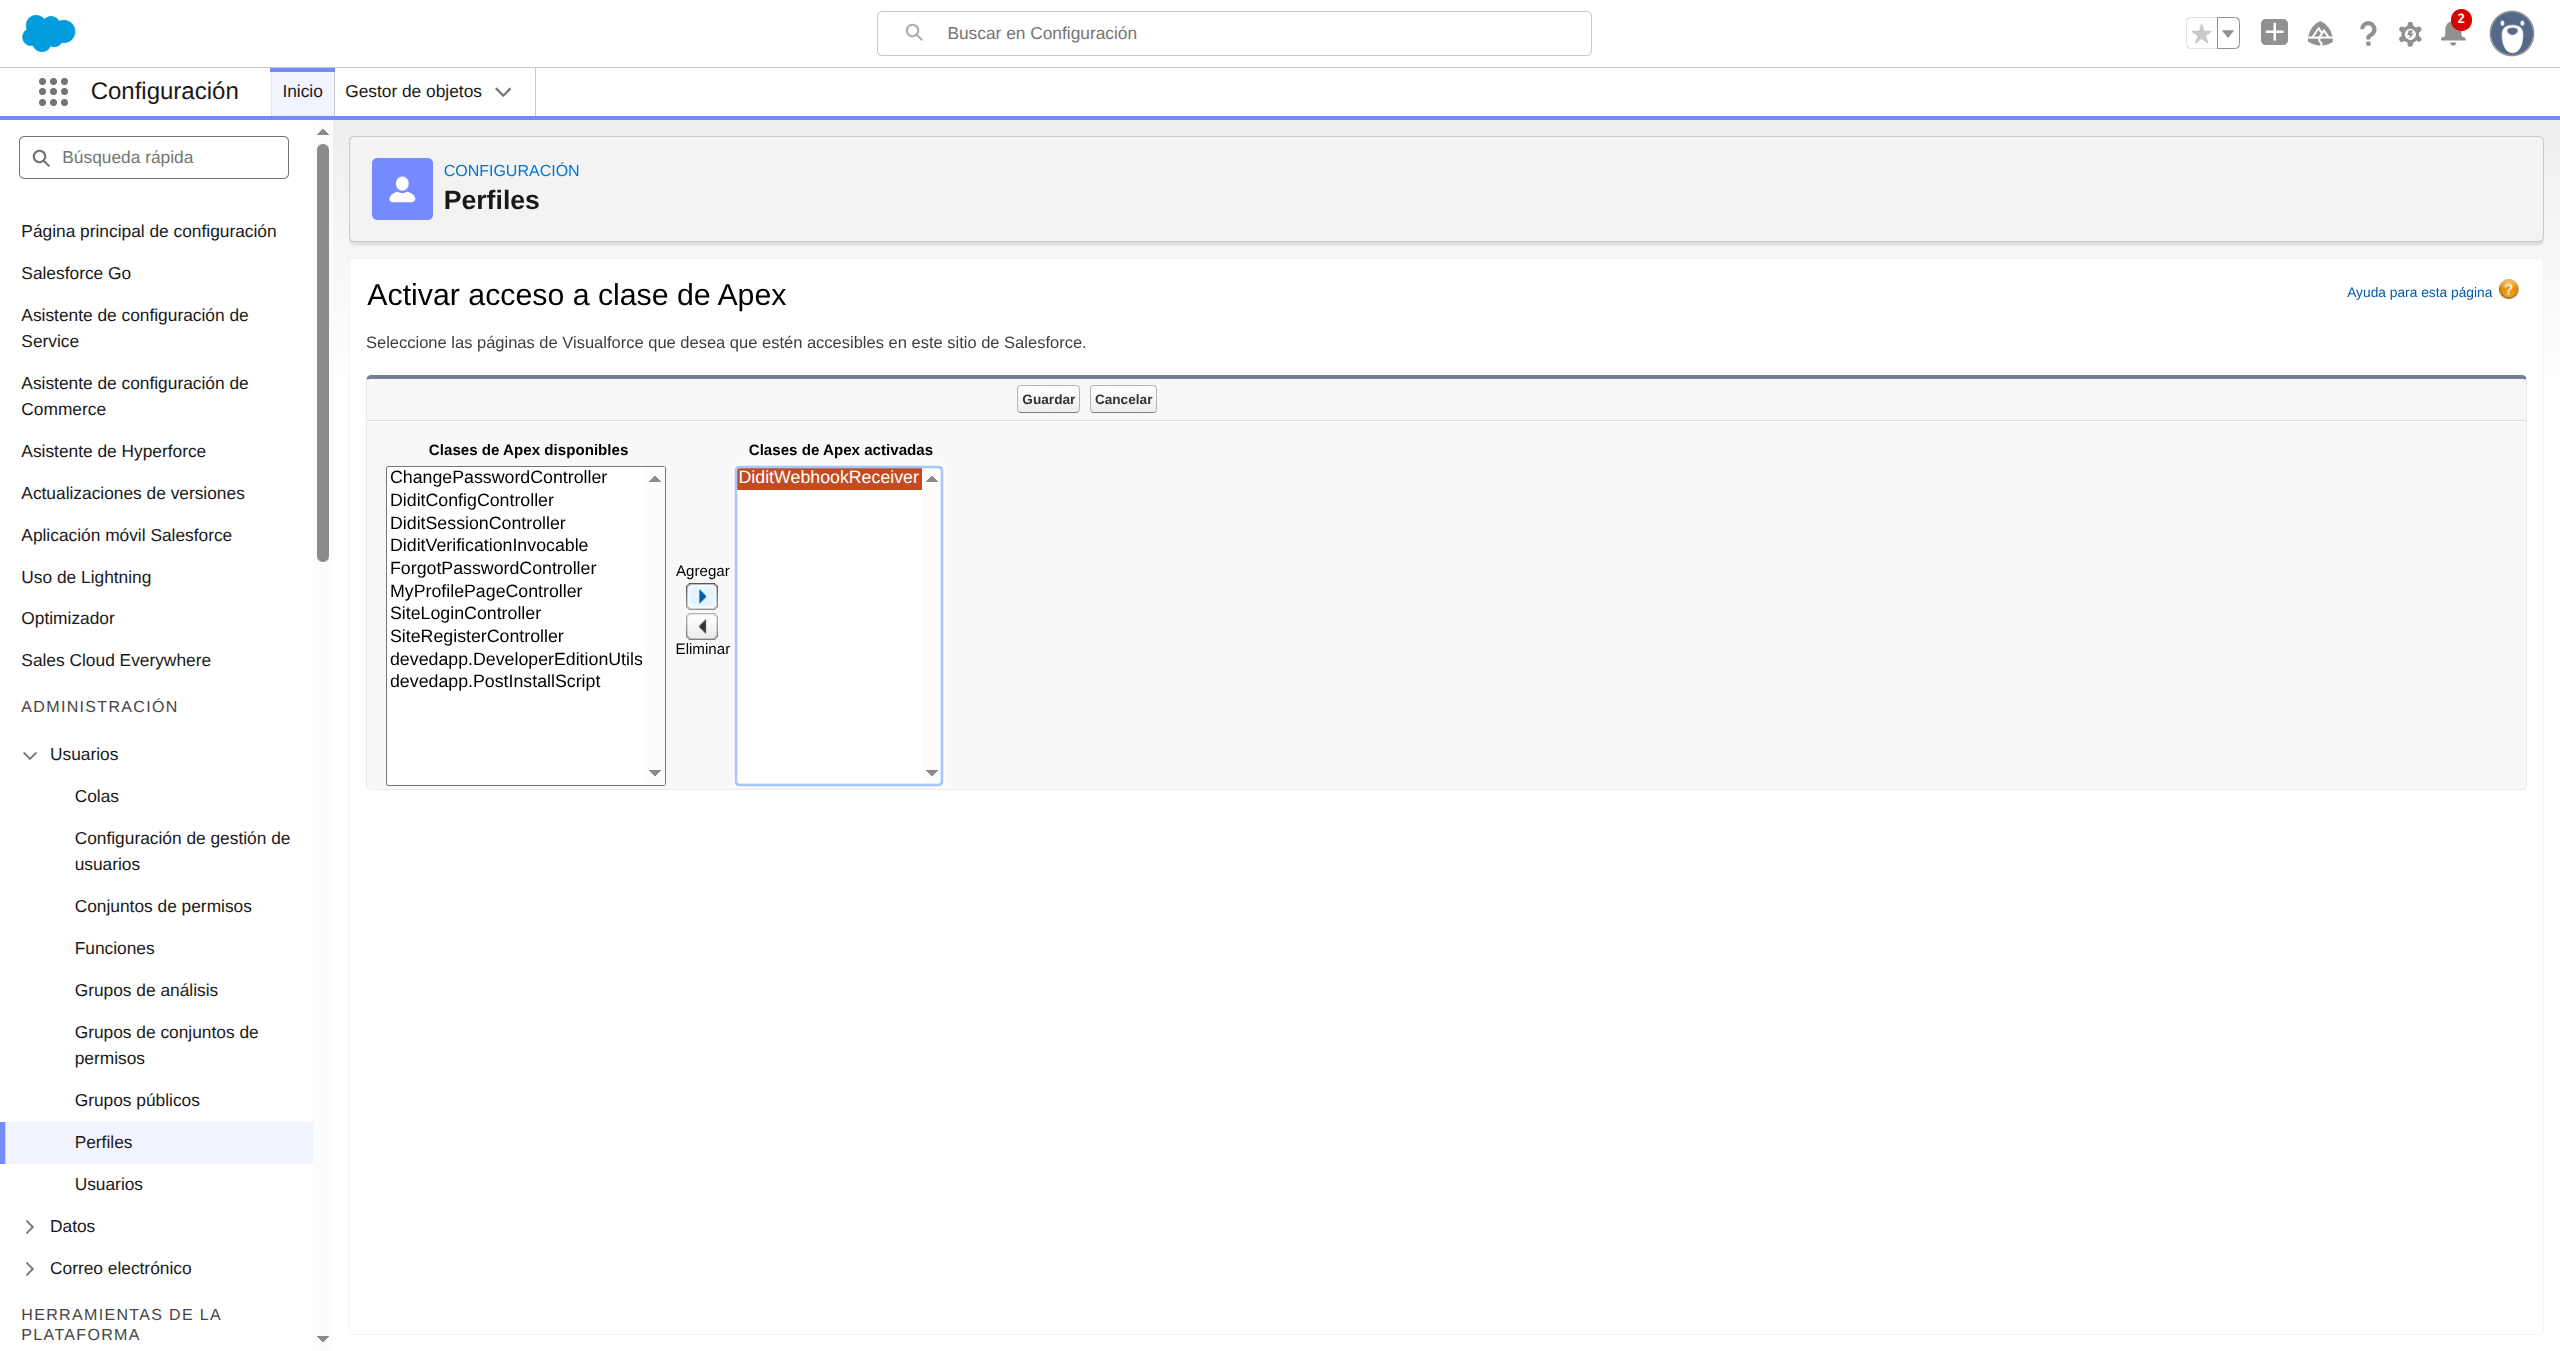
On the Site detail page, click **Public Access Settings**. This opens the Guest User profile. Scroll down to **Enabled Apex Class Access** and click **Edit**. Select **DiditWebhookReceiver** from the Available list and click **Add** to move it to the Enabled list. Click **Save**.
#### Step 4: Grant Guest User access to the webhook class
On the Site detail page, click **Public Access Settings**. This opens the Guest User profile. Scroll down to **Enabled Apex Class Access** and click **Edit**. Select **DiditWebhookReceiver** from the Available list and click **Add** to move it to the Enabled list. Click **Save**.
 #### Step 5: Configure the webhook in Didit Console
1. Go to [business.didit.me](https://business.didit.me) > **API & Webhooks**
2. Set your **Webhook URL** to: `https://your-org.develop.my.salesforce-sites.com/didit/services/apexrest/didit/webhook/`
> **Note:** The exact domain format depends on your org type. Developer Edition orgs include `.develop` in the URL. Production orgs use `https://your-org.my.salesforce-sites.com/didit/services/apexrest/didit/webhook/`. Always copy the URL from your Site detail page (Step 3) to be sure.
3. Copy the **Webhook Secret Key**
4. In Salesforce, go to **Didit Settings** and paste the secret into the **Webhook Secret** field
5. Click **Save Settings**
That's it. From now on, every verification result will automatically update the Contact/Lead record — even if nobody has the Salesforce page open.
#### What the webhook saves
When Didit sends a webhook, the Contact or Lead is updated automatically.
**Always updated — regardless of workflow type:**
| Field | What it stores |
| ----------------------- | --------------------------------------------------------------- |
| **Verification Status** | `Approved`, `Declined`, `In Review`, `In Progress`, `Abandoned` |
| **Identity Verified** | `true` on Approved; `false` on Declined or Abandoned |
| **Verified At** | Timestamp of the Approved result |
| **Didit Session ID** | The session UUID |
**Only updated when the feature is part of your workflow:**
| Field | Requires |
| -------------------------------- | -------------------------------- |
| **Verified Document Type** | ID Verification in your workflow |
| **Document Expiry Date** | ID Verification in your workflow |
| **AML Check Status** | AML screening in your workflow |
| **Verification Decline Reasons** | ID Verification in your workflow |
If a feature is not enabled in your Didit workflow, the corresponding fields are simply left blank — nothing breaks.
A **Didit Verification** child record (`Didit_Verification__c`) is also created for every session, giving you a full audit trail with additional detail (document number, issuing country, name on document, date of birth, face match score, liveness score, AML hit count) — again, only for the features included in the workflow.
You can add the **Didit Verifications** related list to your Contact/Lead page layout to view history.
### Flow Automation (Invocable Action)
The plugin includes an Invocable Apex action that Salesforce Flows can call to trigger verification automatically:
1. In Flow Builder, add an **Action** element
2. Search for **"Create Didit Verification Session"**
3. Pass a Contact or Lead record ID
4. The action returns `url`, `sessionId`, `success`, and `error`
5. Use the URL in a **Send Email** or **Send Notification** action to deliver it to the customer
**Example use cases:**
* **On Lead creation** — automatically send a verification link to every new lead
* **Document expiry monitoring** — build a Scheduled Flow that runs daily, finds all Contacts where `Document Expiry Date ≤ TODAY + 90 days`, and sends a re-verification link — this works out of the box using the `Document Expiry Date` field populated by the webhook
## Troubleshooting
### Button does nothing when clicked
* Make sure you've saved your API Key and Workflow ID in Didit Settings
* Check that the Workflow ID belongs to the same application as your API Key
* Enable **Debug Logging** in Didit Settings and check the browser console for errors
### "Received a non-JSON response from the Didit API"
* Verify the Remote Site Setting for `https://verification.didit.me` is active: Setup → Remote Site Settings
* Check that your API Key is valid and has not expired in the [Didit Business Console](https://business.didit.me)
### Webhook returns 401 — "Webhook secret not configured"
* Go to **Didit Settings** and paste your Webhook Secret Key (copied from Didit Console → API & Webhooks) into the **Webhook Secret** field, then click **Save Settings**
### Webhook returns 401 — "Invalid signature" or "Request timestamp is stale"
* Invalid signature: make sure the Webhook Secret in Didit Settings exactly matches the one in the Didit Console — no extra spaces or characters
* Stale timestamp: webhooks must arrive within 5 minutes of being sent. If your Salesforce org's clock is out of sync this can trigger false positives, but this is very rare
### Verification window does not open (CSP error in browser console)
* The CSP Trusted Site for `https://verify.didit.me` is included in the managed package and is deployed automatically. If you are deploying from source, make sure `cspTrustedSites/Didit_Verify_Frontend.cspTrustedSite-meta.xml` is included in your deployment
## Support (24/7)
Our team is available to help you get up and running.
Fastest response — reach us directly on WhatsApp.
Send us an email at [hello@didit.me](mailto:hello@didit.me).
#### Step 5: Configure the webhook in Didit Console
1. Go to [business.didit.me](https://business.didit.me) > **API & Webhooks**
2. Set your **Webhook URL** to: `https://your-org.develop.my.salesforce-sites.com/didit/services/apexrest/didit/webhook/`
> **Note:** The exact domain format depends on your org type. Developer Edition orgs include `.develop` in the URL. Production orgs use `https://your-org.my.salesforce-sites.com/didit/services/apexrest/didit/webhook/`. Always copy the URL from your Site detail page (Step 3) to be sure.
3. Copy the **Webhook Secret Key**
4. In Salesforce, go to **Didit Settings** and paste the secret into the **Webhook Secret** field
5. Click **Save Settings**
That's it. From now on, every verification result will automatically update the Contact/Lead record — even if nobody has the Salesforce page open.
#### What the webhook saves
When Didit sends a webhook, the Contact or Lead is updated automatically.
**Always updated — regardless of workflow type:**
| Field | What it stores |
| ----------------------- | --------------------------------------------------------------- |
| **Verification Status** | `Approved`, `Declined`, `In Review`, `In Progress`, `Abandoned` |
| **Identity Verified** | `true` on Approved; `false` on Declined or Abandoned |
| **Verified At** | Timestamp of the Approved result |
| **Didit Session ID** | The session UUID |
**Only updated when the feature is part of your workflow:**
| Field | Requires |
| -------------------------------- | -------------------------------- |
| **Verified Document Type** | ID Verification in your workflow |
| **Document Expiry Date** | ID Verification in your workflow |
| **AML Check Status** | AML screening in your workflow |
| **Verification Decline Reasons** | ID Verification in your workflow |
If a feature is not enabled in your Didit workflow, the corresponding fields are simply left blank — nothing breaks.
A **Didit Verification** child record (`Didit_Verification__c`) is also created for every session, giving you a full audit trail with additional detail (document number, issuing country, name on document, date of birth, face match score, liveness score, AML hit count) — again, only for the features included in the workflow.
You can add the **Didit Verifications** related list to your Contact/Lead page layout to view history.
### Flow Automation (Invocable Action)
The plugin includes an Invocable Apex action that Salesforce Flows can call to trigger verification automatically:
1. In Flow Builder, add an **Action** element
2. Search for **"Create Didit Verification Session"**
3. Pass a Contact or Lead record ID
4. The action returns `url`, `sessionId`, `success`, and `error`
5. Use the URL in a **Send Email** or **Send Notification** action to deliver it to the customer
**Example use cases:**
* **On Lead creation** — automatically send a verification link to every new lead
* **Document expiry monitoring** — build a Scheduled Flow that runs daily, finds all Contacts where `Document Expiry Date ≤ TODAY + 90 days`, and sends a re-verification link — this works out of the box using the `Document Expiry Date` field populated by the webhook
## Troubleshooting
### Button does nothing when clicked
* Make sure you've saved your API Key and Workflow ID in Didit Settings
* Check that the Workflow ID belongs to the same application as your API Key
* Enable **Debug Logging** in Didit Settings and check the browser console for errors
### "Received a non-JSON response from the Didit API"
* Verify the Remote Site Setting for `https://verification.didit.me` is active: Setup → Remote Site Settings
* Check that your API Key is valid and has not expired in the [Didit Business Console](https://business.didit.me)
### Webhook returns 401 — "Webhook secret not configured"
* Go to **Didit Settings** and paste your Webhook Secret Key (copied from Didit Console → API & Webhooks) into the **Webhook Secret** field, then click **Save Settings**
### Webhook returns 401 — "Invalid signature" or "Request timestamp is stale"
* Invalid signature: make sure the Webhook Secret in Didit Settings exactly matches the one in the Didit Console — no extra spaces or characters
* Stale timestamp: webhooks must arrive within 5 minutes of being sent. If your Salesforce org's clock is out of sync this can trigger false positives, but this is very rare
### Verification window does not open (CSP error in browser console)
* The CSP Trusted Site for `https://verify.didit.me` is included in the managed package and is deployed automatically. If you are deploying from source, make sure `cspTrustedSites/Didit_Verify_Frontend.cspTrustedSite-meta.xml` is included in your deployment
## Support (24/7)
Our team is available to help you get up and running.
Fastest response — reach us directly on WhatsApp.
Send us an email at [hello@didit.me](mailto:hello@didit.me).