Open Didit on Zapier
Browse triggers, actions, and ready-made templates on the Zapier marketplace.
What You Get
Create Sessions
Trigger verification sessions from form submissions, CRM events, or any Zapier-connected app.
Real-Time Webhooks
Receive instant status updates (Approved, Declined, In Review, etc.) as Zapier triggers.
Retrieve Results
Fetch full session details — ID data, liveness scores, AML hits — on demand.
Prerequisites
| Requirement | Where to get it |
|---|---|
| Didit account | Sign up at business.didit.me — Free KYC plan is enough to test. |
| API Key | Console → API & Webhooks → copy the production key. The Zapier app authenticates with this key for every action. |
| Workflow ID | Console → Workflows → pick the workflow you want to launch (or create one). |
| Zapier account | Free or paid — zapier.com. The free plan handles 100 tasks / month, enough for small pilots. |
How It Works
Connect Didit to Zapier
In Zapier, search for Didit in the app directory (or open the marketplace listing directly) and connect your account using the API Key from Console → API & Webhooks.
Set Up a Trigger
Choose what starts your Zap. This can be a Didit trigger or any other app:
| Trigger Source | Example |
|---|---|
| Didit webhook | Session status changes to “Approved” |
| Google Forms | New form submission → create a verification session |
| HubSpot | New contact created → trigger KYC |
| Stripe | New customer → verify identity before payout |
| Typeform | Onboarding form completed → start verification |
Add a Didit Action
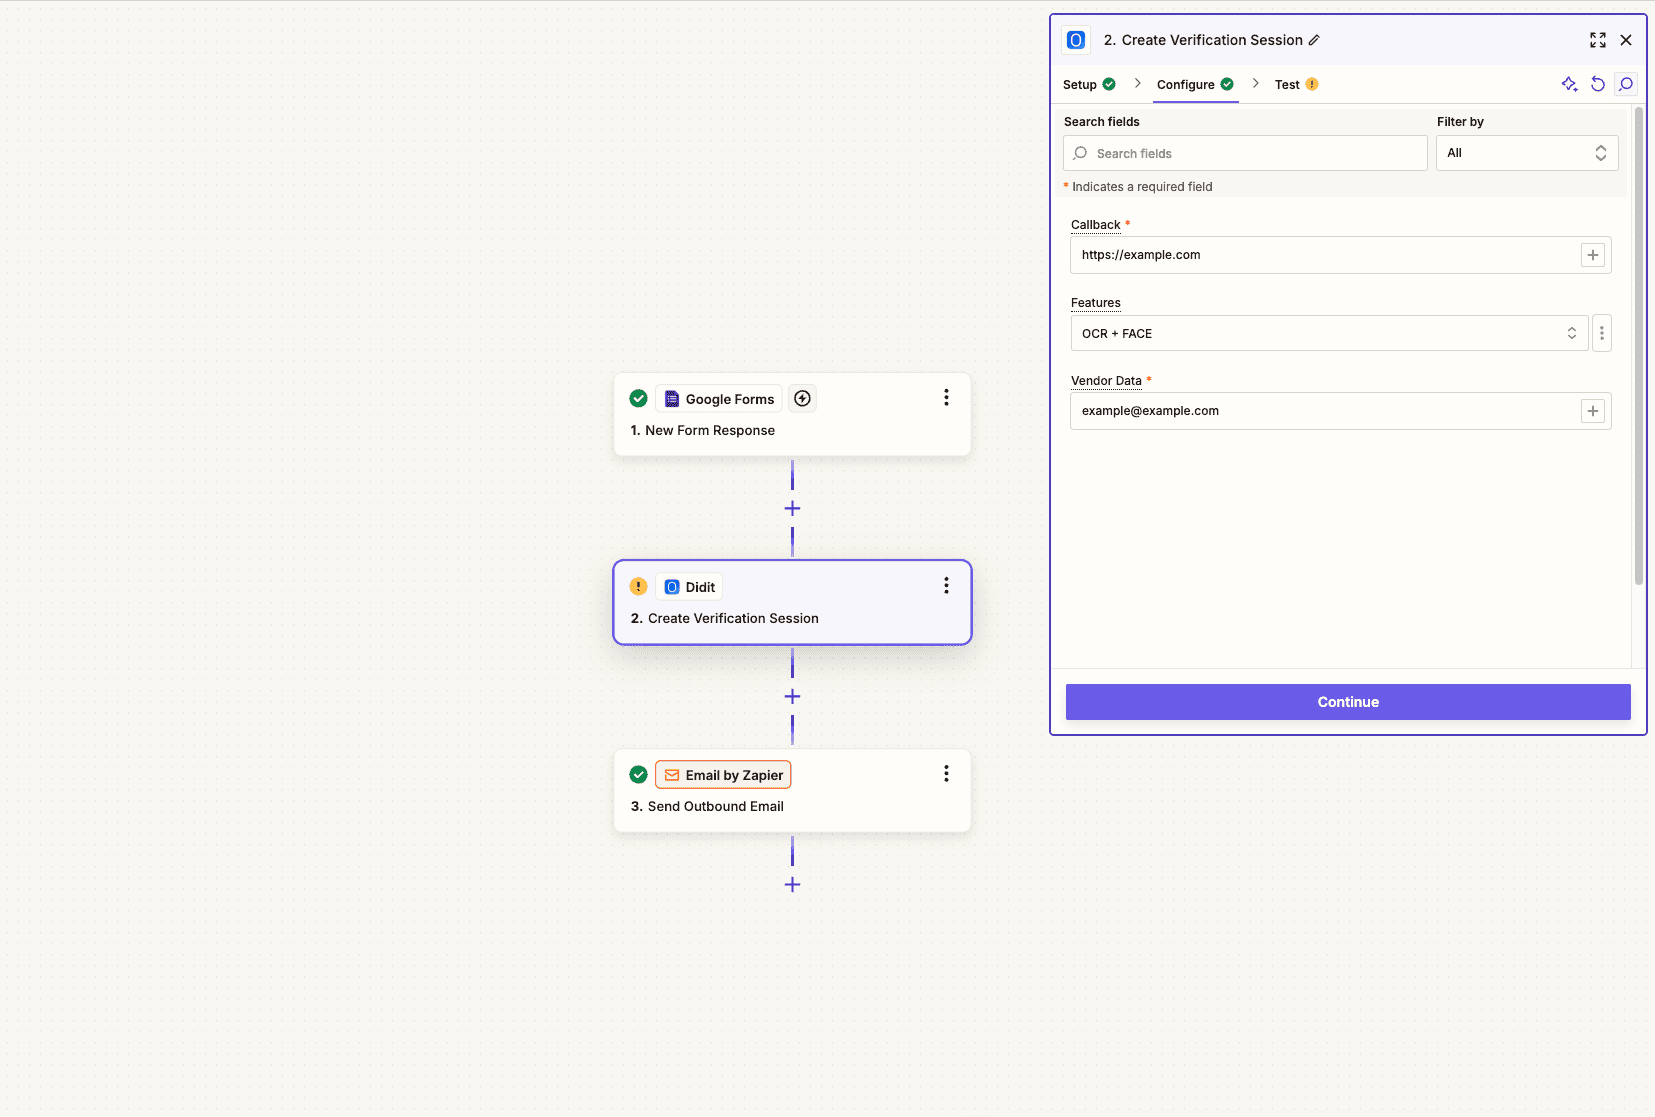
Use one of the available Didit actions (names match the Zapier marketplace listing):Create Verification Session — wraps
POST /v3/session/- Provide the Workflow ID of the verification flow to execute.
- Optionally set a Callback URL for the post-verification redirect.
- Pass Vendor Data (e.g. user email or your internal ID) to link the session back to your records.
- The action returns the new
session_id, the user-facingurl, and the initialstatus— use theurlto send the user to the verification flow.
GET /v3/session/{sessionId}/decision/- Pass a
session_idto fetch the full verification result. - Access ID data, liveness scores, AML results, the final
status, and any uploaded media URLs.
React to Results
Add downstream actions based on the verification outcome:
| Status | Suggested Action |
|---|---|
"Approved" | Update CRM, grant platform access, send welcome email |
"Declined" | Flag in database, notify compliance, send rejection email |
"In Review" | Create task for compliance team, send Slack notification |
"Abandoned" | Send reminder email with a fresh verification link |
Popular Zap Templates
Google Forms → Didit → Gmail
User fills onboarding form → verification session created → result emailed to user and admin.
HubSpot → Didit → HubSpot
New contact → trigger KYC → update contact properties with verification status and ID data.
Stripe → Didit → Slack
New customer → verify identity → notify your team on Slack with the result.
Webhook → Didit → Airtable
Custom trigger → verify user → log session results in Airtable for compliance records.
Available Triggers & Actions
The names below match the current Didit Zapier app on the marketplace. If you ever see a label that differs slightly inside Zapier itself, trust the Zapier UI — the underlying behavior is the same.Triggers (start a Zap)
| Trigger | Underlying event | Description |
|---|---|---|
| Session Status Updated | status.updated webhook | Fires every time a verification session changes status (Approved, Declined, In Review, Resubmitted, Abandoned, Kyc Expired, etc.). |
Actions (do something)
| Action | Underlying endpoint | Description |
|---|---|---|
| Create Verification Session | POST /v3/session/ | Starts a new session with your workflow, optional callback URL, and vendor_data. Returns the session URL to share with the user. |
| Retrieve Verification Session | GET /v3/session/{sessionId}/decision/ | Fetches the full decision payload — ID data, liveness, AML hits, and final status — for a given session_id. |
Things to know
Tips & Best Practices
Use Vendor Data to link sessions
Use Vendor Data to link sessions
Always pass a unique identifier (email, user ID, or UUID) in the Vendor Data field when creating sessions. This lets you match verification results back to the correct user in your system.
Handle all status outcomes
Handle all status outcomes
Build Zap paths (using Zapier’s Paths feature) to handle different statuses differently — Approved, Declined, In Review, Resubmitted, Abandoned, and Expired each deserve a tailored response.
Use Filters to reduce noise
Use Filters to reduce noise
Add Zapier Filters to only trigger downstream actions for specific statuses. For example, only send a welcome email when status is
"Approved".Test before going live
Test before going live
Use Zapier’s test feature along with Didit’s Try Webhook button (in Console → API & Webhooks) to validate your Zap end-to-end before processing real users.
Next Steps
Quick Start Guide
Set up your Didit account, create a workflow, and get your API key.
Webhooks
Learn about webhook payloads and signature verification for server-side integrations.