Authentication Quickstart: First Sign-In in 10 Minutes
Turn on Didit Authentication in a sandbox application, sign a person in with the hosted page and verify their access token on your server.
This quickstart gets Didit Authentication working end to end in about 10 minutes.
You register a callback in a sandbox application, turn on a sign-in method, sign a person in with the hosted sign-in page, verify their access token on your server, and see the sign-in in the console.
Prerequisites
A Didit account with a Sandbox application. Creating an account is free, and every Sandbox application has Authentication turned on.
Node.js 20 or later, and a web app you can run on http://localhost:3000.
Steps
1
Open your sandbox application
In the Business Console, use the application switcher to select your Sandbox application, then open Authentication.A Sandbox application accepts http://localhost callbacks and Didit’s test credentials for social sign-in, and it is never billed.
A Live application turns Authentication on from the Products page instead: see prepare your application.
2
Register your callback and origin
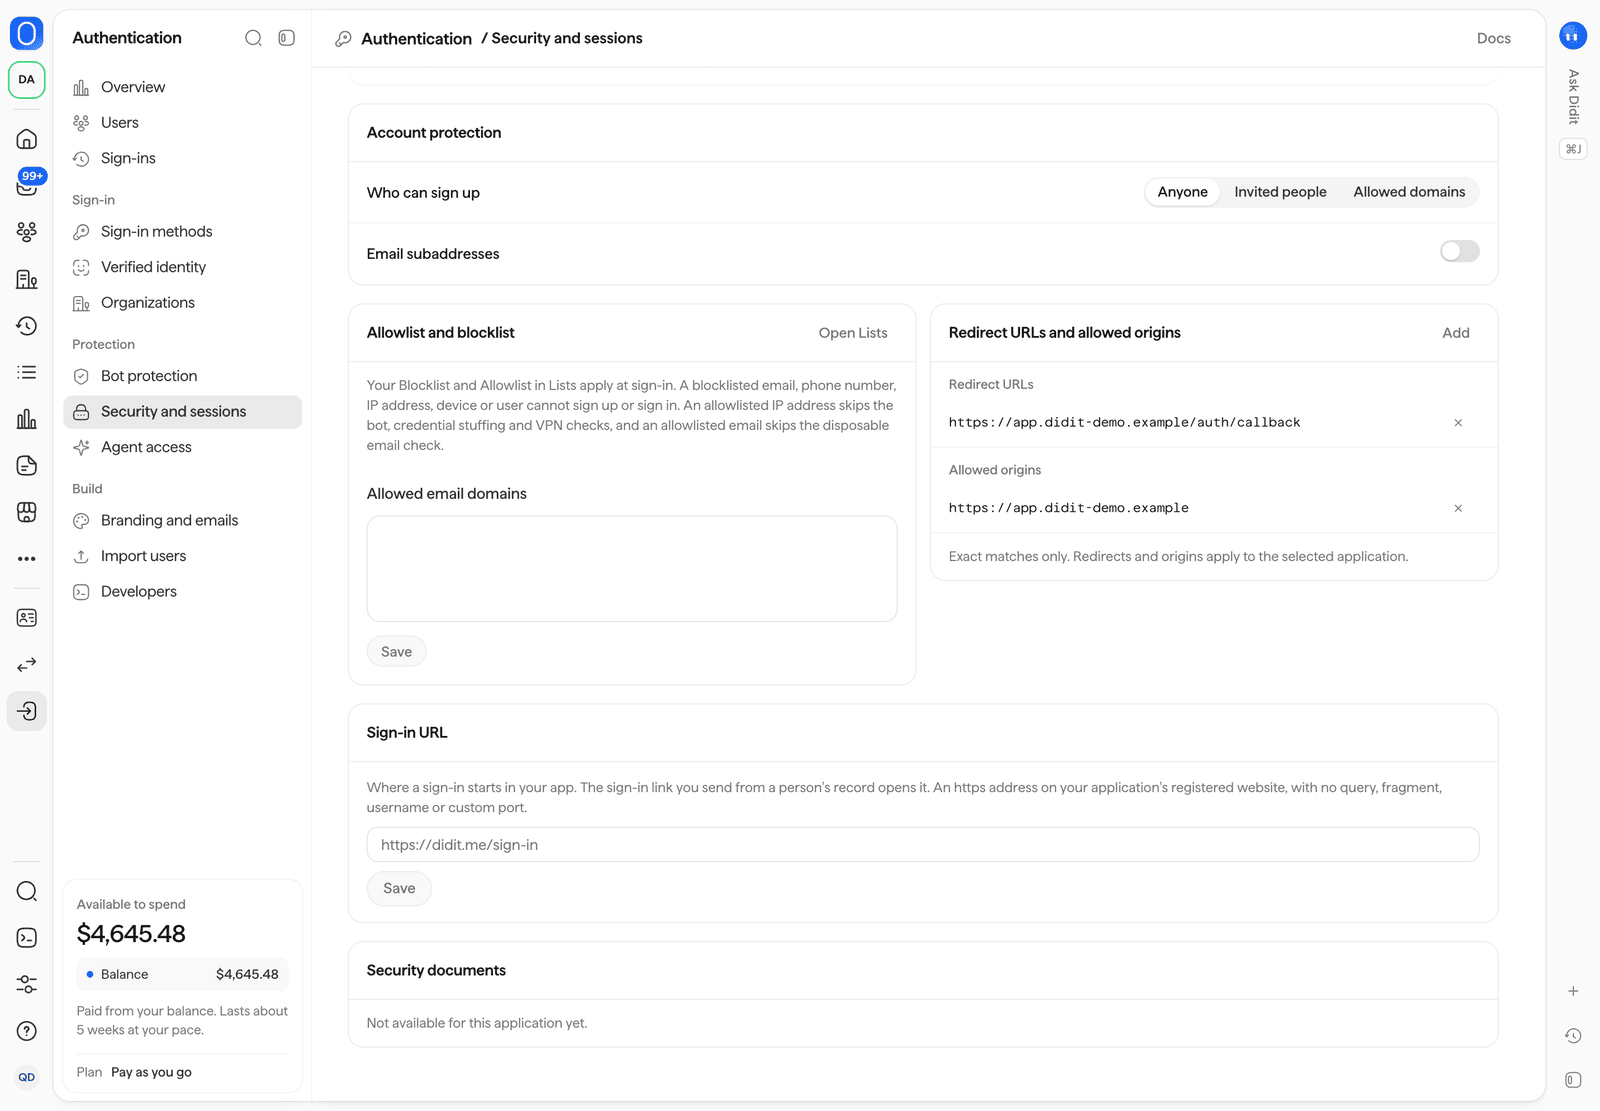
Open Authentication > Security and sessions > Redirect URLs and allowed origins and add:
What
Value
Redirect URL
http://localhost:3000/auth/callback
Allowed origin
http://localhost:3000
Didit only returns a person to a redirect URL you registered, character by character.
The allowed origin lets the browser exchange the code with your application’s Didit origin.
Redirect URLs and allowed origins, under Authentication > Security and sessions.
3
Turn on a sign-in method
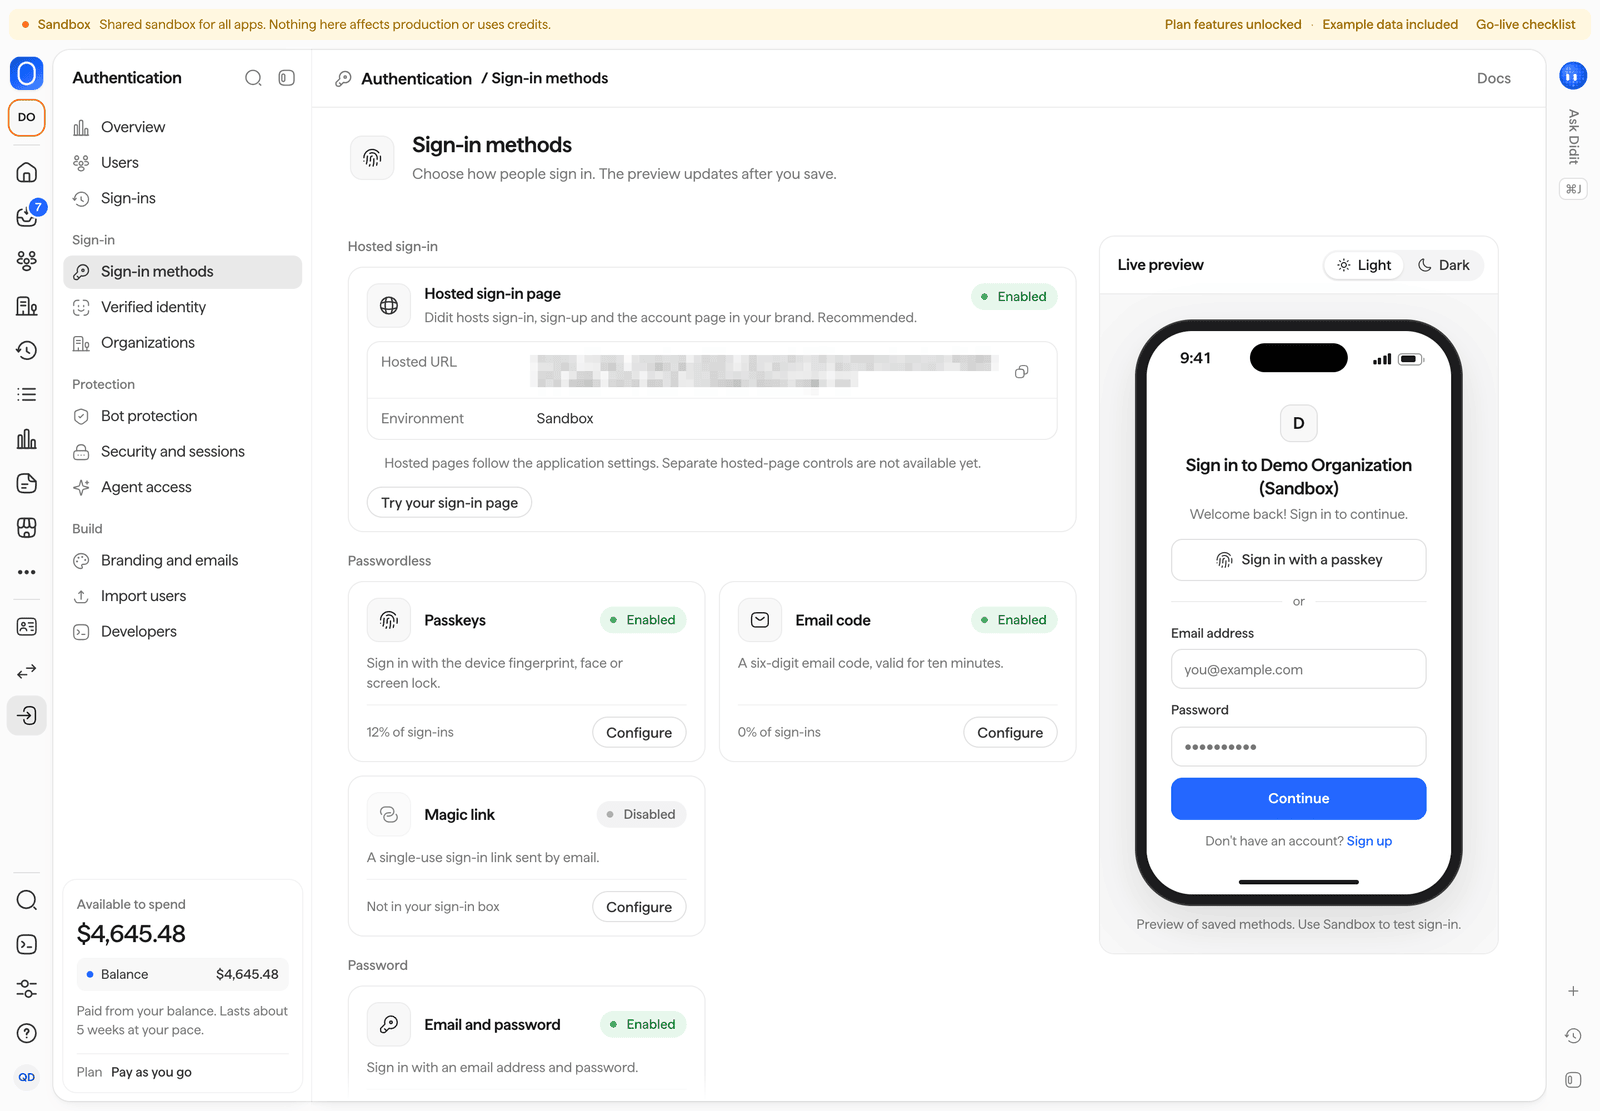
Open Authentication > Sign-in methods and turn on Email code.
A new application starts with every method off, and the hosted page offers only the methods you turn on.Add Passkeys too if you like, or a social sign-in method with Didit test credentials, which work in Sandbox without an app of your own.
Every method is described in sign-in methods.
Authentication > Sign-in methods, with a live preview of the hosted page.
4
Copy your publishable key
Open Authentication > Developers and copy the Publishable key.
In a Sandbox application it starts with pk_test_.The publishable key is public and names your application’s Didit sign-in origin.
Never put the Secret key in browser or mobile code.
5
Install the SDK and sign in
npm install @didit-protocol/auth
auth.ts
import { createDiditAuth } from "@didit-protocol/auth";export const auth = createDiditAuth({ publishableKey: "pk_test_...", redirectUri: "http://localhost:3000/auth/callback",});// Your sign-in buttonexport async function onSignInClick() { await auth.signIn({ returnTo: "/dashboard" });}// Run once on http://localhost:3000/auth/callbackexport async function onCallbackPage() { const { session, returnTo } = await auth.handleRedirectCallback(); console.log(session.email, session.vendorData); window.location.replace(returnTo ?? "/");}
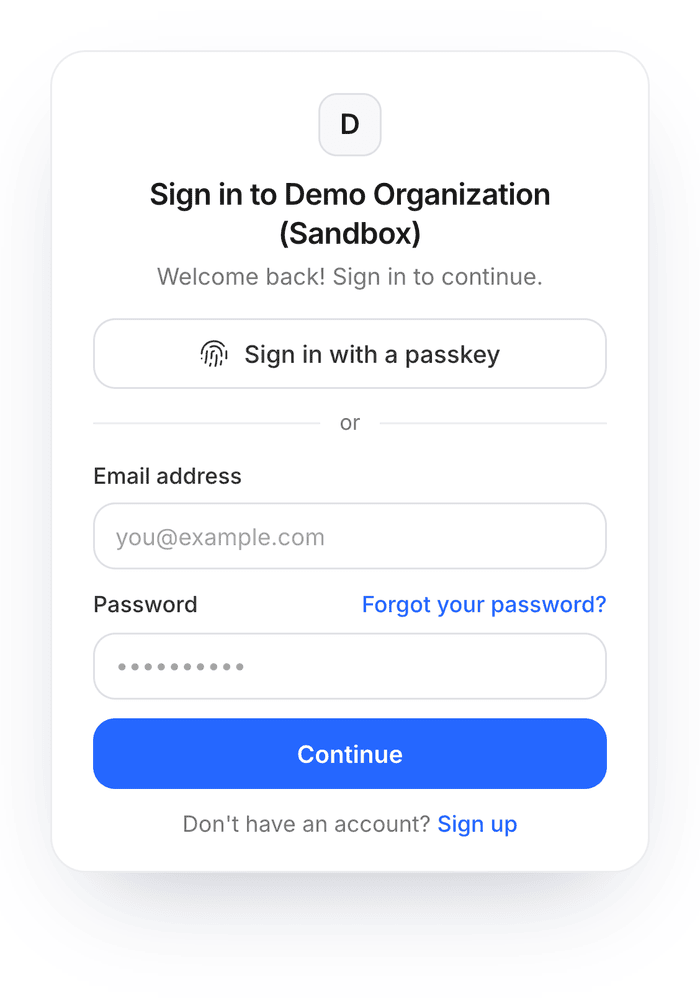
Click your button: the hosted page asks for an email address and sends a six-digit code.
Enter the code, and Didit returns you to your callback, which exchanges the one-time code for the session’s tokens.
A first sign-in with an address that has no account creates one, because the default sign-up policy lets anyone sign up.
The hosted sign-in page on a phone. It shows only the methods you turned on.
6
Verify the token on your server
Send the access token from auth.getToken() to your backend in the Authorization header, and verify it there on every protected request:
verifyToken checks the ES256 signature against your issuer’s published keys, the issuer and the expiry.
Access tokens last at most 5 minutes, and auth.getToken() refreshes them for you.
Other languages verify the same token with the server SDKs or any JWT library, as tokens and JWKS shows.
7
See the sign-in in the console
Open Authentication > Sign-ins.
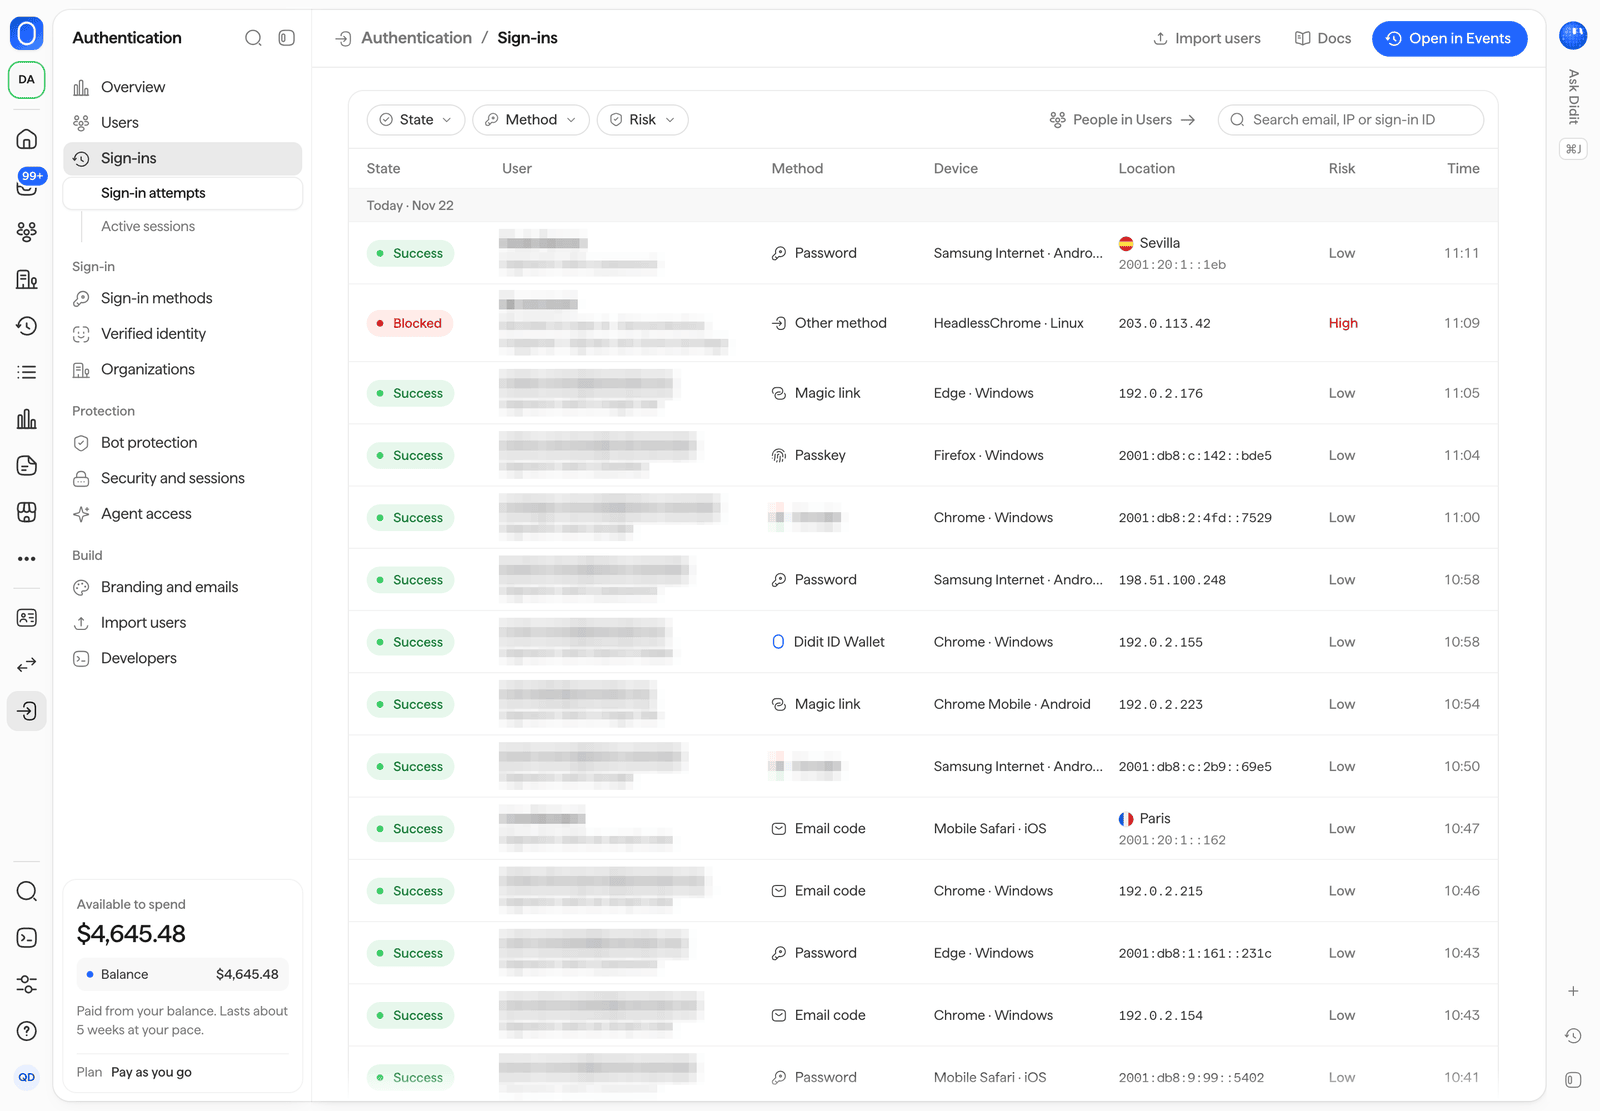
Your sign-in is listed with its result, method, device, location and risk, next to the example sign-ins every sandbox starts with.
The person appears under Users.
Authentication > Sign-ins: every attempt, with filters for state, method and risk.
Hosted or your own screens, token storage, sessions, step-up and troubleshooting.
React and Next.js
Components, hooks, HttpOnly cookies and auth() on the server.
iOS, Android, React Native and Flutter
Native sign-in with the system browser, passkeys and protected storage.
Bot protection
Turn on the policies that stop bots and account takeover.
Last modified on November 22, 2026
{"docsConfig":{"theme":"mint","$schema":"https://mintlify.com/docs.json","name":"Didit Docs","description":"The best way to integrate identity and fraud checks into your app. One API, four product lines (KYC · KYB · Transaction Monitoring · Wallet Screening), 220+ countries, 14,000+ documents, sub-2s inference, $10 free credit/month.","colors":{"primary":"#2567FF","light":"#90B1FF","dark":"#1B4FE0"},"logo":{"light":"https://mintcdn.com/didit-0f962782/dCzNNoYCusBNdK3I/logo/didit.svg?fit=max\u0026auto=format\u0026n=dCzNNoYCusBNdK3I\u0026q=85\u0026s=9f162fb8295fa1fd9300a24b293ce0b7","dark":"https://mintcdn.com/didit-0f962782/TefoKXCbZA_GIK5a/logo/didit-logo-wordmark-white.svg?fit=max\u0026auto=format\u0026n=TefoKXCbZA_GIK5a\u0026q=85\u0026s=c8c541689c814ca6a2c873cf6185a3a7","href":"https://docs.didit.me"},"favicon":"https://mintcdn.com/didit-0f962782/t6r0B-WdGMU5mSS-/favicon.ico?fit=max\u0026auto=format\u0026n=t6r0B-WdGMU5mSS-\u0026q=85\u0026s=b291917b960ebe959ae3b1aa233eafa8","api":{"examples":{"prefill":true},"mdx":{"auth":{"method":"key","name":"x-api-key"},"server":"https://verification.didit.me"}},"background":{"color":{"light":"#FFFFFF","dark":"#1A1A1A"}},"navbar":{"links":[{"icon":"comment-dots","href":"https://help.didit.me","label":"Support"},{"icon":"signal","href":"https://status.didit.me","label":"Status"}],"primary":{"type":"button","label":"Sign in","href":"https://business.didit.me"}},"footer":{"socials":{"x":"https://x.com/didit","github":"https://github.com/didit-protocol","linkedin":"https://linkedin.com/company/91001155","website":"https://didit.me"}},"search":{"prompt":"Search Didit docs..."},"seo":{"metatags":{"twitter:site":"@didit","theme-color":"#2567FF","apple-mobile-web-app-title":"Didit Docs"},"organization":{"id":"https://didit.me/#organization","name":"Didit","legalName":"Didit Protocol","url":"https://didit.me","logo":"https://didit.me/logos/primary-horizontal-light.png","sameAs":["https://www.linkedin.com/company/91001155","https://www.youtube.com/@getdidit","https://github.com/didit-protocol","https://x.com/didit"]},"indexing":"navigable"},"fonts":{"heading":{"family":"Inter","weight":500},"body":{"family":"Inter","weight":400}},"errors":{"404":{"redirect":false,"title":"Page not found","description":"This page moved or never existed. [Back to docs](/)"}},"contextual":{"options":["copy","view","chatgpt","claude","perplexity","mcp","cursor","vscode"],"display":"header"},"thumbnails":{"appearance":"light","background":"https://mintcdn.com/didit-0f962782/Xkecx-xLq1K2abHK/images/og-thumbnail-backplate.png?fit=max\u0026auto=format\u0026n=Xkecx-xLq1K2abHK\u0026q=85\u0026s=c699fa252554b2ac8d4c631e209a1473","fonts":{"family":"Inter"}},"metadata":{"timestamp":true},"styling":{"latex":true},"navigation":{"languages":[{"language":"en","href":""},{"language":"es","navbar":{"links":[{"icon":"comment-dots","href":"https://help.didit.me","label":"Soporte"},{"icon":"signal","href":"https://status.didit.me","label":"Estado"}],"primary":{"type":"button","label":"Iniciar sesión","href":"https://business.didit.me"}},"href":"es"},{"language":"pt-BR","navbar":{"links":[{"icon":"comment-dots","href":"https://help.didit.me","label":"Suporte"},{"icon":"signal","href":"https://status.didit.me","label":"Status"}],"primary":{"type":"button","label":"Entrar","href":"https://business.didit.me"}},"href":"pt-br"},{"language":"ja","navbar":{"links":[{"icon":"comment-dots","href":"https://help.didit.me","label":"サポート"},{"icon":"signal","href":"https://status.didit.me","label":"ステータス"}],"primary":{"type":"button","label":"サインイン","href":"https://business.didit.me"}},"href":"ja"},{"language":"de","navbar":{"links":[{"icon":"comment-dots","href":"https://help.didit.me","label":"Support"},{"icon":"signal","href":"https://status.didit.me","label":"Status"}],"primary":{"type":"button","label":"Anmelden","href":"https://business.didit.me"}},"href":"de"},{"language":"fr","navbar":{"links":[{"icon":"comment-dots","href":"https://help.didit.me","label":"Assistance"},{"icon":"signal","href":"https://status.didit.me","label":"Statut"}],"primary":{"type":"button","label":"Se connecter","href":"https://business.didit.me"}},"href":"fr"},{"language":"it","navbar":{"links":[{"icon":"comment-dots","href":"https://help.didit.me","label":"Supporto"},{"icon":"signal","href":"https://status.didit.me","label":"Stato"}],"primary":{"type":"button","label":"Accedi","href":"https://business.didit.me"}},"href":"it"},{"language":"pt","navbar":{"links":[{"icon":"comment-dots","href":"https://help.didit.me","label":"Suporte"},{"icon":"signal","href":"https://status.didit.me","label":"Estado"}],"primary":{"type":"button","label":"Iniciar sessão","href":"https://business.didit.me"}},"href":"pt"},{"language":"ca","navbar":{"links":[{"icon":"comment-dots","href":"https://help.didit.me","label":"Suport"},{"icon":"signal","href":"https://status.didit.me","label":"Estat"}],"primary":{"type":"button","label":"Inicia la sessió","href":"https://business.didit.me"}},"href":"ca"},{"language":"id","navbar":{"links":[{"icon":"comment-dots","href":"https://help.didit.me","label":"Dukungan"},{"icon":"signal","href":"https://status.didit.me","label":"Status"}],"primary":{"type":"button","label":"Masuk","href":"https://business.didit.me"}},"href":"id"},{"language":"ru","navbar":{"links":[{"icon":"comment-dots","href":"https://help.didit.me","label":"Поддержка"},{"icon":"signal","href":"https://status.didit.me","label":"Статус"}],"primary":{"type":"button","label":"Вход","href":"https://business.didit.me"}},"href":"ru"},{"language":"ko","navbar":{"links":[{"icon":"comment-dots","href":"https://help.didit.me","label":"지원"},{"icon":"signal","href":"https://status.didit.me","label":"상태"}],"primary":{"type":"button","label":"로그인","href":"https://business.didit.me"}},"href":"ko"},{"language":"zh","navbar":{"links":[{"icon":"comment-dots","href":"https://help.didit.me","label":"支持"},{"icon":"signal","href":"https://status.didit.me","label":"状态"}],"primary":{"type":"button","label":"登录","href":"https://business.didit.me"}},"href":"zh"},{"language":"ar","navbar":{"links":[{"icon":"comment-dots","href":"https://help.didit.me","label":"الدعم"},{"icon":"signal","href":"https://status.didit.me","label":"الحالة"}],"primary":{"type":"button","label":"تسجيل الدخول","href":"https://business.didit.me"}},"href":"ar"},{"language":"hi","navbar":{"links":[{"icon":"comment-dots","href":"https://help.didit.me","label":"सहायता"},{"icon":"signal","href":"https://status.didit.me","label":"स्थिति"}],"primary":{"type":"button","label":"साइन इन करें","href":"https://business.didit.me"}},"href":"hi"}]}},"deployment":{"deploymentMetadataValue":{"subdomain":"didit-0f962782","hasAudioNarration":false,"actualSubdomain":"didit-0f962782","customDomains":["docs.didit.me"],"gitSource":{"type":"github","owner":"didit-protocol","repo":"mintlify-docs","deployBranch":"main","contentDirectory":"","isPrivate":false,"mountPath":"","label":""},"entitlements":{"AI_CHAT":{"status":"ENABLED"},"WEB_MCP":{"status":"ENABLED"},"NARRATION":{"status":"ENABLED"}},"buildId":"6b02f05f6d5fca11cbfb13aa","clientVersion":"0.0.4270","searchFilterCounts":[{"language":"ar","tag":"مرجع API","count":430},{"language":"ca","tag":"Referència de l'API","count":430},{"language":"de","tag":"API-Referenz","count":430},{"language":"es","tag":"Referencia de la API","count":430},{"language":"fr","tag":"Référence API","count":430},{"language":"hi","tag":"API संदर्भ","count":430},{"language":"id","tag":"Referensi API","count":430},{"language":"it","tag":"Riferimento API","count":430},{"language":"ja","tag":"APIリファレンス","count":430},{"language":"ko","tag":"API 레퍼런스","count":430},{"language":"pt-BR","tag":"Referência da API","count":430},{"language":"pt","tag":"Referência da API","count":430},{"language":"ru","tag":"Справочник API","count":430},{"language":"zh","tag":"API 参考","count":430},{"language":"en","tag":"API Reference","count":422},{"language":"en","tag":"Database Validation","count":118},{"language":"ar","tag":"التحقق من قواعد البيانات","count":118},{"language":"ca","tag":"Validació en bases de dades","count":118},{"language":"de","tag":"Datenbankvalidierung","count":118},{"language":"es","tag":"Validación de base de datos","count":118},{"language":"fr","tag":"Validation en base de données","count":118},{"language":"hi","tag":"डेटाबेस सत्यापन","count":118},{"language":"id","tag":"Validasi Database","count":118},{"language":"it","tag":"Validazione su database","count":118},{"language":"ja","tag":"データベース検証","count":118},{"language":"ko","tag":"데이터베이스 검증","count":118},{"language":"pt-BR","tag":"Validação de banco de dados","count":118},{"language":"pt","tag":"Validação de base de dados","count":118},{"language":"ru","tag":"Проверка по базам данных","count":118},{"language":"zh","tag":"数据库核验","count":118},{"language":"ca","tag":"Primers passos","count":103},{"language":"de","tag":"Erste Schritte","count":103},{"language":"es","tag":"Primeros pasos","count":103},{"language":"ja","tag":"はじめに","count":103},{"language":"ko","tag":"시작하기","count":103},{"language":"pt-BR","tag":"Primeiros passos","count":103},{"language":"ru","tag":"Начало работы","count":103},{"language":"ko","tag":"인증","count":93},{"language":"en","tag":"Get Started","count":87},{"language":"ar","tag":"ابدأ الآن","count":87},{"language":"fr","tag":"Commencer","count":87},{"language":"hi","tag":"शुरू करें","count":87},{"language":"id","tag":"Mulai","count":87},{"language":"it","tag":"Inizia","count":87},{"language":"pt","tag":"Começar","count":87},{"language":"zh","tag":"快速开始","count":87},{"language":"en","tag":"User Verification","count":74},{"language":"ar","tag":"التحقق من المستخدمين","count":74},{"language":"ca","tag":"Verificació d'usuaris","count":74},{"language":"de","tag":"Benutzerverifizierung","count":74},{"language":"es","tag":"Verificación de usuarios","count":74},{"language":"fr","tag":"Vérification des utilisateurs","count":74},{"language":"hi","tag":"उपयोगकर्ता सत्यापन","count":74},{"language":"id","tag":"Verifikasi Pengguna","count":74},{"language":"it","tag":"Verifica degli utenti","count":74},{"language":"ja","tag":"ユーザー認証","count":74},{"language":"ko","tag":"사용자 인증","count":74},{"language":"pt-BR","tag":"Verificação de usuários","count":74},{"language":"pt","tag":"Verificação de utilizadores","count":74},{"language":"ru","tag":"Проверка пользователей","count":74},{"language":"zh","tag":"用户验证","count":74},{"language":"en","tag":"Travel Rule","count":58},{"language":"ar","tag":"Travel Rule","count":58},{"language":"ca","tag":"Travel Rule","count":58},{"language":"de","tag":"Travel Rule","count":58},{"language":"es","tag":"Travel Rule","count":58},{"language":"fr","tag":"Travel Rule","count":58},{"language":"hi","tag":"Travel Rule","count":58},{"language":"id","tag":"Travel Rule","count":58},{"language":"it","tag":"Travel Rule","count":58},{"language":"ja","tag":"トラベルルール","count":58},{"language":"ko","tag":"Travel Rule","count":58},{"language":"pt-BR","tag":"Travel Rule","count":58},{"language":"pt","tag":"Travel Rule","count":58},{"language":"ru","tag":"Travel Rule","count":58},{"language":"zh","tag":"Travel Rule","count":58},{"language":"en","tag":"Verification","count":48},{"language":"ar","tag":"التحقق","count":48},{"language":"ca","tag":"Verificació","count":48},{"language":"de","tag":"Verifizierung","count":48},{"language":"es","tag":"Verificación","count":48},{"language":"fr","tag":"Vérification","count":48},{"language":"hi","tag":"सत्यापन","count":48},{"language":"id","tag":"Verifikasi","count":48},{"language":"it","tag":"Verifica","count":48},{"language":"ja","tag":"検証","count":48},{"language":"pt-BR","tag":"Verificação","count":48},{"language":"pt","tag":"Verificação","count":48},{"language":"ru","tag":"Верификация","count":48},{"language":"zh","tag":"验证","count":48},{"language":"en","tag":"Integrate / SDKs","count":47},{"language":"ar","tag":"التكامل / SDKs","count":47},{"language":"ca","tag":"Integració / SDK","count":47},{"language":"de","tag":"Integrieren / SDKs","count":47},{"language":"es","tag":"Integración / SDKs","count":47},{"language":"fr","tag":"Intégrer / SDK","count":47},{"language":"hi","tag":"इंटीग्रेट करें / SDK","count":47},{"language":"id","tag":"Integrasi / SDK","count":47},{"language":"it","tag":"Integrazione / SDK","count":47},{"language":"ja","tag":"連携 / SDK","count":47},{"language":"ko","tag":"연동 / SDK","count":47},{"language":"pt-BR","tag":"Integração / SDKs","count":47},{"language":"pt","tag":"Integrar / SDKs","count":47},{"language":"ru","tag":"Интеграция / SDK","count":47},{"language":"zh","tag":"集成 / SDK","count":47},{"language":"en","tag":"Authentication","count":45},{"language":"ar","tag":"المصادقة","count":45},{"language":"ca","tag":"Autenticació","count":45},{"language":"de","tag":"Authentifizierung","count":45},{"language":"es","tag":"Autenticación","count":45},{"language":"fr","tag":"Authentification","count":45},{"language":"hi","tag":"प्रमाणीकरण","count":45},{"language":"id","tag":"Autentikasi","count":45},{"language":"it","tag":"Autenticazione","count":45},{"language":"ja","tag":"認証","count":45},{"language":"pt-BR","tag":"Autenticação","count":45},{"language":"pt","tag":"Autenticação","count":45},{"language":"ru","tag":"Аутентификация","count":45},{"language":"zh","tag":"身份认证","count":45},{"language":"pt-BR","tag":"Recursos","count":38},{"language":"en","tag":"Digital ID wallets","count":35},{"language":"en","tag":"User and Business Verifications","count":35},{"language":"ar","tag":"محافظ الهوية الرقمية","count":35},{"language":"ar","tag":"التحقق من المستخدمين والشركات","count":35},{"language":"ca","tag":"Carteres d'identitat digital","count":35},{"language":"ca","tag":"Verificacions d'usuaris i empreses","count":35},{"language":"de","tag":"Digitale ID-Wallets","count":35},{"language":"de","tag":"Benutzer- und Unternehmensverifizierungen","count":35},{"language":"es","tag":"Wallets de identidad digital","count":35},{"language":"es","tag":"Verificaciones de usuarios y empresas","count":35},{"language":"fr","tag":"Portefeuilles d'identité numérique","count":35},{"language":"fr","tag":"Vérifications des utilisateurs et des entreprises","count":35},{"language":"hi","tag":"डिजिटल ID वॉलेट","count":35},{"language":"hi","tag":"उपयोगकर्ता और व्यवसाय सत्यापन","count":35},{"language":"id","tag":"Dompet ID Digital","count":35},{"language":"id","tag":"Verifikasi Pengguna dan Bisnis","count":35},{"language":"it","tag":"Wallet di identità digitale","count":35},{"language":"it","tag":"Verifiche di utenti e aziende","count":35},{"language":"ja","tag":"デジタルIDウォレット","count":35},{"language":"ja","tag":"ユーザーと企業の認証","count":35},{"language":"ko","tag":"디지털 신분증 지갑","count":35},{"language":"ko","tag":"사용자 인증 및 기업 확인","count":35},{"language":"pt-BR","tag":"Carteiras de identidade digital","count":35},{"language":"pt","tag":"Carteiras de identidade digital","count":35},{"language":"pt","tag":"Verificações de utilizadores e empresas","count":35},{"language":"ru","tag":"Цифровые ID-кошельки","count":35},{"language":"ru","tag":"Верификация пользователей и компаний","count":35},{"language":"zh","tag":"数字身份钱包","count":35},{"language":"zh","tag":"用户与企业验证","count":35},{"language":"ko","tag":"기능","count":34}]},"assistantConfig":{"enableAskAiButton":false,"enableStarterQuestions":false,"enableAskAiSearchBar":true},"basePath":"","hasChatPermissions":true,"hasWebMcpPermissions":true,"toggles":[{"name":"kill-isr","enabled":true,"variant":{"name":"disabled","enabled":false,"feature_enabled":true},"impressionData":false},{"name":"custom-rbac-roles","enabled":true,"variant":{"name":"disabled","enabled":false,"feature_enabled":true},"impressionData":false},{"name":"agent-mintlify-slack","enabled":true,"variant":{"name":"disabled","enabled":false,"feature_enabled":true},"impressionData":false},{"name":"agent-integrations-settings","enabled":true,"variant":{"name":"disabled","enabled":false,"feature_enabled":true},"impressionData":false},{"name":"rbac-expansion","enabled":true,"variant":{"name":"disabled","enabled":false,"feature_enabled":true},"impressionData":false},{"name":"automations-pr-grouping","enabled":true,"variant":{"name":"disabled","enabled":false,"feature_enabled":true},"impressionData":false},{"name":"custom-prefix","enabled":true,"variant":{"name":"disabled","enabled":false,"feature_enabled":true},"impressionData":false},{"name":"analytics-v7","enabled":true,"variant":{"name":"disabled","enabled":false,"feature_enabled":true},"impressionData":false},{"name":"user-flows-analytics","enabled":true,"variant":{"name":"disabled","enabled":false,"feature_enabled":true},"impressionData":false},{"name":"no-publish-flow","enabled":true,"variant":{"name":"disabled","enabled":false,"feature_enabled":true},"impressionData":false},{"name":"workos-onboarding","enabled":true,"variant":{"name":"disabled","enabled":false,"feature_enabled":true},"impressionData":false},{"name":"snapshot-serving-live","enabled":true,"variant":{"name":"disabled","enabled":false,"feature_enabled":true},"impressionData":false},{"name":"stripTemperatureMiddleware","enabled":true,"variant":{"name":"disabled","enabled":false,"feature_enabled":true},"impressionData":false},{"name":"support-platform-pylon-zendesk","enabled":true,"variant":{"name":"disabled","enabled":false,"feature_enabled":true},"impressionData":false},{"name":"snapshot-serving","enabled":true,"variant":{"name":"disabled","enabled":false,"feature_enabled":true},"impressionData":false},{"name":"instant-rollback","enabled":true,"variant":{"name":"disabled","enabled":false,"feature_enabled":true},"impressionData":false},{"name":"granular-notifications-server","enabled":true,"variant":{"name":"disabled","enabled":false,"feature_enabled":true},"impressionData":false},{"name":"granular-notifications","enabled":true,"variant":{"name":"disabled","enabled":false,"feature_enabled":true},"impressionData":false},{"name":"automations-fable","enabled":true,"variant":{"name":"disabled","enabled":false,"feature_enabled":true},"impressionData":false},{"name":"fixed-ai-action-pricing","enabled":true,"variant":{"name":"disabled","enabled":false,"feature_enabled":true},"impressionData":false},{"name":"site-roles","enabled":true,"variant":{"name":"disabled","enabled":false,"feature_enabled":true},"impressionData":false},{"name":"automation-resolve-merge-conflict","enabled":true,"variant":{"name":"disabled","enabled":false,"feature_enabled":true},"impressionData":false},{"name":"scoped-publishing","enabled":true,"variant":{"name":"disabled","enabled":false,"feature_enabled":true},"impressionData":false},{"name":"mintql","enabled":true,"variant":{"name":"disabled","enabled":false,"feature_enabled":true},"impressionData":false},{"name":"page-level-analytics","enabled":true,"variant":{"name":"disabled","enabled":false,"feature_enabled":true},"impressionData":false},{"name":"editor-version-history-v2","enabled":true,"variant":{"name":"disabled","enabled":false,"feature_enabled":true},"impressionData":false},{"name":"billing-page-v2","enabled":true,"variant":{"name":"disabled","enabled":false,"feature_enabled":true},"impressionData":false},{"name":"full-page-search","enabled":true,"variant":{"name":"disabled","enabled":false,"feature_enabled":true},"impressionData":false},{"name":"workspace-projects","enabled":true,"variant":{"name":"disabled","enabled":false,"feature_enabled":true},"impressionData":false},{"name":"assistant-v5","enabled":true,"variant":{"name":"disabled","enabled":false,"feature_enabled":true},"impressionData":false},{"name":"fork-pr-previews","enabled":true,"variant":{"name":"disabled","enabled":false,"feature_enabled":true},"impressionData":false},{"name":"revalidation-jwt","enabled":true,"variant":{"name":"disabled","enabled":false,"feature_enabled":true},"impressionData":false},{"name":"workos-sso-scim","enabled":true,"variant":{"name":"disabled","enabled":false,"feature_enabled":true},"impressionData":false},{"name":"hobby-abuse-scan","enabled":true,"variant":{"name":"disabled","enabled":false,"feature_enabled":true},"impressionData":false},{"name":"dashboard-inbox","enabled":true,"variant":{"name":"disabled","enabled":false,"feature_enabled":true},"impressionData":false},{"name":"workos-signup","enabled":true,"variant":{"name":"disabled","enabled":false,"feature_enabled":true},"impressionData":false},{"name":"turbopuffer-dual-write","enabled":true,"variant":{"name":"disabled","enabled":false,"feature_enabled":true},"impressionData":false},{"name":"workos-enabled","enabled":true,"variant":{"name":"disabled","enabled":false,"feature_enabled":true},"impressionData":false},{"name":"approve-review-flow","enabled":true,"variant":{"name":"disabled","enabled":false,"feature_enabled":true},"impressionData":false},{"name":"editor-metadata","enabled":true,"variant":{"name":"disabled","enabled":false,"feature_enabled":true},"impressionData":false},{"name":"sso-setup-deadline-banner","enabled":true,"variant":{"name":"disabled","enabled":false,"feature_enabled":true},"impressionData":false},{"name":"turbopuffer-serve","enabled":true,"variant":{"name":"disabled","enabled":false,"feature_enabled":true},"impressionData":false},{"name":"live-agents","enabled":true,"variant":{"name":"disabled","enabled":false,"feature_enabled":true},"impressionData":false},{"name":"starter-pricing","enabled":true,"variant":{"name":"treatment","enabled":true,"payload":{"type":"string","value":"treatment"},"feature_enabled":true},"impressionData":false},{"name":"llms-txt-v2","enabled":true,"variant":{"name":"disabled","enabled":false,"feature_enabled":true},"impressionData":false},{"name":"wildcard-email-auth","enabled":true,"variant":{"name":"disabled","enabled":false,"feature_enabled":true},"impressionData":false},{"name":"update-worker-routing","enabled":true,"variant":{"name":"disabled","enabled":false,"feature_enabled":true},"impressionData":false}],"googleFontsInlined":false},"customCss":[{"filePath":"style.css","href":"/_mintlify/custom/didit-0f962782/714dd91730ddd114/style.css"}]}
{"page":{"pagePath":"authentication/quickstart","slug":"/authentication/quickstart","pageMetadata":{"title":"Authentication Quickstart: First Sign-In in 10 Minutes","sidebarTitle":"Quickstart","keywords":["authentication quickstart","add login to web app","hosted sign-in quickstart","passkey login quickstart","email code login","verify JWT access token","Didit Authentication"],"description":"Turn on Didit Authentication in a sandbox application, sign a person in with the hosted page and verify their access token on your server.","href":"/authentication/quickstart"},"description":{"compiledSource":"\"use strict\";\nconst {jsx: _jsx} = arguments[0];\nconst {useMDXComponents: _provideComponents} = arguments[0];\nfunction _createMdxContent(props) {\n const _components = {\n p: \"p\",\n ..._provideComponents(),\n ...props.components\n };\n return _jsx(_components.p, {\n children: \"Turn on Didit Authentication in a sandbox application, sign a person in with the hosted page and verify their access token on your server.\"\n });\n}\nfunction MDXContent(props = {}) {\n const {wrapper: MDXLayout} = {\n ..._provideComponents(),\n ...props.components\n };\n return MDXLayout ? _jsx(MDXLayout, {\n ...props,\n children: _jsx(_createMdxContent, {\n ...props\n })\n }) : _createMdxContent(props);\n}\nreturn {\n default: MDXContent\n};\n","frontmatter":{},"scope":{}},"pageType":"default","mdx":{"mdxSource":{"compiledSource":"\"use strict\";const{Fragment:_Fragment,jsx:_jsx,jsxs:_jsxs}=arguments[0];const{useMDXComponents:_provideComponents}=arguments[0];function _createMdxContent(props){const _components={a:`a`,code:`code`,li:`li`,ol:`ol`,p:`p`,pre:`pre`,span:`span`,strong:`strong`,tbody:`tbody`,td:`td`,th:`th`,thead:`thead`,tr:`tr`,ul:`ul`,..._provideComponents(),...props.components},{Card,CardGroup,CodeBlock,Frame,Heading,OptimizedImage,Step,Steps,Table}=_components;if(!Card)_missingMdxReference(`Card`,true);if(!CardGroup)_missingMdxReference(`CardGroup`,true);if(!CodeBlock)_missingMdxReference(`CodeBlock`,true);if(!Frame)_missingMdxReference(`Frame`,true);if(!Heading)_missingMdxReference(`Heading`,true);if(!OptimizedImage)_missingMdxReference(`OptimizedImage`,true);if(!Step)_missingMdxReference(`Step`,true);if(!Steps)_missingMdxReference(`Steps`,true);if(!Table)_missingMdxReference(`Table`,true);return _jsxs(_Fragment,{children:[_jsx(_components.p,{children:`This quickstart gets Didit Authentication working end to end in about 10 minutes.\nYou register a callback in a sandbox application, turn on a sign-in method, sign a person in with the hosted sign-in page, verify their access token on your server, and see the sign-in in the console.`}),`\n`,_jsx(Heading,{level:`2`,id:`prerequisites`,children:`Prerequisites`}),`\n`,_jsxs(_components.ul,{children:[`\n`,_jsx(_components.li,{children:`A Didit account with a Sandbox application. Creating an account is free, and every Sandbox application has Authentication turned on.`}),`\n`,_jsxs(_components.li,{children:[`Node.js 20 or later, and a web app you can run on `,_jsx(_components.code,{children:`http://localhost:3000`}),`.`]}),`\n`]}),`\n`,_jsx(Heading,{level:`2`,id:`steps`,children:`Steps`}),`\n`,_jsxs(Steps,{children:[_jsxs(Step,{title:`Open your sandbox application`,children:[_jsxs(_components.p,{children:[`In the `,_jsx(_components.a,{href:`https://business.didit.me`,children:`Business Console`}),`, use the application switcher to select your `,_jsx(_components.strong,{children:`Sandbox`}),` application, then open `,_jsx(_components.strong,{children:`Authentication`}),`.`]}),_jsxs(_components.p,{children:[`A Sandbox application accepts `,_jsx(_components.code,{children:`http://localhost`}),` callbacks and Didit’s test credentials for social sign-in, and it is never billed.\nA Live application turns Authentication on from the `,_jsx(_components.strong,{children:`Products`}),` page instead: see `,_jsx(_components.a,{href:`/authentication/overview#prepare-your-application`,children:`prepare your application`}),`.`]})]}),_jsxs(Step,{title:`Register your callback and origin`,children:[_jsxs(_components.p,{children:[`Open `,_jsx(_components.strong,{children:`Authentication > Security and sessions > Redirect URLs and allowed origins`}),` and add:`]}),_jsxs(Table,{children:[_jsx(_components.thead,{children:_jsxs(_components.tr,{children:[_jsx(_components.th,{children:`What`}),_jsx(_components.th,{children:`Value`})]})}),_jsxs(_components.tbody,{children:[_jsxs(_components.tr,{children:[_jsx(_components.td,{children:`Redirect URL`}),_jsx(_components.td,{children:_jsx(_components.code,{children:`http://localhost:3000/auth/callback`})})]}),_jsxs(_components.tr,{children:[_jsx(_components.td,{children:`Allowed origin`}),_jsx(_components.td,{children:_jsx(_components.code,{children:`http://localhost:3000`})})]})]})]}),_jsx(_components.p,{children:`Didit only returns a person to a redirect URL you registered, character by character.\nThe allowed origin lets the browser exchange the code with your application’s Didit origin.`}),_jsx(Frame,{caption:`Redirect URLs and allowed origins, under Authentication > Security and sessions.`,children:_jsx(OptimizedImage,{src:`https://mintcdn.com/didit-0f962782/RpqZjIB1GnUPdMTN/images/authentication/console-redirect-urls.png?fit=max\u0026auto=format\u0026n=RpqZjIB1GnUPdMTN\u0026q=85\u0026s=8bf9cdacf97580097f4e8c6bd242af6f`,alt:`The Redirect URLs and allowed origins card in the Didit Business Console, next to the allowlist and blocklist and the sign-in URL`,\"data-og-width\":`1600`,width:`1600`,\"data-og-height\":`1111`,height:`1111`,\"data-path\":`images/authentication/console-redirect-urls.png`,\"data-optimize\":`true`,\"data-opv\":`3`,srcset:`https://mintcdn.com/didit-0f962782/RpqZjIB1GnUPdMTN/images/authentication/console-redirect-urls.png?w=280\u0026fit=max\u0026auto=format\u0026n=RpqZjIB1GnUPdMTN\u0026q=85\u0026s=dc653589f29f40ce569d8b313ac7e67c 280w, https://mintcdn.com/didit-0f962782/RpqZjIB1GnUPdMTN/images/authentication/console-redirect-urls.png?w=560\u0026fit=max\u0026auto=format\u0026n=RpqZjIB1GnUPdMTN\u0026q=85\u0026s=4e85ab28b3c08bb1a8396bfb6757f588 560w, https://mintcdn.com/didit-0f962782/RpqZjIB1GnUPdMTN/images/authentication/console-redirect-urls.png?w=840\u0026fit=max\u0026auto=format\u0026n=RpqZjIB1GnUPdMTN\u0026q=85\u0026s=f6ad7644c720d900733faaba2d1d783b 840w, https://mintcdn.com/didit-0f962782/RpqZjIB1GnUPdMTN/images/authentication/console-redirect-urls.png?w=1100\u0026fit=max\u0026auto=format\u0026n=RpqZjIB1GnUPdMTN\u0026q=85\u0026s=f841eb49d949d3d9ede1536b6b320709 1100w, https://mintcdn.com/didit-0f962782/RpqZjIB1GnUPdMTN/images/authentication/console-redirect-urls.png?w=1650\u0026fit=max\u0026auto=format\u0026n=RpqZjIB1GnUPdMTN\u0026q=85\u0026s=f66993cebb118865ff3975ef5feb9bdf 1650w, https://mintcdn.com/didit-0f962782/RpqZjIB1GnUPdMTN/images/authentication/console-redirect-urls.png?w=2500\u0026fit=max\u0026auto=format\u0026n=RpqZjIB1GnUPdMTN\u0026q=85\u0026s=9135c37d9677d902da471ac4a9ff4b08 2500w`})})]}),_jsxs(Step,{title:`Turn on a sign-in method`,children:[_jsxs(_components.p,{children:[`Open `,_jsx(_components.strong,{children:`Authentication > Sign-in methods`}),` and turn on `,_jsx(_components.strong,{children:`Email code`}),`.\nA new application starts with every method off, and the hosted page offers only the methods you turn on.`]}),_jsxs(_components.p,{children:[`Add `,_jsx(_components.strong,{children:`Passkeys`}),` too if you like, or a social sign-in method with `,_jsx(_components.strong,{children:`Didit test credentials`}),`, which work in Sandbox without an app of your own.\nEvery method is described in `,_jsx(_components.a,{href:`/authentication/sign-in-methods`,children:`sign-in methods`}),`.`]}),_jsx(Frame,{caption:`Authentication > Sign-in methods, with a live preview of the hosted page.`,children:_jsx(OptimizedImage,{src:`https://mintcdn.com/didit-0f962782/RpqZjIB1GnUPdMTN/images/authentication/console-sign-in-methods.png?fit=max\u0026auto=format\u0026n=RpqZjIB1GnUPdMTN\u0026q=85\u0026s=4f71ad0125f22dd8184ad837854ec8db`,alt:`The Sign-in methods page in the Didit Business Console, with the hosted sign-in page card, the passwordless and password methods, and a live preview of the hosted page`,\"data-og-width\":`1600`,width:`1600`,\"data-og-height\":`1111`,height:`1111`,\"data-path\":`images/authentication/console-sign-in-methods.png`,\"data-optimize\":`true`,\"data-opv\":`3`,srcset:`https://mintcdn.com/didit-0f962782/RpqZjIB1GnUPdMTN/images/authentication/console-sign-in-methods.png?w=280\u0026fit=max\u0026auto=format\u0026n=RpqZjIB1GnUPdMTN\u0026q=85\u0026s=b53cc07bfe7c5bd2e39e5d3e1baf0887 280w, https://mintcdn.com/didit-0f962782/RpqZjIB1GnUPdMTN/images/authentication/console-sign-in-methods.png?w=560\u0026fit=max\u0026auto=format\u0026n=RpqZjIB1GnUPdMTN\u0026q=85\u0026s=b39d1f57e19bebac30e0f48b71760311 560w, https://mintcdn.com/didit-0f962782/RpqZjIB1GnUPdMTN/images/authentication/console-sign-in-methods.png?w=840\u0026fit=max\u0026auto=format\u0026n=RpqZjIB1GnUPdMTN\u0026q=85\u0026s=53b5153b5d8652c6a3faed9b2f10ed6e 840w, https://mintcdn.com/didit-0f962782/RpqZjIB1GnUPdMTN/images/authentication/console-sign-in-methods.png?w=1100\u0026fit=max\u0026auto=format\u0026n=RpqZjIB1GnUPdMTN\u0026q=85\u0026s=9b804efd8dd20d49b118699b98df3fe1 1100w, https://mintcdn.com/didit-0f962782/RpqZjIB1GnUPdMTN/images/authentication/console-sign-in-methods.png?w=1650\u0026fit=max\u0026auto=format\u0026n=RpqZjIB1GnUPdMTN\u0026q=85\u0026s=8cb9bb5f881bfa3f2870ba4a210d3363 1650w, https://mintcdn.com/didit-0f962782/RpqZjIB1GnUPdMTN/images/authentication/console-sign-in-methods.png?w=2500\u0026fit=max\u0026auto=format\u0026n=RpqZjIB1GnUPdMTN\u0026q=85\u0026s=3d7a020b21d421265c172470aba47ae9 2500w`})})]}),_jsxs(Step,{title:`Copy your publishable key`,children:[_jsxs(_components.p,{children:[`Open `,_jsx(_components.strong,{children:`Authentication > Developers`}),` and copy the `,_jsx(_components.strong,{children:`Publishable key`}),`.\nIn a Sandbox application it starts with `,_jsx(_components.code,{children:`pk_test_`}),`.`]}),_jsxs(_components.p,{children:[`The publishable key is public and names your application’s Didit sign-in origin.\nNever put the `,_jsx(_components.strong,{children:`Secret key`}),` in browser or mobile code.`]})]}),_jsxs(Step,{title:`Install the SDK and sign in`,children:[_jsx(CodeBlock,{filename:``,numberOfLines:`1`,language:`shellscript`,children:_jsx(_components.pre,{className:`shiki shiki-themes github-light-default dark-plus`,style:{backgroundColor:`#ffffff`,\"--shiki-dark-bg\":`#0B0C0E`,color:`#1f2328`,\"--shiki-dark\":`#D4D4D4`},language:`shellscript`,children:_jsxs(_components.code,{language:`shellscript`,numberOfLines:`1`,children:[_jsxs(_components.span,{className:`line`,children:[_jsx(_components.span,{style:{color:`#953800`,\"--shiki-dark\":`#DCDCAA`},children:`npm`}),_jsx(_components.span,{style:{color:`#0A3069`,\"--shiki-dark\":`#CE9178`},children:` install`}),_jsx(_components.span,{style:{color:`#0A3069`,\"--shiki-dark\":`#CE9178`},children:` @didit-protocol/auth`})]}),`\n`]})})}),_jsx(CodeBlock,{filename:`auth.ts`,numberOfLines:`18`,language:`typescript`,children:_jsx(_components.pre,{className:`shiki shiki-themes github-light-default dark-plus`,style:{backgroundColor:`#ffffff`,\"--shiki-dark-bg\":`#0B0C0E`,color:`#1f2328`,\"--shiki-dark\":`#D4D4D4`},language:`typescript`,children:_jsxs(_components.code,{language:`typescript`,numberOfLines:`18`,children:[_jsxs(_components.span,{className:`line`,children:[_jsx(_components.span,{style:{color:`#CF222E`,\"--shiki-dark\":`#C586C0`},children:`import`}),_jsx(_components.span,{style:{color:`#1F2328`,\"--shiki-dark\":`#D4D4D4`},children:` { `}),_jsx(_components.span,{style:{color:`#1F2328`,\"--shiki-dark\":`#9CDCFE`},children:`createDiditAuth`}),_jsx(_components.span,{style:{color:`#1F2328`,\"--shiki-dark\":`#D4D4D4`},children:` } `}),_jsx(_components.span,{style:{color:`#CF222E`,\"--shiki-dark\":`#C586C0`},children:`from`}),_jsx(_components.span,{style:{color:`#0A3069`,\"--shiki-dark\":`#CE9178`},children:` \"@didit-protocol/auth\"`}),_jsx(_components.span,{style:{color:`#1F2328`,\"--shiki-dark\":`#D4D4D4`},children:`;`})]}),`\n`,_jsx(_components.span,{className:`line`}),`\n`,_jsxs(_components.span,{className:`line`,children:[_jsx(_components.span,{style:{color:`#CF222E`,\"--shiki-dark\":`#C586C0`},children:`export`}),_jsx(_components.span,{style:{color:`#CF222E`,\"--shiki-dark\":`#569CD6`},children:` const`}),_jsx(_components.span,{style:{color:`#0550AE`,\"--shiki-dark\":`#4FC1FF`},children:` auth`}),_jsx(_components.span,{style:{color:`#CF222E`,\"--shiki-dark\":`#D4D4D4`},children:` =`}),_jsx(_components.span,{style:{color:`#8250DF`,\"--shiki-dark\":`#DCDCAA`},children:` createDiditAuth`}),_jsx(_components.span,{style:{color:`#1F2328`,\"--shiki-dark\":`#D4D4D4`},children:`({`})]}),`\n`,_jsxs(_components.span,{className:`line`,children:[_jsx(_components.span,{style:{color:`#1F2328`,\"--shiki-dark\":`#9CDCFE`},children:` publishableKey:`}),_jsx(_components.span,{style:{color:`#0A3069`,\"--shiki-dark\":`#CE9178`},children:` \"pk_test_...\"`}),_jsx(_components.span,{style:{color:`#1F2328`,\"--shiki-dark\":`#D4D4D4`},children:`,`})]}),`\n`,_jsxs(_components.span,{className:`line`,children:[_jsx(_components.span,{style:{color:`#1F2328`,\"--shiki-dark\":`#9CDCFE`},children:` redirectUri:`}),_jsx(_components.span,{style:{color:`#0A3069`,\"--shiki-dark\":`#CE9178`},children:` \"http://localhost:3000/auth/callback\"`}),_jsx(_components.span,{style:{color:`#1F2328`,\"--shiki-dark\":`#D4D4D4`},children:`,`})]}),`\n`,_jsx(_components.span,{className:`line`,children:_jsx(_components.span,{style:{color:`#1F2328`,\"--shiki-dark\":`#D4D4D4`},children:`});`})}),`\n`,_jsx(_components.span,{className:`line`}),`\n`,_jsx(_components.span,{className:`line`,children:_jsx(_components.span,{style:{color:`#6E7781`,\"--shiki-dark\":`#6A9955`},children:`// Your sign-in button`})}),`\n`,_jsxs(_components.span,{className:`line`,children:[_jsx(_components.span,{style:{color:`#CF222E`,\"--shiki-dark\":`#C586C0`},children:`export`}),_jsx(_components.span,{style:{color:`#CF222E`,\"--shiki-dark\":`#569CD6`},children:` async`}),_jsx(_components.span,{style:{color:`#CF222E`,\"--shiki-dark\":`#569CD6`},children:` function`}),_jsx(_components.span,{style:{color:`#8250DF`,\"--shiki-dark\":`#DCDCAA`},children:` onSignInClick`}),_jsx(_components.span,{style:{color:`#1F2328`,\"--shiki-dark\":`#D4D4D4`},children:`() {`})]}),`\n`,_jsxs(_components.span,{className:`line`,children:[_jsx(_components.span,{style:{color:`#CF222E`,\"--shiki-dark\":`#C586C0`},children:` await`}),_jsx(_components.span,{style:{color:`#1F2328`,\"--shiki-dark\":`#9CDCFE`},children:` auth`}),_jsx(_components.span,{style:{color:`#1F2328`,\"--shiki-dark\":`#D4D4D4`},children:`.`}),_jsx(_components.span,{style:{color:`#8250DF`,\"--shiki-dark\":`#DCDCAA`},children:`signIn`}),_jsx(_components.span,{style:{color:`#1F2328`,\"--shiki-dark\":`#D4D4D4`},children:`({ `}),_jsx(_components.span,{style:{color:`#1F2328`,\"--shiki-dark\":`#9CDCFE`},children:`returnTo:`}),_jsx(_components.span,{style:{color:`#0A3069`,\"--shiki-dark\":`#CE9178`},children:` \"/dashboard\"`}),_jsx(_components.span,{style:{color:`#1F2328`,\"--shiki-dark\":`#D4D4D4`},children:` });`})]}),`\n`,_jsx(_components.span,{className:`line`,children:_jsx(_components.span,{style:{color:`#1F2328`,\"--shiki-dark\":`#D4D4D4`},children:`}`})}),`\n`,_jsx(_components.span,{className:`line`}),`\n`,_jsx(_components.span,{className:`line`,children:_jsx(_components.span,{style:{color:`#6E7781`,\"--shiki-dark\":`#6A9955`},children:`// Run once on http://localhost:3000/auth/callback`})}),`\n`,_jsxs(_components.span,{className:`line`,children:[_jsx(_components.span,{style:{color:`#CF222E`,\"--shiki-dark\":`#C586C0`},children:`export`}),_jsx(_components.span,{style:{color:`#CF222E`,\"--shiki-dark\":`#569CD6`},children:` async`}),_jsx(_components.span,{style:{color:`#CF222E`,\"--shiki-dark\":`#569CD6`},children:` function`}),_jsx(_components.span,{style:{color:`#8250DF`,\"--shiki-dark\":`#DCDCAA`},children:` onCallbackPage`}),_jsx(_components.span,{style:{color:`#1F2328`,\"--shiki-dark\":`#D4D4D4`},children:`() {`})]}),`\n`,_jsxs(_components.span,{className:`line`,children:[_jsx(_components.span,{style:{color:`#CF222E`,\"--shiki-dark\":`#569CD6`},children:` const`}),_jsx(_components.span,{style:{color:`#1F2328`,\"--shiki-dark\":`#D4D4D4`},children:` { `}),_jsx(_components.span,{style:{color:`#0550AE`,\"--shiki-dark\":`#4FC1FF`},children:`session`}),_jsx(_components.span,{style:{color:`#1F2328`,\"--shiki-dark\":`#D4D4D4`},children:`, `}),_jsx(_components.span,{style:{color:`#0550AE`,\"--shiki-dark\":`#4FC1FF`},children:`returnTo`}),_jsx(_components.span,{style:{color:`#1F2328`,\"--shiki-dark\":`#D4D4D4`},children:` } `}),_jsx(_components.span,{style:{color:`#CF222E`,\"--shiki-dark\":`#D4D4D4`},children:`=`}),_jsx(_components.span,{style:{color:`#CF222E`,\"--shiki-dark\":`#C586C0`},children:` await`}),_jsx(_components.span,{style:{color:`#1F2328`,\"--shiki-dark\":`#9CDCFE`},children:` auth`}),_jsx(_components.span,{style:{color:`#1F2328`,\"--shiki-dark\":`#D4D4D4`},children:`.`}),_jsx(_components.span,{style:{color:`#8250DF`,\"--shiki-dark\":`#DCDCAA`},children:`handleRedirectCallback`}),_jsx(_components.span,{style:{color:`#1F2328`,\"--shiki-dark\":`#D4D4D4`},children:`();`})]}),`\n`,_jsxs(_components.span,{className:`line`,children:[_jsx(_components.span,{style:{color:`#1F2328`,\"--shiki-dark\":`#9CDCFE`},children:` console`}),_jsx(_components.span,{style:{color:`#1F2328`,\"--shiki-dark\":`#D4D4D4`},children:`.`}),_jsx(_components.span,{style:{color:`#8250DF`,\"--shiki-dark\":`#DCDCAA`},children:`log`}),_jsx(_components.span,{style:{color:`#1F2328`,\"--shiki-dark\":`#D4D4D4`},children:`(`}),_jsx(_components.span,{style:{color:`#1F2328`,\"--shiki-dark\":`#9CDCFE`},children:`session`}),_jsx(_components.span,{style:{color:`#1F2328`,\"--shiki-dark\":`#D4D4D4`},children:`.`}),_jsx(_components.span,{style:{color:`#1F2328`,\"--shiki-dark\":`#9CDCFE`},children:`email`}),_jsx(_components.span,{style:{color:`#1F2328`,\"--shiki-dark\":`#D4D4D4`},children:`, `}),_jsx(_components.span,{style:{color:`#1F2328`,\"--shiki-dark\":`#9CDCFE`},children:`session`}),_jsx(_components.span,{style:{color:`#1F2328`,\"--shiki-dark\":`#D4D4D4`},children:`.`}),_jsx(_components.span,{style:{color:`#1F2328`,\"--shiki-dark\":`#9CDCFE`},children:`vendorData`}),_jsx(_components.span,{style:{color:`#1F2328`,\"--shiki-dark\":`#D4D4D4`},children:`);`})]}),`\n`,_jsxs(_components.span,{className:`line`,children:[_jsx(_components.span,{style:{color:`#1F2328`,\"--shiki-dark\":`#9CDCFE`},children:` window`}),_jsx(_components.span,{style:{color:`#1F2328`,\"--shiki-dark\":`#D4D4D4`},children:`.`}),_jsx(_components.span,{style:{color:`#1F2328`,\"--shiki-dark\":`#9CDCFE`},children:`location`}),_jsx(_components.span,{style:{color:`#1F2328`,\"--shiki-dark\":`#D4D4D4`},children:`.`}),_jsx(_components.span,{style:{color:`#8250DF`,\"--shiki-dark\":`#DCDCAA`},children:`replace`}),_jsx(_components.span,{style:{color:`#1F2328`,\"--shiki-dark\":`#D4D4D4`},children:`(`}),_jsx(_components.span,{style:{color:`#1F2328`,\"--shiki-dark\":`#9CDCFE`},children:`returnTo`}),_jsx(_components.span,{style:{color:`#CF222E`,\"--shiki-dark\":`#D4D4D4`},children:` ??`}),_jsx(_components.span,{style:{color:`#0A3069`,\"--shiki-dark\":`#CE9178`},children:` \"/\"`}),_jsx(_components.span,{style:{color:`#1F2328`,\"--shiki-dark\":`#D4D4D4`},children:`);`})]}),`\n`,_jsx(_components.span,{className:`line`,children:_jsx(_components.span,{style:{color:`#1F2328`,\"--shiki-dark\":`#D4D4D4`},children:`}`})}),`\n`]})})}),_jsx(_components.p,{children:`Click your button: the hosted page asks for an email address and sends a six-digit code.\nEnter the code, and Didit returns you to your callback, which exchanges the one-time code for the session’s tokens.\nA first sign-in with an address that has no account creates one, because the default sign-up policy lets anyone sign up.`}),_jsx(Frame,{caption:`The hosted sign-in page on a phone. It shows only the methods you turned on.`,children:_jsx(OptimizedImage,{src:`https://mintcdn.com/didit-0f962782/RpqZjIB1GnUPdMTN/images/authentication/hosted-sign-in-phone.png?fit=max\u0026auto=format\u0026n=RpqZjIB1GnUPdMTN\u0026q=85\u0026s=842077ff63a6dcffc50b0f0542ab07e4`,alt:`The hosted sign-in page on a phone, with a passkey button and email and password fields`,\"data-og-width\":`700`,width:`700`,\"data-og-height\":`998`,height:`998`,\"data-path\":`images/authentication/hosted-sign-in-phone.png`,\"data-optimize\":`true`,\"data-opv\":`3`,srcset:`https://mintcdn.com/didit-0f962782/RpqZjIB1GnUPdMTN/images/authentication/hosted-sign-in-phone.png?w=280\u0026fit=max\u0026auto=format\u0026n=RpqZjIB1GnUPdMTN\u0026q=85\u0026s=3b9f9b2abff78ff7f4463c72cfdb566b 280w, https://mintcdn.com/didit-0f962782/RpqZjIB1GnUPdMTN/images/authentication/hosted-sign-in-phone.png?w=560\u0026fit=max\u0026auto=format\u0026n=RpqZjIB1GnUPdMTN\u0026q=85\u0026s=35f3e5edc9a292df595def4b9a4e54f8 560w, https://mintcdn.com/didit-0f962782/RpqZjIB1GnUPdMTN/images/authentication/hosted-sign-in-phone.png?w=840\u0026fit=max\u0026auto=format\u0026n=RpqZjIB1GnUPdMTN\u0026q=85\u0026s=61c8d9c1a51289e4cb6c59ae2c07b4bd 840w, https://mintcdn.com/didit-0f962782/RpqZjIB1GnUPdMTN/images/authentication/hosted-sign-in-phone.png?w=1100\u0026fit=max\u0026auto=format\u0026n=RpqZjIB1GnUPdMTN\u0026q=85\u0026s=2340507a15d14010f2dc84b19a026ab4 1100w, https://mintcdn.com/didit-0f962782/RpqZjIB1GnUPdMTN/images/authentication/hosted-sign-in-phone.png?w=1650\u0026fit=max\u0026auto=format\u0026n=RpqZjIB1GnUPdMTN\u0026q=85\u0026s=bbfca8af2a0aba093a0e851306a0135d 1650w, https://mintcdn.com/didit-0f962782/RpqZjIB1GnUPdMTN/images/authentication/hosted-sign-in-phone.png?w=2500\u0026fit=max\u0026auto=format\u0026n=RpqZjIB1GnUPdMTN\u0026q=85\u0026s=04b69b2ea249e38a0d293a3b4848a2a1 2500w`})})]}),_jsxs(Step,{title:`Verify the token on your server`,children:[_jsxs(_components.p,{children:[`Send the access token from `,_jsx(_components.code,{children:`auth.getToken()`}),` to your backend in the `,_jsx(_components.code,{children:`Authorization`}),` header, and verify it there on every protected request:`]}),_jsx(CodeBlock,{filename:`server.ts`,numberOfLines:`12`,language:`typescript`,children:_jsx(_components.pre,{className:`shiki shiki-themes github-light-default dark-plus`,style:{backgroundColor:`#ffffff`,\"--shiki-dark-bg\":`#0B0C0E`,color:`#1f2328`,\"--shiki-dark\":`#D4D4D4`},language:`typescript`,children:_jsxs(_components.code,{language:`typescript`,numberOfLines:`12`,children:[_jsxs(_components.span,{className:`line`,children:[_jsx(_components.span,{style:{color:`#CF222E`,\"--shiki-dark\":`#C586C0`},children:`import`}),_jsx(_components.span,{style:{color:`#1F2328`,\"--shiki-dark\":`#D4D4D4`},children:` { `}),_jsx(_components.span,{style:{color:`#1F2328`,\"--shiki-dark\":`#9CDCFE`},children:`verifyToken`}),_jsx(_components.span,{style:{color:`#1F2328`,\"--shiki-dark\":`#D4D4D4`},children:` } `}),_jsx(_components.span,{style:{color:`#CF222E`,\"--shiki-dark\":`#C586C0`},children:`from`}),_jsx(_components.span,{style:{color:`#0A3069`,\"--shiki-dark\":`#CE9178`},children:` \"@didit-protocol/auth/server\"`}),_jsx(_components.span,{style:{color:`#1F2328`,\"--shiki-dark\":`#D4D4D4`},children:`;`})]}),`\n`,_jsx(_components.span,{className:`line`}),`\n`,_jsxs(_components.span,{className:`line`,children:[_jsx(_components.span,{style:{color:`#CF222E`,\"--shiki-dark\":`#C586C0`},children:`export`}),_jsx(_components.span,{style:{color:`#CF222E`,\"--shiki-dark\":`#569CD6`},children:` async`}),_jsx(_components.span,{style:{color:`#CF222E`,\"--shiki-dark\":`#569CD6`},children:` function`}),_jsx(_components.span,{style:{color:`#8250DF`,\"--shiki-dark\":`#DCDCAA`},children:` authenticate`}),_jsx(_components.span,{style:{color:`#1F2328`,\"--shiki-dark\":`#D4D4D4`},children:`(`}),_jsx(_components.span,{style:{color:`#953800`,\"--shiki-dark\":`#9CDCFE`},children:`request`}),_jsx(_components.span,{style:{color:`#CF222E`,\"--shiki-dark\":`#D4D4D4`},children:`:`}),_jsx(_components.span,{style:{color:`#953800`,\"--shiki-dark\":`#4EC9B0`},children:` Request`}),_jsx(_components.span,{style:{color:`#1F2328`,\"--shiki-dark\":`#D4D4D4`},children:`) {`})]}),`\n`,_jsxs(_components.span,{className:`line`,children:[_jsx(_components.span,{style:{color:`#CF222E`,\"--shiki-dark\":`#569CD6`},children:` const`}),_jsx(_components.span,{style:{color:`#0550AE`,\"--shiki-dark\":`#4FC1FF`},children:` header`}),_jsx(_components.span,{style:{color:`#CF222E`,\"--shiki-dark\":`#D4D4D4`},children:` =`}),_jsx(_components.span,{style:{color:`#1F2328`,\"--shiki-dark\":`#9CDCFE`},children:` request`}),_jsx(_components.span,{style:{color:`#1F2328`,\"--shiki-dark\":`#D4D4D4`},children:`.`}),_jsx(_components.span,{style:{color:`#1F2328`,\"--shiki-dark\":`#9CDCFE`},children:`headers`}),_jsx(_components.span,{style:{color:`#1F2328`,\"--shiki-dark\":`#D4D4D4`},children:`.`}),_jsx(_components.span,{style:{color:`#8250DF`,\"--shiki-dark\":`#DCDCAA`},children:`get`}),_jsx(_components.span,{style:{color:`#1F2328`,\"--shiki-dark\":`#D4D4D4`},children:`(`}),_jsx(_components.span,{style:{color:`#0A3069`,\"--shiki-dark\":`#CE9178`},children:`\"authorization\"`}),_jsx(_components.span,{style:{color:`#1F2328`,\"--shiki-dark\":`#D4D4D4`},children:`) `}),_jsx(_components.span,{style:{color:`#CF222E`,\"--shiki-dark\":`#D4D4D4`},children:`??`}),_jsx(_components.span,{style:{color:`#0A3069`,\"--shiki-dark\":`#CE9178`},children:` \"\"`}),_jsx(_components.span,{style:{color:`#1F2328`,\"--shiki-dark\":`#D4D4D4`},children:`;`})]}),`\n`,_jsxs(_components.span,{className:`line`,children:[_jsx(_components.span,{style:{color:`#CF222E`,\"--shiki-dark\":`#569CD6`},children:` const`}),_jsx(_components.span,{style:{color:`#0550AE`,\"--shiki-dark\":`#4FC1FF`},children:` token`}),_jsx(_components.span,{style:{color:`#CF222E`,\"--shiki-dark\":`#D4D4D4`},children:` =`}),_jsx(_components.span,{style:{color:`#1F2328`,\"--shiki-dark\":`#9CDCFE`},children:` header`}),_jsx(_components.span,{style:{color:`#1F2328`,\"--shiki-dark\":`#D4D4D4`},children:`.`}),_jsx(_components.span,{style:{color:`#8250DF`,\"--shiki-dark\":`#DCDCAA`},children:`startsWith`}),_jsx(_components.span,{style:{color:`#1F2328`,\"--shiki-dark\":`#D4D4D4`},children:`(`}),_jsx(_components.span,{style:{color:`#0A3069`,\"--shiki-dark\":`#CE9178`},children:`\"Bearer \"`}),_jsx(_components.span,{style:{color:`#1F2328`,\"--shiki-dark\":`#D4D4D4`},children:`) `}),_jsx(_components.span,{style:{color:`#CF222E`,\"--shiki-dark\":`#D4D4D4`},children:`?`}),_jsx(_components.span,{style:{color:`#1F2328`,\"--shiki-dark\":`#9CDCFE`},children:` header`}),_jsx(_components.span,{style:{color:`#1F2328`,\"--shiki-dark\":`#D4D4D4`},children:`.`}),_jsx(_components.span,{style:{color:`#8250DF`,\"--shiki-dark\":`#DCDCAA`},children:`slice`}),_jsx(_components.span,{style:{color:`#1F2328`,\"--shiki-dark\":`#D4D4D4`},children:`(`}),_jsx(_components.span,{style:{color:`#0550AE`,\"--shiki-dark\":`#B5CEA8`},children:`7`}),_jsx(_components.span,{style:{color:`#1F2328`,\"--shiki-dark\":`#D4D4D4`},children:`) `}),_jsx(_components.span,{style:{color:`#CF222E`,\"--shiki-dark\":`#D4D4D4`},children:`:`}),_jsx(_components.span,{style:{color:`#0A3069`,\"--shiki-dark\":`#CE9178`},children:` \"\"`}),_jsx(_components.span,{style:{color:`#1F2328`,\"--shiki-dark\":`#D4D4D4`},children:`;`})]}),`\n`,_jsxs(_components.span,{className:`line`,children:[_jsx(_components.span,{style:{color:`#CF222E`,\"--shiki-dark\":`#C586C0`},children:` try`}),_jsx(_components.span,{style:{color:`#1F2328`,\"--shiki-dark\":`#D4D4D4`},children:` {`})]}),`\n`,_jsxs(_components.span,{className:`line`,children:[_jsx(_components.span,{style:{color:`#CF222E`,\"--shiki-dark\":`#569CD6`},children:` const`}),_jsx(_components.span,{style:{color:`#0550AE`,\"--shiki-dark\":`#4FC1FF`},children:` claims`}),_jsx(_components.span,{style:{color:`#CF222E`,\"--shiki-dark\":`#D4D4D4`},children:` =`}),_jsx(_components.span,{style:{color:`#CF222E`,\"--shiki-dark\":`#C586C0`},children:` await`}),_jsx(_components.span,{style:{color:`#8250DF`,\"--shiki-dark\":`#DCDCAA`},children:` verifyToken`}),_jsx(_components.span,{style:{color:`#1F2328`,\"--shiki-dark\":`#D4D4D4`},children:`(`}),_jsx(_components.span,{style:{color:`#1F2328`,\"--shiki-dark\":`#9CDCFE`},children:`token`}),_jsx(_components.span,{style:{color:`#1F2328`,\"--shiki-dark\":`#D4D4D4`},children:`, { `}),_jsx(_components.span,{style:{color:`#1F2328`,\"--shiki-dark\":`#9CDCFE`},children:`publishableKey:`}),_jsx(_components.span,{style:{color:`#1F2328`,\"--shiki-dark\":`#9CDCFE`},children:` process`}),_jsx(_components.span,{style:{color:`#1F2328`,\"--shiki-dark\":`#D4D4D4`},children:`.`}),_jsx(_components.span,{style:{color:`#1F2328`,\"--shiki-dark\":`#9CDCFE`},children:`env`}),_jsx(_components.span,{style:{color:`#1F2328`,\"--shiki-dark\":`#D4D4D4`},children:`.`}),_jsx(_components.span,{style:{color:`#0550AE`,\"--shiki-dark\":`#4FC1FF`},children:`DIDIT_PUBLISHABLE_KEY`}),_jsx(_components.span,{style:{color:`#1F2328`,\"--shiki-dark\":`#D4D4D4`},children:` });`})]}),`\n`,_jsxs(_components.span,{className:`line`,children:[_jsx(_components.span,{style:{color:`#CF222E`,\"--shiki-dark\":`#C586C0`},children:` return`}),_jsx(_components.span,{style:{color:`#1F2328`,\"--shiki-dark\":`#D4D4D4`},children:` { `}),_jsx(_components.span,{style:{color:`#1F2328`,\"--shiki-dark\":`#9CDCFE`},children:`personId:`}),_jsx(_components.span,{style:{color:`#1F2328`,\"--shiki-dark\":`#9CDCFE`},children:` claims`}),_jsx(_components.span,{style:{color:`#1F2328`,\"--shiki-dark\":`#D4D4D4`},children:`.`}),_jsx(_components.span,{style:{color:`#1F2328`,\"--shiki-dark\":`#9CDCFE`},children:`sub`}),_jsx(_components.span,{style:{color:`#1F2328`,\"--shiki-dark\":`#D4D4D4`},children:`, `}),_jsx(_components.span,{style:{color:`#1F2328`,\"--shiki-dark\":`#9CDCFE`},children:`vendorData:`}),_jsx(_components.span,{style:{color:`#1F2328`,\"--shiki-dark\":`#9CDCFE`},children:` claims`}),_jsx(_components.span,{style:{color:`#1F2328`,\"--shiki-dark\":`#D4D4D4`},children:`.`}),_jsx(_components.span,{style:{color:`#1F2328`,\"--shiki-dark\":`#9CDCFE`},children:`vendor_data`}),_jsx(_components.span,{style:{color:`#1F2328`,\"--shiki-dark\":`#D4D4D4`},children:` };`})]}),`\n`,_jsxs(_components.span,{className:`line`,children:[_jsx(_components.span,{style:{color:`#1F2328`,\"--shiki-dark\":`#D4D4D4`},children:` } `}),_jsx(_components.span,{style:{color:`#CF222E`,\"--shiki-dark\":`#C586C0`},children:`catch`}),_jsx(_components.span,{style:{color:`#1F2328`,\"--shiki-dark\":`#D4D4D4`},children:` {`})]}),`\n`,_jsxs(_components.span,{className:`line`,children:[_jsx(_components.span,{style:{color:`#CF222E`,\"--shiki-dark\":`#C586C0`},children:` return`}),_jsx(_components.span,{style:{color:`#0550AE`,\"--shiki-dark\":`#569CD6`},children:` null`}),_jsx(_components.span,{style:{color:`#1F2328`,\"--shiki-dark\":`#D4D4D4`},children:`;`})]}),`\n`,_jsx(_components.span,{className:`line`,children:_jsx(_components.span,{style:{color:`#1F2328`,\"--shiki-dark\":`#D4D4D4`},children:` }`})}),`\n`,_jsx(_components.span,{className:`line`,children:_jsx(_components.span,{style:{color:`#1F2328`,\"--shiki-dark\":`#D4D4D4`},children:`}`})}),`\n`]})})}),_jsxs(_components.p,{children:[_jsx(_components.code,{children:`verifyToken`}),` checks the ES256 signature against your issuer’s published keys, the issuer and the expiry.\nAccess tokens last at most 5 minutes, and `,_jsx(_components.code,{children:`auth.getToken()`}),` refreshes them for you.\nOther languages verify the same token with the `,_jsx(_components.a,{href:`/integration/server-sdks/overview`,children:`server SDKs`}),` or any JWT library, as `,_jsx(_components.a,{href:`/authentication/tokens-and-jwks#verify-a-token-on-your-server`,children:`tokens and JWKS`}),` shows.`]})]}),_jsxs(Step,{title:`See the sign-in in the console`,children:[_jsxs(_components.p,{children:[`Open `,_jsx(_components.strong,{children:`Authentication > Sign-ins`}),`.\nYour sign-in is listed with its result, method, device, location and risk, next to the example sign-ins every sandbox starts with.\nThe person appears under `,_jsx(_components.strong,{children:`Users`}),`.`]}),_jsx(Frame,{caption:`Authentication > Sign-ins: every attempt, with filters for state, method and risk.`,children:_jsx(OptimizedImage,{src:`https://mintcdn.com/didit-0f962782/RpqZjIB1GnUPdMTN/images/authentication/console-sign-ins.png?fit=max\u0026auto=format\u0026n=RpqZjIB1GnUPdMTN\u0026q=85\u0026s=3c79b4e120c911b732d738e52d1687c8`,alt:`The Sign-ins page in the Didit Business Console, listing sign-in attempts with their state, person, method, device, location, risk and time`,\"data-og-width\":`1600`,width:`1600`,\"data-og-height\":`1111`,height:`1111`,\"data-path\":`images/authentication/console-sign-ins.png`,\"data-optimize\":`true`,\"data-opv\":`3`,srcset:`https://mintcdn.com/didit-0f962782/RpqZjIB1GnUPdMTN/images/authentication/console-sign-ins.png?w=280\u0026fit=max\u0026auto=format\u0026n=RpqZjIB1GnUPdMTN\u0026q=85\u0026s=a6661ced9e0db1fc841bb4162f00a30d 280w, https://mintcdn.com/didit-0f962782/RpqZjIB1GnUPdMTN/images/authentication/console-sign-ins.png?w=560\u0026fit=max\u0026auto=format\u0026n=RpqZjIB1GnUPdMTN\u0026q=85\u0026s=2b5430e83da0c4a30b62d937a56bc355 560w, https://mintcdn.com/didit-0f962782/RpqZjIB1GnUPdMTN/images/authentication/console-sign-ins.png?w=840\u0026fit=max\u0026auto=format\u0026n=RpqZjIB1GnUPdMTN\u0026q=85\u0026s=5f51d19b6e0597ac7bbaabea716845ec 840w, https://mintcdn.com/didit-0f962782/RpqZjIB1GnUPdMTN/images/authentication/console-sign-ins.png?w=1100\u0026fit=max\u0026auto=format\u0026n=RpqZjIB1GnUPdMTN\u0026q=85\u0026s=ea4961e4af82736482987319c773076b 1100w, https://mintcdn.com/didit-0f962782/RpqZjIB1GnUPdMTN/images/authentication/console-sign-ins.png?w=1650\u0026fit=max\u0026auto=format\u0026n=RpqZjIB1GnUPdMTN\u0026q=85\u0026s=2cf6c160ae1f8b33ab178fd874fae554 1650w, https://mintcdn.com/didit-0f962782/RpqZjIB1GnUPdMTN/images/authentication/console-sign-ins.png?w=2500\u0026fit=max\u0026auto=format\u0026n=RpqZjIB1GnUPdMTN\u0026q=85\u0026s=f1e544935ad393a1315dd6eb3986fcda 2500w`})}),_jsxs(_components.p,{children:[`To receive sign-in activity on your server, subscribe a `,_jsx(_components.a,{href:`/integration/webhooks`,children:`webhook destination`}),` to `,_jsx(_components.code,{children:`auth.signup`}),` and `,_jsx(_components.code,{children:`auth.login`}),`. See `,_jsx(_components.a,{href:`/authentication/events-and-webhooks`,children:`events and webhooks`}),`.`]})]})]}),`\n`,_jsx(Heading,{level:`2`,id:`before-you-go-live`,children:`Before you go live`}),`\n`,_jsxs(_components.ol,{children:[`\n`,_jsxs(_components.li,{children:[`Turn on Authentication for your Live application on the `,_jsx(_components.strong,{children:`Products`}),` page.`]}),`\n`,_jsxs(_components.li,{children:[`Register your production `,_jsx(_components.code,{children:`https://`}),` redirect URLs and origins there: a Live application accepts `,_jsx(_components.code,{children:`https://`}),` only.`]}),`\n`,_jsx(_components.li,{children:`Replace Didit’s test credentials for social sign-in with your own app’s client ID and secret.`}),`\n`,_jsxs(_components.li,{children:[`Copy the Live publishable key (`,_jsx(_components.code,{children:`pk_live_`}),`) into your production configuration.`]}),`\n`,_jsxs(_components.li,{children:[`Walk through the `,_jsx(_components.a,{href:`/authentication/integration-guide#go-live-checklist`,children:`go-live checklist`}),`.`]}),`\n`]}),`\n`,_jsx(Heading,{level:`2`,id:`next-steps`,children:`Next steps`}),`\n`,_jsxs(CardGroup,{cols:2,children:[_jsx(Card,{title:`Integration guide`,icon:`diagram-project`,href:`/authentication/integration-guide`,children:_jsx(_components.p,{children:`Hosted or your own screens, token storage, sessions, step-up and troubleshooting.`})}),_jsx(Card,{title:`React and Next.js`,icon:`react`,href:`/authentication/quickstarts/nextjs`,children:_jsxs(_components.p,{children:[`Components, hooks, HttpOnly cookies and `,_jsx(_components.code,{children:`auth()`}),` on the server.`]})}),_jsx(Card,{title:`iOS, Android, React Native and Flutter`,icon:`mobile`,href:`/authentication/quickstarts/ios`,children:_jsx(_components.p,{children:`Native sign-in with the system browser, passkeys and protected storage.`})}),_jsx(Card,{title:`Bot protection`,icon:`shield-halved`,href:`/authentication/bot-protection`,children:_jsx(_components.p,{children:`Turn on the policies that stop bots and account takeover.`})})]})]})}function MDXContent(props={}){const{wrapper:MDXLayout}={..._provideComponents(),...props.components};return MDXLayout?_jsx(MDXLayout,{...props,children:_jsx(_createMdxContent,{...props})}):_createMdxContent(props)}return{default:MDXContent};function _missingMdxReference(id,component){throw new Error(`Expected `+(component?`component`:`object`)+\" `\"+id+\"` to be defined: you likely forgot to import, pass, or provide it.\")}","frontmatter":{},"scope":{"config":{},"pageMetadata":{"title":"Authentication Quickstart: First Sign-In in 10 Minutes","sidebarTitle":"Quickstart","keywords":["authentication quickstart","add login to web app","hosted sign-in quickstart","passkey login quickstart","email code login","verify JWT access token","Didit Authentication"],"description":"Turn on Didit Authentication in a sandbox application, sign a person in with the hosted page and verify their access token on your server.","href":"/authentication/quickstart"}}},"mdxSourceWithNoJs":null},"mdxExtracts":{"tableOfContents":[{"title":"Prerequisites","slug":"prerequisites","depth":2,"children":[]},{"title":"Steps","slug":"steps","depth":2,"children":[]},{"title":"Before you go live","slug":"before-you-go-live","depth":2,"children":[]},{"title":"Next steps","slug":"next-steps","depth":2,"children":[]}],"codeExamples":{}},"jsLinks":["/_mintlify/custom/didit-0f962782/c0e2b20b5285ec45/snippets/data/database-validation-coverage.js","/_mintlify/custom/didit-0f962782/4ac7d3c2a19a354d/database-validation-playground.js"],"subdomain":"didit-0f962782","siteName":"Didit Docs","title":"Authentication Quickstart: First Sign-In in 10 Minutes - Didit Docs","navMaps":{"firstHrefInVersion":{},"firstHrefInLanguage":{"en":{"href":"/authentication/quickstart","matchLevel":0},"es":{"href":"/es/authentication/quickstart","matchLevel":1},"pt-BR":{"href":"/pt-br/authentication/quickstart","matchLevel":1},"ja":{"href":"/ja/authentication/quickstart","matchLevel":1},"de":{"href":"/de/authentication/quickstart","matchLevel":1},"fr":{"href":"/fr/authentication/quickstart","matchLevel":1},"it":{"href":"/it/authentication/quickstart","matchLevel":1},"pt":{"href":"/pt/authentication/quickstart","matchLevel":1},"ca":{"href":"/ca/authentication/quickstart","matchLevel":1},"id":{"href":"/id/authentication/quickstart","matchLevel":1},"ru":{"href":"/ru/authentication/quickstart","matchLevel":1},"ko":{"href":"/ko/authentication/quickstart","matchLevel":1},"zh":{"href":"/zh/authentication/quickstart","matchLevel":1},"ar":{"href":"/ar/authentication/quickstart","matchLevel":1},"hi":{"href":"/hi/authentication/quickstart","matchLevel":1}}},"lastModified":"2026-11-22T10:31:14.289Z","gitLastModified":"2026-11-22T10:29:05.000Z","originalFileLocation":"authentication/quickstart.mdx","locale":"en"},"headHtml":"\u003cscript data-mint-head>(function(){var d=document.documentElement,p=null;if(!p){try{p=localStorage.getItem(\"isDarkMode\")}catch(e){}if(p==='true')p='dark';else if(p==='false')p='light';if(p!=='light'\u0026\u0026p!=='dark'\u0026\u0026p!=='system')p=\"system\"}var r=p==='system'?(matchMedia(\"(prefers-color-scheme: dark)\").matches?'dark':'light'):p;d.classList.remove(r==='dark'?'light':'dark');d.classList.add(r);d.setAttribute(\"data-theme-preference\",p)})();\u003c/script>\u003cmeta data-mint-head name=\"description\" content=\"Turn on Didit Authentication in a sandbox application, sign a person in with the hosted page and verify their access token on your server.\">\u003cmeta data-mint-head name=\"application-name\" content=\"Didit Docs\">\u003cmeta data-mint-head name=\"generator\" content=\"Mintlify\">\u003clink data-mint-head rel=\"icon\" type=\"image/png\" sizes=\"192x192\" href=\"/mintlify-assets/_mintlify/favicons/didit-0f962782/h7Er2opLBVoQwrdf/_generated/favicon/android-chrome-192x192.png\" media=\"(prefers-color-scheme: light)\">\u003clink data-mint-head rel=\"apple-touch-icon\" type=\"image/png\" sizes=\"180x180\" href=\"/mintlify-assets/_mintlify/favicons/didit-0f962782/h7Er2opLBVoQwrdf/_generated/favicon/apple-touch-icon.png\">\u003clink data-mint-head rel=\"icon\" type=\"image/png\" sizes=\"16x16\" href=\"/mintlify-assets/_mintlify/favicons/didit-0f962782/h7Er2opLBVoQwrdf/_generated/favicon/favicon-16x16.png\" media=\"(prefers-color-scheme: light)\">\u003clink data-mint-head rel=\"icon\" type=\"image/png\" sizes=\"32x32\" href=\"/mintlify-assets/_mintlify/favicons/didit-0f962782/h7Er2opLBVoQwrdf/_generated/favicon/favicon-32x32.png\" media=\"(prefers-color-scheme: light)\">\u003clink data-mint-head rel=\"shortcut icon\" type=\"image/x-icon\" href=\"/mintlify-assets/_mintlify/favicons/didit-0f962782/h7Er2opLBVoQwrdf/_generated/favicon/favicon.ico\" media=\"(prefers-color-scheme: light)\">\u003clink data-mint-head rel=\"icon\" type=\"image/png\" sizes=\"192x192\" href=\"/mintlify-assets/_mintlify/favicons/didit-0f962782/h7Er2opLBVoQwrdf/_generated/favicon-dark/android-chrome-192x192.png\" media=\"(prefers-color-scheme: dark)\">\u003clink data-mint-head rel=\"icon\" type=\"image/png\" sizes=\"16x16\" href=\"/mintlify-assets/_mintlify/favicons/didit-0f962782/h7Er2opLBVoQwrdf/_generated/favicon-dark/favicon-16x16.png\" media=\"(prefers-color-scheme: dark)\">\u003clink data-mint-head rel=\"icon\" type=\"image/png\" sizes=\"32x32\" href=\"/mintlify-assets/_mintlify/favicons/didit-0f962782/h7Er2opLBVoQwrdf/_generated/favicon-dark/favicon-32x32.png\" media=\"(prefers-color-scheme: dark)\">\u003clink data-mint-head rel=\"shortcut icon\" type=\"image/x-icon\" href=\"/mintlify-assets/_mintlify/favicons/didit-0f962782/h7Er2opLBVoQwrdf/_generated/favicon-dark/favicon.ico\" media=\"(prefers-color-scheme: dark)\">\u003cmeta data-mint-head property=\"og:title\" content=\"Authentication Quickstart: First Sign-In in 10 Minutes - Didit Docs\">\u003cmeta data-mint-head property=\"og:description\" content=\"Turn on Didit Authentication in a sandbox application, sign a person in with the hosted page and verify their access token on your server.\">\u003cmeta data-mint-head property=\"og:site_name\" content=\"Didit Docs\">\u003cmeta data-mint-head property=\"og:url\" content=\"https://docs.didit.me/authentication/quickstart\">\u003cmeta data-mint-head property=\"og:type\" content=\"website\">\u003cmeta data-mint-head property=\"og:image\" content=\"https://didit-0f962782.mintlify.site/_mintlify/api/og/v2?division=Getting+Started\u0026amp;title=Authentication+Quickstart%3A+First+Sign-In+in+10+Minutes\u0026amp;description=Turn+on+Didit+Authentication+in+a+sandbox+application%2C+sign+a+person+in+with+the+hosted+page+and+verify+their+access+token+on+your+server.\u0026amp;theme=6763de7356559382b06288d9\u0026amp;signature=15435dfdbb5db2d0cac4ef17dcc3bc6d6ecf03ec7aca0183df5130900d52b8de\">\u003cmeta data-mint-head property=\"og:image:width\" content=\"1200\">\u003cmeta data-mint-head property=\"og:image:height\" content=\"630\">\u003cmeta data-mint-head name=\"twitter:card\" content=\"summary_large_image\">\u003cmeta data-mint-head name=\"twitter:title\" content=\"Authentication Quickstart: First Sign-In in 10 Minutes - Didit Docs\">\u003cmeta data-mint-head name=\"twitter:description\" content=\"Turn on Didit Authentication in a sandbox application, sign a person in with the hosted page and verify their access token on your server.\">\u003cmeta data-mint-head name=\"twitter:image\" content=\"https://didit-0f962782.mintlify.site/_mintlify/api/og/v2?division=Getting+Started\u0026amp;title=Authentication+Quickstart%3A+First+Sign-In+in+10+Minutes\u0026amp;description=Turn+on+Didit+Authentication+in+a+sandbox+application%2C+sign+a+person+in+with+the+hosted+page+and+verify+their+access+token+on+your+server.\u0026amp;theme=6763de7356559382b06288d9\u0026amp;signature=15435dfdbb5db2d0cac4ef17dcc3bc6d6ecf03ec7aca0183df5130900d52b8de\">\u003cmeta data-mint-head name=\"twitter:image:width\" content=\"1200\">\u003cmeta data-mint-head name=\"twitter:image:height\" content=\"630\">\u003cmeta data-mint-head name=\"msapplication-config\" content=\"/mintlify-assets/_mintlify/favicons/didit-0f962782/h7Er2opLBVoQwrdf/_generated/favicon/browserconfig.xml\">\u003cmeta data-mint-head name=\"apple-mobile-web-app-title\" content=\"Didit Docs\">\u003cmeta data-mint-head name=\"msapplication-TileColor\" content=\"#2567FF\">\u003cmeta data-mint-head name=\"theme-color\" content=\"#2567FF\">\u003clink data-mint-head rel=\"canonical\" href=\"https://docs.didit.me/authentication/quickstart\">\u003clink data-mint-head rel=\"alternate\" type=\"application/xml\" href=\"/sitemap.xml\">\u003clink data-mint-head rel=\"alternate\" type=\"text/markdown\" href=\"/authentication/quickstart.md\">\u003clink data-mint-head rel=\"alternate\" hreflang=\"en\" href=\"https://docs.didit.me/authentication/quickstart\">\u003clink data-mint-head rel=\"alternate\" hreflang=\"es\" href=\"https://docs.didit.me/es/authentication/quickstart\">\u003clink data-mint-head rel=\"alternate\" hreflang=\"pt-BR\" href=\"https://docs.didit.me/pt-br/authentication/quickstart\">\u003clink data-mint-head rel=\"alternate\" hreflang=\"ja\" href=\"https://docs.didit.me/ja/authentication/quickstart\">\u003clink data-mint-head rel=\"alternate\" hreflang=\"de\" href=\"https://docs.didit.me/de/authentication/quickstart\">\u003clink data-mint-head rel=\"alternate\" hreflang=\"fr\" href=\"https://docs.didit.me/fr/authentication/quickstart\">\u003clink data-mint-head rel=\"alternate\" hreflang=\"it\" href=\"https://docs.didit.me/it/authentication/quickstart\">\u003clink data-mint-head rel=\"alternate\" hreflang=\"pt\" href=\"https://docs.didit.me/pt/authentication/quickstart\">\u003clink data-mint-head rel=\"alternate\" hreflang=\"ca\" href=\"https://docs.didit.me/ca/authentication/quickstart\">\u003clink data-mint-head rel=\"alternate\" hreflang=\"id\" href=\"https://docs.didit.me/id/authentication/quickstart\">\u003clink data-mint-head rel=\"alternate\" hreflang=\"ru\" href=\"https://docs.didit.me/ru/authentication/quickstart\">\u003clink data-mint-head rel=\"alternate\" hreflang=\"ko\" href=\"https://docs.didit.me/ko/authentication/quickstart\">\u003clink data-mint-head rel=\"alternate\" hreflang=\"zh\" href=\"https://docs.didit.me/zh/authentication/quickstart\">\u003clink data-mint-head rel=\"alternate\" hreflang=\"ar\" href=\"https://docs.didit.me/ar/authentication/quickstart\">\u003clink data-mint-head rel=\"alternate\" hreflang=\"hi\" href=\"https://docs.didit.me/hi/authentication/quickstart\">\u003clink data-mint-head rel=\"alternate\" hreflang=\"x-default\" href=\"https://docs.didit.me/authentication/quickstart\">\u003cscript data-mint-head type=\"application/ld+json\">{\"@context\":\"https://schema.org\",\"@graph\":[{\"@type\":\"Organization\",\"@id\":\"https://didit.me/#organization\",\"name\":\"Didit\",\"legalName\":\"Didit Protocol\",\"url\":\"https://didit.me\",\"logo\":{\"@type\":\"ImageObject\",\"url\":\"https://didit.me/logos/primary-horizontal-light.png\"},\"sameAs\":[\"https://www.linkedin.com/company/91001155\",\"https://www.youtube.com/@getdidit\",\"https://github.com/didit-protocol\",\"https://x.com/didit\"]},{\"@type\":\"WebSite\",\"@id\":\"https://docs.didit.me#website\",\"name\":\"Didit Docs\",\"url\":\"https://docs.didit.me\",\"publisher\":{\"@id\":\"https://didit.me/#organization\"}},{\"@type\":\"WebPage\",\"@id\":\"https://docs.didit.me/authentication/quickstart#webpage\",\"url\":\"https://docs.didit.me/authentication/quickstart\",\"name\":\"Authentication Quickstart: First Sign-In in 10 Minutes\",\"description\":\"Turn on Didit Authentication in a sandbox application, sign a person in with the hosted page and verify their access token on your server.\",\"dateModified\":\"2026-11-22T10:29:05.000Z\",\"isPartOf\":{\"@id\":\"https://docs.didit.me#website\"},\"breadcrumb\":{\"@id\":\"https://docs.didit.me/authentication/quickstart#breadcrumb\"}},{\"@type\":\"BreadcrumbList\",\"@id\":\"https://docs.didit.me/authentication/quickstart#breadcrumb\",\"itemListElement\":[{\"@type\":\"ListItem\",\"position\":1,\"name\":\"Getting Started\",\"item\":\"https://docs.didit.me/authentication/overview\"},{\"@type\":\"ListItem\",\"position\":2,\"name\":\"Authentication Quickstart: First Sign-In in 10 Minutes\",\"item\":\"https://docs.didit.me/authentication/quickstart\"}]},{\"@type\":[\"Article\",\"TechArticle\"],\"@id\":\"https://docs.didit.me/authentication/quickstart#article\",\"headline\":\"Authentication Quickstart: First Sign-In in 10 Minutes\",\"name\":\"Authentication Quickstart: First Sign-In in 10 Minutes\",\"description\":\"Turn on Didit Authentication in a sandbox application, sign a person in with the hosted page and verify their access token on your server.\",\"url\":\"https://docs.didit.me/authentication/quickstart\",\"mainEntityOfPage\":{\"@id\":\"https://docs.didit.me/authentication/quickstart#webpage\"},\"dateModified\":\"2026-11-22T10:29:05.000Z\",\"keywords\":\"authentication quickstart, add login to web app, hosted sign-in quickstart, passkey login quickstart, email code login, verify JWT access token, Didit Authentication\",\"publisher\":{\"@id\":\"https://didit.me/#organization\"},\"isPartOf\":{\"@id\":\"https://docs.didit.me#website\"}}]}\u003c/script>\u003cscript data-mint-head type=\"application/ld+json\">{\"@context\":\"https://schema.org\",\"@type\":\"WebSite\",\"name\":\"Didit Docs\",\"publisher\":{\"@type\":\"Organization\",\"name\":\"Didit\"},\"provider\":{\"@type\":\"Organization\",\"name\":\"Mintlify\",\"url\":\"https://mintlify.com\"}}\u003c/script>","agentPointerHref":"/authentication/quickstart.md","siteName":"Didit Docs","nav":{"global":null,"languages":[{"language":"en","tabs":[{"tab":"Get Started","icon":"https://mintlify.s3.us-west-1.amazonaws.com/didit-0f962782/icons/rocket.svg","pages":[{"title":"Get Started","href":""}]},{"tab":"Integrate / SDKs","icon":"https://mintlify.s3.us-west-1.amazonaws.com/didit-0f962782/icons/code.svg","pages":[{"title":"Integrate / SDKs","href":"/integration/sdks"}]},{"tab":"API Reference","icon":"https://mintlify.s3.us-west-1.amazonaws.com/didit-0f962782/icons/code.svg","pages":[{"title":"API Reference","href":"/api-reference/overview"}]},{"tab":"User Verification","icon":"https://mintlify.s3.us-west-1.amazonaws.com/didit-0f962782/icons/user-verifications.svg","pages":[{"title":"User Verification","href":"/core-technology/liveness/overview"}]},{"tab":"Business Verification","icon":"https://mintlify.s3.us-west-1.amazonaws.com/didit-0f962782/icons/business-verifications.svg","pages":[{"title":"Business Verification","href":"/business-verification/overview"}]},{"tab":"Transaction Monitoring","icon":"https://mintlify.s3.us-west-1.amazonaws.com/didit-0f962782/icons/transactions.svg","pages":[{"title":"Transaction Monitoring","href":"/transaction-monitoring/overview"}]},{"tab":"Authentication","icon":"https://mintlify.s3.us-west-1.amazonaws.com/didit-0f962782/icons/authentication.svg","groups":[{"group":"Getting Started","icon":"https://mintlify.s3.us-west-1.amazonaws.com/didit-0f962782/icons/rocket.svg","pages":[{"title":"Authentication: End-User Sign-In, Passkeys and Sessions","sidebarTitle":"Authentication","description":"Add end-user sign-in with hosted pages, passkeys, codes, social and SSO, and connect it to identity verification and transaction monitoring.","href":"/authentication/overview"},{"title":"Authentication Quickstart: First Sign-In in 10 Minutes","sidebarTitle":"Quickstart","href":"/authentication/quickstart"},{"title":"Authentication Integration Guide: Architecture and Go-Live","sidebarTitle":"Integration guide","description":"How a production Didit Authentication integration fits together: hosted or own screens, token storage, backend checks, sessions, native apps and go-live.","href":"/authentication/integration-guide"},{"group":"Quickstarts","pages":[{"title":"JavaScript quickstart","href":"/authentication/quickstarts/javascript"},{"title":"React quickstart","href":"/authentication/quickstarts/react"},{"title":"Next.js quickstart","href":"/authentication/quickstarts/nextjs"},{"title":"iOS quickstart","href":"/authentication/quickstarts/ios"},{"title":"Android quickstart","href":"/authentication/quickstarts/android"},{"title":"React Native quickstart","href":"/authentication/quickstarts/react-native"},{"title":"Flutter quickstart","href":"/authentication/quickstarts/flutter"}]}]},{"group":"Features","icon":"https://mintlify.s3.us-west-1.amazonaws.com/didit-0f962782/icons/sliders.svg","pages":[{"title":"Sign-In Methods: Passkeys, Codes, Social, SSO","sidebarTitle":"Sign-in methods","href":"/authentication/sign-in-methods"},{"title":"Verified Identity: Verify at Sign-Up and Step-Up Before Payouts","sidebarTitle":"Verified identity","href":"/authentication/verified-identity"},{"title":"Organizations for B2B Apps: Members, Roles and Company SSO","sidebarTitle":"Organizations","href":"/authentication/organizations"},{"title":"Bot Protection at Sign-In: Stuffing, Brute Force","sidebarTitle":"Bot protection","href":"/authentication/bot-protection"},{"title":"Agent Access: Let Your Users' AI Agents Act for Them","sidebarTitle":"Agent access","href":"/authentication/agent-access"},{"title":"Branded Sign-In Pages, Sign-In Emails and Custom Auth Domain","sidebarTitle":"Branding and custom domain","href":"/authentication/branding-and-custom-domain"},{"title":"Migrate Users: Import Passwords and MFA","sidebarTitle":"Migrate your users","href":"/authentication/migration"}]},{"group":"Reference","icon":"https://mintlify.s3.us-west-1.amazonaws.com/didit-0f962782/icons/book.svg","pages":[{"title":"Tokens and JWKS: Verify Didit Authentication JWTs","sidebarTitle":"Tokens and JWKS","href":"/authentication/tokens-and-jwks"},{"title":"Authentication Events and Webhooks","sidebarTitle":"Events and webhooks","href":"/authentication/events-and-webhooks"},{"title":"Set Up Didit Authentication by API","sidebarTitle":"Set up by API","href":"/authentication/set-up-by-api"},{"group":"API reference","pages":[{"title":"Get OpenID Configuration | Didit Authentication API","sidebarTitle":"Get OpenID configuration","openapi":"openapi-authentication.json GET /.well-known/openid-configuration","href":"/authentication/api-reference/get-openid-configuration"},{"title":"Get Signing Keys (JWKS) | Didit Authentication API","sidebarTitle":"Get signing keys (JWKS)","openapi":"openapi-authentication.json GET /.well-known/jwks.json","href":"/authentication/api-reference/get-jwks"},{"title":"Token Endpoint: Code Exchange and Refresh | Didit Authentication API","sidebarTitle":"Exchange or refresh tokens","openapi":"openapi-authentication.json POST /token/","href":"/authentication/api-reference/token"},{"title":"Get Session | Didit Authentication API","sidebarTitle":"Get the session","openapi":"openapi-authentication.json GET /session/","href":"/authentication/api-reference/get-session"},{"title":"Revoke Session (Sign Out) | Didit Authentication API","sidebarTitle":"Revoke the session","openapi":"openapi-authentication.json DELETE /session/","href":"/authentication/api-reference/revoke-session"},{"title":"Create Step-Up | Didit Authentication API","sidebarTitle":"Create a step-up","openapi":"openapi-authentication.json POST /step-up/","href":"/authentication/api-reference/create-step-up"},{"title":"Get Step-Up Status | Didit Authentication API","sidebarTitle":"Get a step-up","openapi":"openapi-authentication.json GET /step-up/{step_up_id}/","href":"/authentication/api-reference/retrieve-step-up"},{"title":"Create Monitoring Token | Didit Authentication API","sidebarTitle":"Create a monitoring token","openapi":"openapi-authentication.json POST /monitoring-token/","href":"/authentication/api-reference/create-monitoring-token"}]}]},{"group":"Console","icon":"https://mintlify.s3.us-west-1.amazonaws.com/didit-0f962782/icons/console.svg","pages":[{"title":"Authentication Console Guide: Sign-Ins, Sessions and Settings","sidebarTitle":"Authentication console","href":"/authentication/console"}]}]},{"tab":"Changelog","icon":"https://mintlify.s3.us-west-1.amazonaws.com/didit-0f962782/icons/calendar.svg","pages":[{"title":"Changelog","href":"/changelog"}]}],"global":{"anchors":[{"anchor":"API Reference","icon":"code","href":"/api-reference/overview"},{"anchor":"Business Console","icon":"gauge","href":"https://business.didit.me"},{"anchor":"OpenAPI Spec","icon":"file-code","href":"https://docs.didit.me/openapi-25.json"},{"anchor":"Integration Prompt","icon":"wand-magic-sparkles","href":"/integration/integration-prompt"},{"anchor":"MCP Server","icon":"plug","href":"/integration/mcp/overview"},{"anchor":"Agent Skills","icon":"robot","href":"https://github.com/didit-protocol/skills"}]}},{"language":"es","navbar":{"links":[{"icon":"comment-dots","href":"https://help.didit.me","label":"Soporte"},{"icon":"signal","href":"https://status.didit.me","label":"Estado"}],"primary":{"type":"button","label":"Iniciar sesión","href":"https://business.didit.me"}},"pages":[{"title":"es","href":"/es/authentication/quickstart"}]},{"language":"pt-BR","navbar":{"links":[{"icon":"comment-dots","href":"https://help.didit.me","label":"Suporte"},{"icon":"signal","href":"https://status.didit.me","label":"Status"}],"primary":{"type":"button","label":"Entrar","href":"https://business.didit.me"}},"pages":[{"title":"pt-BR","href":"/pt-br/authentication/quickstart"}]},{"language":"ja","navbar":{"links":[{"icon":"comment-dots","href":"https://help.didit.me","label":"サポート"},{"icon":"signal","href":"https://status.didit.me","label":"ステータス"}],"primary":{"type":"button","label":"サインイン","href":"https://business.didit.me"}},"pages":[{"title":"ja","href":"/ja/authentication/quickstart"}]},{"language":"de","navbar":{"links":[{"icon":"comment-dots","href":"https://help.didit.me","label":"Support"},{"icon":"signal","href":"https://status.didit.me","label":"Status"}],"primary":{"type":"button","label":"Anmelden","href":"https://business.didit.me"}},"pages":[{"title":"de","href":"/de/authentication/quickstart"}]},{"language":"fr","navbar":{"links":[{"icon":"comment-dots","href":"https://help.didit.me","label":"Assistance"},{"icon":"signal","href":"https://status.didit.me","label":"Statut"}],"primary":{"type":"button","label":"Se connecter","href":"https://business.didit.me"}},"pages":[{"title":"fr","href":"/fr/authentication/quickstart"}]},{"language":"it","navbar":{"links":[{"icon":"comment-dots","href":"https://help.didit.me","label":"Supporto"},{"icon":"signal","href":"https://status.didit.me","label":"Stato"}],"primary":{"type":"button","label":"Accedi","href":"https://business.didit.me"}},"pages":[{"title":"it","href":"/it/authentication/quickstart"}]},{"language":"pt","navbar":{"links":[{"icon":"comment-dots","href":"https://help.didit.me","label":"Suporte"},{"icon":"signal","href":"https://status.didit.me","label":"Estado"}],"primary":{"type":"button","label":"Iniciar sessão","href":"https://business.didit.me"}},"pages":[{"title":"pt","href":"/pt/authentication/quickstart"}]},{"language":"ca","navbar":{"links":[{"icon":"comment-dots","href":"https://help.didit.me","label":"Suport"},{"icon":"signal","href":"https://status.didit.me","label":"Estat"}],"primary":{"type":"button","label":"Inicia la sessió","href":"https://business.didit.me"}},"pages":[{"title":"ca","href":"/ca/authentication/quickstart"}]},{"language":"id","navbar":{"links":[{"icon":"comment-dots","href":"https://help.didit.me","label":"Dukungan"},{"icon":"signal","href":"https://status.didit.me","label":"Status"}],"primary":{"type":"button","label":"Masuk","href":"https://business.didit.me"}},"pages":[{"title":"id","href":"/id/authentication/quickstart"}]},{"language":"ru","navbar":{"links":[{"icon":"comment-dots","href":"https://help.didit.me","label":"Поддержка"},{"icon":"signal","href":"https://status.didit.me","label":"Статус"}],"primary":{"type":"button","label":"Вход","href":"https://business.didit.me"}},"pages":[{"title":"ru","href":"/ru/authentication/quickstart"}]},{"language":"ko","navbar":{"links":[{"icon":"comment-dots","href":"https://help.didit.me","label":"지원"},{"icon":"signal","href":"https://status.didit.me","label":"상태"}],"primary":{"type":"button","label":"로그인","href":"https://business.didit.me"}},"pages":[{"title":"ko","href":"/ko/authentication/quickstart"}]},{"language":"zh","navbar":{"links":[{"icon":"comment-dots","href":"https://help.didit.me","label":"支持"},{"icon":"signal","href":"https://status.didit.me","label":"状态"}],"primary":{"type":"button","label":"登录","href":"https://business.didit.me"}},"pages":[{"title":"zh","href":"/zh/authentication/quickstart"}]},{"language":"ar","navbar":{"links":[{"icon":"comment-dots","href":"https://help.didit.me","label":"الدعم"},{"icon":"signal","href":"https://status.didit.me","label":"الحالة"}],"primary":{"type":"button","label":"تسجيل الدخول","href":"https://business.didit.me"}},"pages":[{"title":"ar","href":"/ar/authentication/quickstart"}]},{"language":"hi","navbar":{"links":[{"icon":"comment-dots","href":"https://help.didit.me","label":"सहायता"},{"icon":"signal","href":"https://status.didit.me","label":"स्थिति"}],"primary":{"type":"button","label":"साइन इन करें","href":"https://business.didit.me"}},"pages":[{"title":"hi","href":"/hi/authentication/quickstart"}]}]},"basePath":"","title":"Authentication Quickstart: First Sign-In in 10 Minutes - Didit Docs","deploymentId":"dpl_DyXGnKeCjZyA3sUdfMJ7FjkdBefg","buildId":"dpl_DyXGnKeCjZyA3sUdfMJ7FjkdBefg","dynamics":["07c022d89b","a74be98ba7","a9bb46feb3"],"chunks":["Frame-D0FT0qQs.js","DynamicMarkdown-CQM9Bhbv.js","zoom-image-lightbox-BQ4tbj_9.js","lightbox-handle-r17bVUz3.js","Markdown-CX2QY19L.js","AssistantPageLink-CY3bFglh.js","dist-Dl6_zDnT.js","lib-DMeTj1gb.js","lib-B8HbPgcC.js","katex-Dbtb6Wk7.js","html-void-elements-mCSPHezU.js","marked.esm-CZWythHk.js"]}


 Get Started
 Integrate / SDKs
 User Verification
 Business Verification
 Transaction Monitoring
 Authentication
 Changelog